Os experientes praticantes de detecção da Minelab têm uma lista bastante abrangente de perguntas frequentes sobre como usar um detector de metais. Eles também têm muitas dicas de profissionais para a detecção de metal.
Sim, os detectores de metais da Minelab têm a capacidade de "discriminar" entre os diferentes tipos de alvos. O recurso de discriminação nos detectores da Minelab medem duas propriedades do alvo, as propriedades ferrosas e as propriedades condutoras.
Propriedades ferrosas referem-se à quantidade de ferro que está em um alvo e, portanto,o quão fortemente ele é atraído por um ímã. Alvos ferrosos tendem a ser lixo, de modo que podem ser discriminados / mascarados com base nas suas propriedades ferrosas pelo detector. Propriedades condutoras se referem à forma como um alvo conduz a corrente elétrica e, portanto, responde ao campo magnético de um detector de metais. Sucatas de lixo como pregos e lâminas têm diferentes propriedades condutoras em relação aos alvos valiosos como moedas e anéis. Neste caso, o detector de metais pode fazer um julgamento sobre se o alvo é apenas lixo com base na sua condutividade.
O processo para configurar os ajustes de discriminação e o método utilizado para indicar tesouro ou lixo irá variar em toda a gama de detectores da Minelab.
Como regra geral, quanto menor for a frequência utilizada pelo detector, mais fundo ele pode penetrar no solo.Em baixas frequências, no entanto, a sensibilidade para alvos pequenos e de baixa condução será reduzida. Quanto mais elevada for a frequência, maior será a sensibilidade para alvos pequenos, mas não penetrará tão profundamente. Em geral, os detectores de ouro operam em frequências mais altas (para encontrar pepitas pequenas), enquanto que os detectores de moedas e de tesouro trabalham em frequências mais baixas para uma penetração mais profunda. A exceção a isso são os detectores de metais do tipo MPS que são sensíveis e podem buscar profundo simultaneamente.
Bobinas menores são mais leves, mais fáceis de controlar e podem ser escolhidas por sua capacidade de negociar em terrenos difíceis ou em vegetação rasteira. Elas são também uma vantagem em áreas de muito lixo.
Sujeira, poeira e umidade podem ficar dentro da tampa protetora da bobina, levando a falsos sinais e também a um mau desempenho. Para manter o desempenho máximo de seu detector da Minelab, recomenda-se limpar o "skidplate" com bastante regularidade.
Verifique em coil selection guide para encontrar a bobina mais adequada para as suas necessidades de detecção.
As especificações de fone de ouvido não são realmente críticas em um detector de metais uma vez que os seus circuitos de áudio não produzem som com qualidade Hi-Fi. por exemplo. Os nossos detectores tem uma saída de frequência de cerca de 75 -1200Hz
Nossos circuitos de áudio irão conduzir a maioria dos fones de ouvido a partir de 16 - 100 + ohms.
A otimização de áudio também é muito subjetiva, já que todo mundo ouve de forma diferente.
Nos esforçamos para não confundir os nossos clientes com especificações técnicas desnecessárias, pois na realidade não há nenhuma maneira honesta para determinar quais são os melhores fones de ouvido para você antes que você experimente e possa julgá-los.
Se você tem um detector com tons de áudio ajustáveis, tais como um CTX 3030, nós também recomendamos que você passe algum tempo para garantir que os tons de detecção sejam otimizados para as suas necessidades auditivas.
Não há uma resposta específica para esta pergunta, uma vez que depende do tamanho do alvo, orientação, conteúdo metálico, minerais do solo e condutividade, além do ruído elétrico e ruído ambiental na área etc.
Apenas se apresentar defeito.
Em alguns detectores você não precisa realizar o equilíbrio de solo. Em outros, os usuários novos na detecção são recomendados para usar a função de Rastreamento de Equilíbrio de Solo. Nesta função de Tracking, o detector vai euilibrar automaticamente para você e permanecerá equilíbrado, mesmo que os minerais do solo venham a variar. Em detectores que equilíbrio do solo ocorre manualmente, como o X-TERRA 305 e X-TERRA 505, você precisará realizar o equilíbrio de solo no início de cada seção de detecção, e terá que fazê-lo periodicamente, conforme necessário. Sempre realize o Equilíbrio de Solo em terreno limpo e longe de objetos de metal.
.
Correntes de ouro são muito difíceis de detectar, em particular correntes muito finas. Cada elo de uma corrente pode ser muito pequeno e o detector vê cada alvo como um alvo em separado, por isso pode ser um alvo facilmente perdido. É mais provável detectar um broche ou quaisquer pingentes que ainda possam estar na corrente, do que estes que são muito maiores do que os elos de correntes individuais. Os detectores de alta frequência, como o Eureka Gold ou um X-TERRA 705, com uma bobina de 18,75 kHz, e no modo de garimpo, muitas vezes irão pegar correntes finas melhores do que a maioria dos detectores de moedas.
Coca-Cola é carbono e, como tal, pode ser muito condutora, tal como ocore com uma moeda.
O GPZ 7000 é o nosso detector que vai mais profundo em todas as condições de solo e pode detectar até mesmo através de rocha altamente mineralizada.
Não, características do cabo combinam com os enrolamentos da bobina de fábrica, de modo que, se você estender o cabo, irá reduzir o desempenho da bobina.
Bobinas menores são melhores para locais sujos, uma vez que reduzem os casos de detecção de vários alvos ao mesmo tempo. As bobinas concêntricas são geralmente melhores do que bobinas Double-D por esta mesma razão.
Detectores de metais captam sinais eletromagnéticos de objetos metálicos subterrâneos. Sinais semelhantes também podem ser recebidos através do ar a partir de outras fontes eletromagnéticas, como as redes de energia, transmissores de rádio, geradores, etc.
Se o detector estiver barulhento quando você está detectando, mas fica em silêncio quando você parar de varrer a bobina, então ele está recebendo sinais de solo mineralizado. Execute um equilíbrio de solo e continue a detectar.
Para a Série GPX apenas: se ele ainda continuar barulhento, então você pode precisar experimentar uma seleção alternativa de solo / sincronismo. Todos os outros detectores: se ele ainda continuar barulhento, você precisa para reduzir a sua sensibilidade para o mais alto nível de sensibilidade estável.
A única maneira garantida de obter todos os alvos possíveis é não usar a discriminação. No entanto, se você cavar cada alvo, desperdiçará muito tempo. Padrões de discriminação são sempre um compromisso entre cavar a maioria dos bons alvos e ignorar a maioria dos alvos que sejam sucata.
Isto pode ser causado por uma série de razões:
Normalmente porque você está levantando a bobina no final de seu balanço. Sempre varra lentamente e em nível baixo duante toda a sua varredura.
Zero Voltage Transmission (ZVT) technology creates ultra‑constant high-power opposite polarity magnetic fields.
ZVT provides users with superior ground balance to enhance detector stability in mineralised soils and will detect gold nuggets at extreme depths that exceed all current competitor products.
The GPZ 7000 is our best performer on the medium to larger nuggets, even in highly mineralised or variable ground. It retains superior depth capabilities compared to any other detector while still providing good sensitivity to smaller, shallower targets.
The GPZ 7000 detector has Minelab branded, and aftermarket coils available for purchase. Minelab branded coils are available from Minelab certified dealerships. You can purchase the 14” or 19” Super-D coils.
NuggetFinder coil have released 2 Minelab approved aftermarket coils. A 12” round Super-D coil and a 17” elliptical Super-D coil which can be purchased by NuggetFinder stockists.
No, the GPZ 7000 does not have any discrimination capability.
The Difficult Ground Type setting is the default setting and is recommended as gold is usually found in areas with highly mineralised soils.
The Normal Ground Type setting will provide the greatest detection depth but can only be used in “quiet” soils where there are lower levels of mineralisation in the soil.
If the detector is running unstable or noisy when using a “Normal” ground type you should switch to “Difficult”.
The Severe Ground Type will provide the lowest detection depth and should only be used when detecting in areas with extremely high levels of mineralisation. This setting should only be used in areas where you need to raise the coil above the ground when using the “Difficult” Ground Type setting.
When ground balancing, the yellow ferrite ring artificially adds additional data to help the GPZ 7000 improve the ground balance accuracy. This should always be used to ensure smooth operation. Sweep the coil over the yellow ferrite ring in a figure 8 motion ground balancing, ensuring that you sweep over the yellow ferrite ring with each figure 8 movement.
When balanced correctly you should hear a smooth audio tone when sweeping the coil over the yellow ferrite ring.
When ground balancing the GPZ 7000 a swinging or figure-8 movement is recommended as the GPZ 7000 constantly monitors the changes in the soil. Sweeping the coil over as much ground as possible ensuring that you sweep over the yellow ferrite ring with each swing/figure-8 motion when ground balancing allows the detector to gain as much information as possible about the local ground conditions which provides a superior ground balance.
Wireless audio is susceptible to audio dropouts when the signal is blocked. Audio dropouts can be reduced by ensuring a direct line of sight between the WM12 and the detector. It is best to wear the WM12 as close as possible to the detector. This minimises the path to the wireless transmitter and makes it less likely that the operator's body will block the signal path between the WM12 and the detector.
The GPZ 7000 will operate for approximately 8 hours when commencing with a fully charged battery. Charging the battery will typically take 5 – 6 hours.
The WM12 wireless module will operate for approximately 12 hours on a fully charged battery and takes around 12 hours to charge when charging via the BC10 charger.
Yes, the GPZ 7000 can be charged from a nominal 24V battery system. The BC10 charger can will function between 11 – 30 volts DC.
You can also use the supplied 240V AC plug-pack if your vehicle is fitted with an inverter.
No, Minelab currently has no plans to release a replaceable cell or alkaline battery pack.
There are 2 USB cables supplied in the box with your GPZ 7000. The USB-A to Mini-USB cable is used for charging the WM12 wireless module.
The USB-A to USB-B is used for software updates and is plugged into the rear of the screen pod and a PC.
On the rear of the screen pod is a USB-B port that can be used if a software upgrade is released. Check the downloads section of the GPZ 7000 page on our website for updates.
A tecnologia GeoSense-PI ™ analisa e responde aos sinais de solo com grande clareza e precisão, para que você possa detectar em ambientes difíceis antes considerados indetectáveis. Ele suprime rapidamente os sinais indesejados por meio de três sistemas de feedback sobrepostos para uma detecção super rápida, mesmo das menores peças de ouro.
O GPX 6000 tem o melhor desempenho nas pepitas menores mais abundantes, mesmo em solos altamente mineralizados ou variáveis. Ele retém uma profundidade excelente, logo atrás do GPZ 7000 em nuggets maiores e mais profundos.
As bobinas GPX 6000 são uma nova linha de bobinas leves e de alto desempenho que não são compatíveis com os detectores da série GPX anteriores.
A bobina Double-D de 14 "no GPX 6000 só pode ser usada para cancelamento de EMI ou cancelamento de sinais condutores de sujeira. Ela não é capaz de discriminação de ferro.
The following Minelab coils are currently available to operate with the GPX 6000:
Minelab approved aftermarket coils are available from Coiltek and NuggetFinder.
O primeiro enrolamento do cabo da bobina deve sempre passar por cima do eixo. O cabo da bobina deve então ser enrolado em volta do eixo e mantido no lugar com as duas tiras de velcro. Você deve permitir espaço suficiente para que a bobina possa se mover livremente durante a detecção.
O GPX 6000 não rastreia o componente de ferrite do solo. GeoSense-PI usa outras técnicas para remover a resposta 'X' que é invisível para o operador.
Você não precisa de uma ferrita amarela para equilibrar o solo do GPX 6000.
O tom limite pode ser ativado e desativado em qualquer configuração de sensibilidade com um toque longo do botão Tipo de solo.
Observe que o tom de Limiar é ativado nas faixas de sensibilidade Manual e desativado nas faixas de sensibilidade Automática. Na próxima vez que o GPX 6000 for ligado, o tom do Limiar voltará ao padrão.
A configuração Tipo de solo difícil é melhor usada em solos mais fortemente mineralizados, particularmente com rochas quentes ou solo altamente variável.
A configuração do Tipo de solo normal tem a maior profundidade em pepitas maiores; é melhor usado sempre que possível e sempre em solo com níveis de mineralização mais baixos ou solo menos variável. O tipo de solo normal pode pegar pedras quentes como alvo. Se as rochas quentes não puderem ser balanceadas, você precisará usar a configuração de tipo de solo Difícil.
The GPX 6000 with GeoSense-PI is continually tracking the ground, so either technique would work. Minelab recommends pumping the GPX 6000 up and down above the ground with the Quick-Trak button depressed to achieve the fastest Ground Balance.
O aterramento condutor não precisa estar associado ao sal visível. Por exemplo, chuvas recentes podem tornar o solo mais condutivo e aumentar a resposta condutora indesejada do solo.
O áudio sem fio é suscetível a quedas de áudio quando o sinal é bloqueado. As perdas de áudio podem ser reduzidas garantindo uma linha de visão direta entre os fones de ouvido e o detector. É melhor usar fones de ouvido com os controles Bluetooth mais próximos do detector. Isso minimiza o caminho para o transmissor Bluetooth e torna menos provável que o corpo do operador bloqueie o caminho do sinal entre os fones de ouvido e o detector.
O GPX 6000 operará por aproximadamente 8 horas ao iniciar com uma bateria totalmente carregada. O carregamento da bateria normalmente leva de 5 a 6 horas.
Os fones de ouvido ML 100 funcionarão por aproximadamente 24 horas com a bateria totalmente carregada e levar cerca de 3,5 horas para carregar.
A bateria do GPX 6000 só deve ser carregada de um sistema de bateria de carro nominal de 12 V ao carregar de um veículo.
A Minelab atualmente não tem planos de lançar uma célula substituível ou bateria alcalina.
O cabo USB é usado para carregar os fones de ouvido Bluetooth e seria usado se uma atualização de software estivesse disponível para o GPX 6000.
Atrás da grade do alto-falante está uma porta USB que pode ser usada se uma atualização de software for lançada. Verifique a seção de downloads da página GPX 6000 em nosso site para atualizações.
Você nunca pode prever qual nível de mineralização do solo estará presente em qualquer local, razão pela qual Normal é o tempo recomendado para começar. Em seguida, você pode permitir que o detector diga a você qual sincronismo usar, varrendo a bobina e ouvindo a estabilidade do limite.
Depois de executar um Auto Tune e Ground Balance, você deve começar a procurar e, se o detector estiver muito barulhento ou sinalizar em muitas pedras quentes, então o Timing que você está usando é muito agressivo para o solo em que está. Você precisa selecionar outro Timing mais próximo da extremidade escura da escala abaixo, por exemplo, Enhance.
O GPX 5000 é conhecido por sofrer de interferência eletromagnética (EMI), especialmente durante tempestades. Existem três razões conhecidas para esta interferência:
Em dias ruins de EMI, aqui estão algumas dicas que podem manter seu limite mínimo:
Certifique-se de que você não está usando uma bobina Monoloop com a chave Coil Rx configurada para Cancelar.
As bobinas Monoloop possuem um cabo perfeitamente redondo.
As bobinas Double-D possuem um cabo mais plano devido aos dois núcleos internos.
Coloque a chave Coil / Rx em Cancelar. Se você reduziu ligeiramente a profundidade do que esperava, sua bobina é um Double-D. Se você não tem praticamente nenhuma profundidade, então você tem uma bobina Monoloop.
A função Estabilizador controla o ponto em que variações tênues no Limiar começam a ser ouvidas. Essas variações fracas podem ser ruído ambiente ou sinais fracos de alvo. À medida que você aumenta o controle do Estabilizador, os sinais fracos do alvo ficam mais altos, mas o nível de ruído também aumenta, o que pode ocultar potencialmente um sinal de alvo desejável. O Estabilizador permite mascarar essas variações tênues para fornecer um limite perfeitamente estável, melhorando sua capacidade de identificar sinais de alvo tênues.
O estabilizador deve ser deixado na posição FP (predefinição de fábrica) até que as condições do solo no local sejam determinadas. Uma vez que o nível Rx Gain tenha sido definido para as condições locais e outras configurações de áudio tenham sido selecionadas, o Estabilizador pode então ser usado para ajustar a estabilidade do Limiar.
Para encontrar a posição ideal do Estabilizador, certifique-se de que a bobina esteja sendo varrida pelo solo. Um número abaixo do ponto em que o limite começa a vibrar, geralmente é a melhor configuração.
O efeito do Estabilizador pode ser visto como tendo um efeito semelhante ao do controle Rx Gain. No entanto, o estabilizador afeta apenas o processamento de áudio e não altera o sinal de recepção (Rx), portanto, deve ser usado como um ajuste fino do estágio final. Depois de fazer qualquer ajuste no estabilizador, se as condições do solo mudarem ou você desejar mudar as bobinas, pode ser necessário redefinir o ganho de Rx, mas antes de fazer isso, retorne o estabilizador para a configuração predefinida de fábrica primeiro. Isso garantirá que você selecione o nível de ganho de Rx mais apropriado para se adequar às condições e, em seguida, você pode fazer o ajuste fino usando o estabilizador.
Dica: Girando o controle do Estabilizador próximo ao mínimo (anti-horário), o limite ficará muito estável, mas você terá perdido muita sensibilidade para alvos menores. Esse pode ser um recurso desejável em certos cenários, como procurar pepitas grandes em uma área com muito lixo ou usar o GPX 5000 e o GPX 4800 para procurar moedas ou tesouros.
Dica: recomendamos que a melhor ordem para definir esses controles seja:
O Volume de destino controla a força dos sinais de destino e, em configurações acima de 8, também aumentará ligeiramente o volume do limite. Isso é útil para condições de muito vento, para pessoas que sofrem de perda auditiva ou ao usar alto-falantes externos. Com o amplificador de áudio embutido na bateria de íons de lítio, você pode conectar um alto-falante diretamente na bateria e definir um nível apropriado de amplificação usando o Volume alvo. Esteja ciente de que ao mudar de fones de ouvido para um alto-falante externo, você pode precisar fazer pequenos ajustes nos controles de Limite e Limite de Volume.
O Volume alvo pode ser usado como um reforço de áudio em condições silenciosas e também pode ser usado para reduzir ou suavizar os sinais de ruído do solo em solos altamente mineralizados. Este é um recurso poderoso e funcionará em conjunto com o controle do Estabilizador, proporcionando o máximo em capacidade de ajuste fino. Um pouco de experiência pode ser necessária para encontrar a combinação ideal em diferentes condições.
NOTA: Sempre que forem necessários ajustes no Ganho, devido a uma mudança de bobina ou localização, certifique-se de que o Volume Alvo retorne primeiro à configuração FP. Você pode então fazer o ajuste fino para se adequar às novas condições.
The SDC 2300 is our compact and waterproof gold prospecting detector. It uses Multi Period Fast (MPF) Pulse Induction (PI) technology that provides excellent sensitivity when detecting small to medium sized nuggets in highly mineralised or variable ground. The SDC 2300 provides good depth on larger deeper nuggets.
No, there are no other Minelab branded coils available for the SDC 2300. The supplied 8” round coil provides excellent overall performance for the SDC 2300 and keeps the detector waterproof and compact
No, there is no discrimination function available for the SDC 2300.
Having no constant threshold audio emit through the speaker or headphones indicates that the threshold audio is in the OFF or minimum setting.
The threshold volume can be adjusted by pushing the threshold button on the right side of the handle.
There are 9 levels of Threshold audio which are indicated by the LED display. With each press of the threshold button, you will notice the LEDs on the display incrementally move to the right, the threshold audio will also start increasing. When the threshold level is at maximum, pressing the Threshold button will cycle the threshold level back to the OFF or minimum setting.

The SDC 2300 has 2 Audio pitch settings, Low or High. High pitch is the default, to change to the low setting switch the detector off then push and hold the Threshold button while switching the detector on.

The SDC 2300 will remember its previous setting so you will need to push and hold the Threshold button whilst switching the detector on to toggle back to the High pitch setting.
The SDC 2300 is waterproof to 3m (10ft) This is the complete detector including the control box.
Yes, the SDC 2300 has a salt mode in the sensitivity adjustment, however Minelab does not recommend using the SDC 2300 on the beach as the SDC 2300 does not have a discrimination or target ID feature so you will dig a lot of trash.
The salt mode in your SDC 2300 is designed to be used on conductive ground such as salt lakes or wet mineralised soils found in gold fields where a high salt content is apparent. For example, recent rains may make the soil more conductive and increase the unwanted conductive soil response. If the soil is conductive or you are detecting on a salt lake, then adjust the sensitivity dial to a salt setting.

To check the battery level on your SDC 2300 simply push and hold the Noise Cancel button then press and release the Threshold button. The Noise Cancel button can now be released.
An indication of the battery level will be displayed by the LED's for approximately 3 seconds.

The SDC 2300 will operate for approximately 8 hours when commencing with a fully charged Li-Ion battery. Charging the battery will typically take 5 – 6 hours. When using C-Cell Alkaline batteries you will generally have a longer use time (10-14 hours) but this will depend on the quality of the C-Cell batteries you are using.
No, The SDC 2300 battery should only be charged from a nominal 12V car battery system when charging from a vehicle.
The SDC 2300 includes a rechargeable Li-Ion battery pack inside the box. The battery compartment can also accept C-Cell Alkaline batteries or C-Cell NiMH rechargeable batteries. You can see the polarity for the C-Cell batteries on the side of the control box.

No, the software on the SDC 2300 cannot be upgraded.
The GOLD MONSTER 1000 is Minelab’s entry level gold prospecting detector, designed to find the smallest of nuggets in moderately mineralised ground. It retains excellent sensitivity to smaller shallow nuggets and can detect some larger nuggets at depth.
The Gold Chance Indicator at the top of the screen indicates if the target has a ferrous or non-ferrous content. If the indicator is consistently pointing to the right, it is indicating a high non-ferrous content and is likely a non-ferrous metal such as: gold, silver, brass, copper, aluminium, lead, zinc or other alloys that do not have any iron (ferrous) content.

If the indicator is pointing to the left, it is showing a high ferrous content and is likely steel or iron.

Large steel and iron (ferrous) targets can indicate on the right. This happens when the conductive properties of the large ferrous target dominate the signal and mask the magnetic properties of the target.
The GM05 and GM10 are the only compatible coils that can be used with the GOLD MONSTER 1000. The GM05 is included in the box and the GM10 coil can be purchased as an accessory from Minelab dealerships.
There are currently no aftermarket coils available for the GOLD MONSTER 1000.
The first winding of the coil cable from the coil should always go over the shaft. Winding the coil cable over the shaft provides minimal stress on the coil cable which will help avoid damage. The coil cable should then be wound closely around the shaft, allowing enough room for the coil to be able to move freely when detecting.

Press the coil cable into the clip on the rear of the screen pod and then carefully screw the coil connector into the rear of the screen pod.


There are 10 manual and 2 auto sensitivity levels.
Auto is located in position 11 on the sensitivity dial and will be indicated with a black dot in the centre of the sensitivity dial.
When in Auto the detector will function smoothly in most soil types and will continually adjust the detector’s sensitivity level to maintain smooth operation.

Auto + is located in position 12 on the sensitivity dial and will be indicated with a black dot in the centre of the sensitivity dial.
Auto + is a more aggressive sensitivity which provides users with additional sensitivity for extra depth performance. Auto+ should only be used in moderately mineralised soils as this setting may provide more ground noise.

Manual sensitivity adjustments (1 – 10) are for the expert user who has a good understanding of soil mineralisation and electro-magnetic interference (EMI).
Manual sensitivity allows the user to adjust the detector’s performance manually, when you have selected a sensitivity setting in the manual range the detector will not adjust levels like it does in the Auto or Auto+ modes. You may need to keep adjusting the manual sensitivity when in variable or heavily mineralised soil types.

The GOLD MONSTER 1000 is very sensitive, when you wave your hand over the coil the detector can detect the salt in your blood.
When you are retrieving a target, you should always use the supplied plastic scoop to ensure you detect the desired target and not your hand.
Because the GOLD MONSTER 1000 is highly sensitive to salt detection it is not recommended for beach use.
Chattering, or inconsistent audio is generally a sign that the detector is picking up interference from ground mineralisation or electro-magnetic interference (EMI). If you are in Auto +, try adjusting the sensitivity to Auto or a lower manual sensitivity. If lowering the sensitivity doesn’t fix the issue, then you should move away from sources of EMI. (power lines, cellular phone towers, power generators, thunder/electrical storms, etc.)
Random detection beeps can be caused by mineralisation in the soil. The GOLD MONSTER 1000 has an auto-tracking ground balance feature that continually monitors the minerals in the soil and adjusts the detectors’ ground balance. Rapid changes or high levels of mineralisation in the soil can cause the detector to false signal, if this happens, pump the coil up and down (0.5 - 10cm / 0.2 - 4”) over the areas that are giving false signals. This will help ground balance the detector to the mineralisation in the soil.
If the mineralisation level is too high, then lower the sensitivity to compensate for the mineralisation level.
Lifting your coil into the air will amplify any noise that is in the area. Minelab does not suggest doing this as this is not how our products are designed to be used. Lifting the coil slightly into the air is acceptable when performing a Noise Cancel, once the Noise Cancel is complete the coil should always be kept near the surface of the soil to avoid interference.
No, the GOLD MONSTER 1000 does not have any wireless capability. You can plug in any 3.5mm (1/8”) stereo headphones to the rear of the control pod.
The GOLD MONSTER 1000 will operate for approximately 12 hours when commencing with a fully charged Li-Ion battery. Charging the battery will typically take 5 to 6 hours.
No, the GOLD MONSTER 1000 battery should only be charged from a nominal 12V car battery system when charging from a vehicle.
No, the software in the GOLD MONSTER 1000 cannot be upgraded.
O software de proteção contra vírus em alguns computadores coloca o email do Minelab em um arquivo / pasta de spam. Verifique esse email na sua pasta de spam. Se você não recebeu o e-mail, entre em contato com o Centro de Serviço Autorizado Minelab mais próximo .
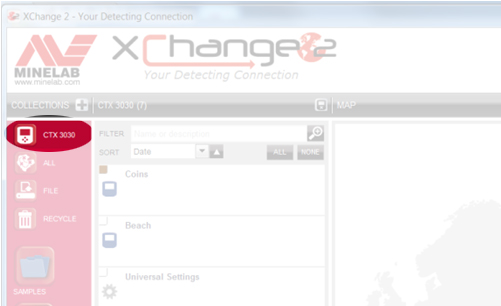
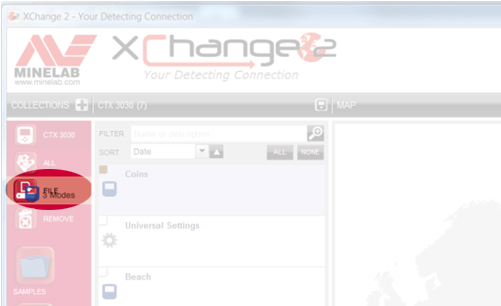
Quando o XChange 2 é instalado pela primeira vez, o ícone do 'arquivo' não aparecerá até que o software reconheça o CTX 3030 sendo conectado pela primeira vez. Esta é a única vez que isso vai acontecer. Após a conexão inicial, o ícone 'ARQUIVO' aparecerá e permanecerá. Você não precisará mais conectar o CTX 3030 para acessá-lo.
A configuração de fábrica do GeoTrails é desativada, então você precisará ativá-lo. Primeiro ligue o GPS, depois ligue o GeoTrails. Na tela do mapa, pressione e segure o botão Mapa para acessar esta opção. Use as setas para selecionar 'Exibir GeoTrails' e pressione o botão Selecionar.
Enhanced ativa o SBAS ou Satellite Based Augmentation System, que é um termo genérico para WAAS usado nos EUA e EGNOS na Europa. Esses sistemas usam um satélite geoestacionário para sondar a atmosfera e enviar para o seu receptor GPS. Funciona bem nos EUA, mas na Europa parece ser melhor para aviões do que no solo. Na Austrália, você recebe sinais de um satélite sobre o Japão, o que piora sua situação. Não tenho certeza de quanto da Europa tem isso como um problema.
O padrão para o botão 'Usuário' é controlar a luz de fundo, então, se um usuário alterar isso para outra coisa, a luz de fundo é controlada no Menu / Opções / Luz de fundo - LIGADO / DESLIGADO / HORA
Tudo pronto e seu fuso horário foi definido.
Se você não sabe seu fuso horário UTC, consulte o seguinte link: http://www.timeanddate.com/time/map/
Em uma sessão, se o módulo sem fio WM 10 estiver habilitado e o detector estiver conectado a ele, você ouvirá os tons conforme o esperado. Se você desligar o WM 10, ele irá 'silenciar' o detector. Desligue e ligue o detector e você poderá ouvir os tons.
O CTX 3030 tem um recurso de compensação de solo semelhante ao dos modelos Explorer SE Pro e E-TRAC que funciona muito bem na maioria das condições de solo, portanto, não há necessidade de equilibrar o solo do CTX 3030 na maioria das condições. O equilíbrio do solo só deve ser executado em 'Solo Extremamente Mineralizado'. Não execute o equilíbrio do solo na praia, isso irá 'confundir' o detector.
Este é um recurso padrão, quando você executa 'Edição de perfil de ID de tom' e seleciona Reproduzir tom ou Reproduzir tudo, os tons não soarão se o módulo sem fio WM 10 estiver conectado.
Existem 4 configurações de volume diferentes. O CTX 3030 lembra o que cada configuração é. Se você diminuir o volume enquanto usa os fones de ouvido e, em seguida, desconectar os fones de ouvido, o volume do alto-falante externo não terá mudado em relação à configuração anterior.
Antes de colocar o apoio de braço tipo twist-lock no eixo, gire a trava totalmente no sentido anti-horário. Não há necessidade de girar a fechadura completamente 90 graus para travá-la. Em geral, cerca de 30 a 45 graus é suficiente.
Isso foi corrigido em uma atualização de software. Conecte seu detector ao XChange 2 e verifique se há atualizações de software. Sempre recomendamos usar a atualização de software mais recente. Se você estiver com a atualização mais recente ou se a atualização não corrigiu o problema, entre em contato com o Centro de Serviços Autorizado da Minelab regional.
Os modos mudarão (ou serão traduzidos) SOMENTE ao mudar de INGLÊS para outro idioma e não ao contrário. Se o detector for configurado inicialmente em um idioma diferente do inglês, os modos aparecerão nesse idioma. Mas se você alterar o idioma para inglês posteriormente, os modos permanecerão no idioma original.
O Trigger irá cancelar qualquer ajuste sendo feito e voltar um nível no menu.
Se você tem usado muito o detector desde a última vez que o conectou ao XChange 2, há muitos dados armazenados. O upload dos dados pode demorar vários minutos. Por favor, seja paciente.
Isso pode estar relacionado ao mascaramento, configuração de baixa sensibilidade, sobrecarga da bobina ou etc. Execute uma 'redefinição de fábrica' e teste novamente o detector.
Para conectar o módulo sem fio WM 10 ao seu detector:
Se o emparelhamento falhar, tente selecionar outro canal
A localização do WM 10 pode ser um problema para perda de caminho. O corpo humano é muito atenuante, portanto, ter o WM 10 colocado na parte traseira, longe do detector, pode causar problemas. Se você estiver tendo problemas, coloque o WM 10 em uma linha de visão clara para o detector para obter os melhores resultados.
Os instantâneos são salvos apenas enquanto o detector está ligado. É um recurso de design que os instantâneos são excluídos quando o detector é desligado.
Durante o uso inicial do GPS, o detector demorará um pouco para acumular dados locais. A partir de uma inicialização a frio, o 'travamento' de onde os satélites estão e etc. leva alguns minutos, mas pode levar uma hora para acumular muitos dados locais. Esses dados podem ser usados para obter melhor resolução e uso do céu sombreado.
Isso é tão simples quanto salvar os modos e / ou dados que você deseja como um arquivo e enviar o arquivo por e-mail. Este é o procedimento:
Todos os modos e outros dados do seu CTX 3030 serão exibidos na lista.
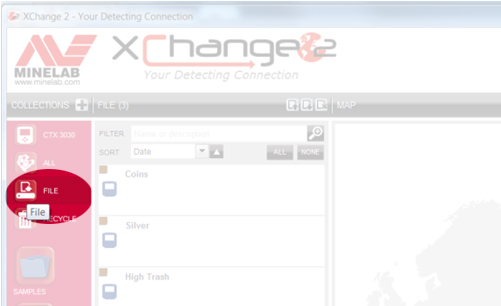
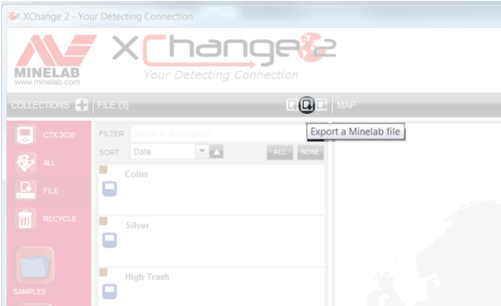
Toda a coleção FILE será exportada como um único arquivo e salva na pasta Downloads do seu PC. Você pode salvar o arquivo em outro lugar ou enviá-lo por e-mail para quem quiser.
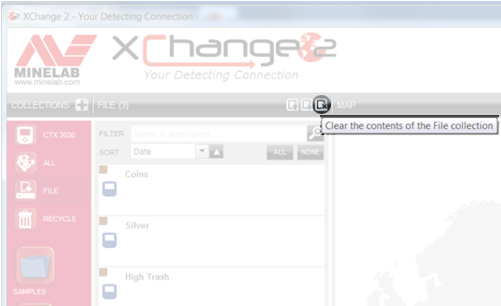
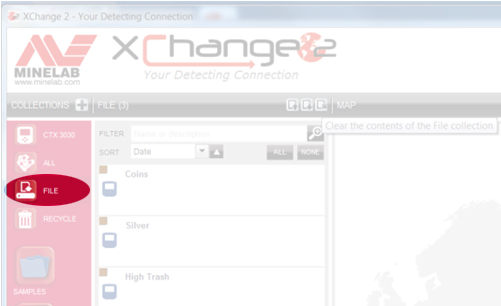
Se você receber um ARQUIVO do Minelab de outra pessoa, basta abrir o XChange 2, selecionar a coleção de ARQUIVOS e clicar no ícone 'Limpar o conteúdo da sua coleção de arquivos'.
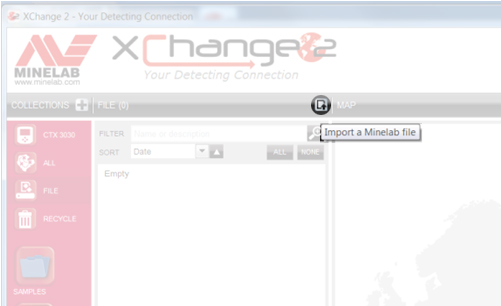
Em seguida, clique no ícone 'Importar um arquivo Minelab'.
Em seguida, clique em 'Escolher arquivo',
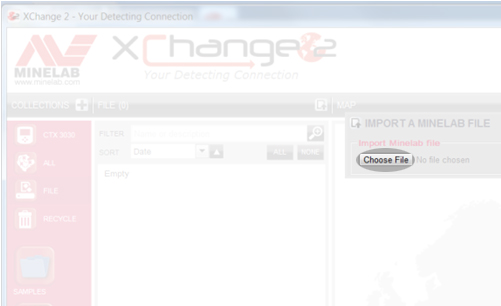
e navegue até o local do arquivo. Realce o arquivo e clique em 'Abrir' e os itens dentro dele serão exibidos na Coleção de Arquivos.
Arraste e solte os itens que deseja manter em uma de suas próprias Coleções ou diretamente em seu CTX 3030.
O áudio combinado produz tons diferentes para objetos altamente ferrosos e objetos com níveis variados de condutividade. Primeiro, você define a linha ferrosa (linha horizontal) onde deseja que os alvos ferrosos forneçam a resposta de áudio. Por exemplo, se você definir em 21, qualquer alvo com uma leitura ferrosa de 21 ou superior (número maior) produzirá o tom de áudio que você programar para alvos ferrosos. Por outro lado, se o alvo tiver uma leitura ferrosa inferior a 21, a resposta de áudio será baseada em suas propriedades condutoras. No áudio combinado, você tem quatro 'bins' representando grupos condutores com números condutores de 01 a 50. Você simplesmente move as linhas para representar grupos-alvo diferentes e designa um tom para cada grupo. Por exemplo, você poderia definir o compartimento um com as linhas em 01 e 14. Qualquer alvo com um valor ferroso menor que 21 e um valor condutivo de 14 ou menos cairia neste compartimento e forneceria o tom de áudio associado a ele por meio da programação .
O compartimento dois, por exemplo, pode representar alvos entre 15 e 28. O compartimento três pode representar alvos de 29 a 40 e o compartimento quatro pode ser o restante dos alvos condutores com valores de CO de 41 a 50. Com os números usados nestes exemplos, se você ultrapassou um alvo com um valor FE de 12 e um valor de CO de 44, ele forneceria o tom condutor que você atribuiu ao compartimento condutor quatro. Se você passar por cima de um alvo com um ID de 11 - 22, ele fornecerá o tom atribuído ao compartimento condutor dois. Novamente, o usuário pode redimensionar e atribuir tons a cada grupo alvo (bin). Para aqueles que gostaram de caçar em Two Tone Ferrous com o E-TRAC, isso dá um passo adiante, permitindo que você ajuste a linha FE e divida os alvos CO em quatro grupos separados.
O ouro pode ser identificado em qualquer lugar na faixa de 10-09 a 13-30 e, possivelmente, fora dessa faixa. Às vezes, a leitura condutiva pode ser muito baixa, como 02, então para melhorar suas chances você realmente tem que cavar tudo, incluindo papel alumínio e abas de puxar.
Em relação às configurações, o modo Praia padrão é bastante adequado. Uma coisa que você pode fazer é alterar o perfil de Tone ID para Ferrous 35. O que isso faz é fazer com que joias de baixa condutividade produzam um tom mais alto do que produziria no perfil Condutivo, tornando-o mais fácil de reconhecer. Você também pode selecionar Combinar e personalizar os tons de acordo com suas preferências pessoais.
Para praias de água salgada, a sensibilidade manual é recomendada, a menos que suas praias tenham altos níveis de mineralização magnética. Se sua unidade estiver funcionando bem e estável na Sensibilidade 18, tente aumentá-la um pouco mais. Em situações em que você está realmente detectando na água salgada, ative a configuração Água do mar.
A outra coisa que alguns penteadeiras de praia costumam fazer é abrir um pouco o padrão de discriminação. Principalmente diminuindo ligeiramente a rejeição ferrosa ou simplesmente procurando no Padrão 2 (simplesmente pressione e solte o botão Detectar). Isso é altamente recomendado em praias com baixos níveis de alvos de lixo. Neste caso, outra coisa que você pode tentar é alterar a resposta de áudio para LONG. Isso pode melhorar sua capacidade de ouvir a resposta tênue do alvo que a joia pode produzir.
Assista ao vídeo de instrução da comunidade aprovado sobre a edição de FindPoints e WayPoints.
Assista ao vídeo de instrução da comunidade aprovado sobre como vincular fotos de seu telefone a FindPoints.
Assista ao vídeo instrutivo da comunidade aprovado que inclui Como gravar um GeoHunt.
Assista ao vídeo de instrução da comunidade aprovado que inclui Como gravar um FindPoint ou WayPoint.
Assista ao vídeo de instrução da comunidade aprovado que inclui Como habilitar a função GPS.
Assista ao vídeo de instrução da comunidade aprovado que inclui opções de tela Ativando a detecção.
Assista ao vídeo instrutivo da comunidade aprovado que inclui a ativação do painel grande de ID de alvo.
Assista ao vídeo de instrução da comunidade aprovado que inclui a ativação do painel de sensibilidade.
Assista ao vídeo de instrução da comunidade aprovado que inclui a ativação da ferramenta de navegação na tela de detecção.
Assista ao vídeo de instrução da comunidade aprovado que inclui a seleção de um modo de pesquisa no CTX 3030.
Assista ao vídeo de instrução da comunidade aprovado que inclui o modo de edição de pesquisa no CTX 3030.
Assista ao vídeo instrutivo da comunidade aprovado que inclui a transferência de dados de um CTX 3030 para o XChange 2.
Assista ao vídeo instrutivo da comunidade aprovado que inclui a criação de uma nova coleção no XChange 2.
Assista ao vídeo instrutivo da comunidade aprovado que inclui a alteração das preferências do XChange 2.
Assista ao vídeo de instrução da comunidade aprovado que inclui o ajuste das configurações universais.
Assista ao vídeo instrutivo da comunidade aprovado que inclui Fazer um novo modo de pesquisa no XChange 2.
Não, as bobinas FBS 2 só podem ser usadas no CTX 3030, enquanto as bobinas FBS só podem ser usadas nos detectores das séries E-TRAC, Safari e Explorer.
MULTI-IQ+ is the next generation of MULTI-IQ technology and provides more power with lower electromagnetic interference (EMI) in built up areas.
This provides superior performance and depth allowing users to find previously undetectable targets in most locations.
O MANTICORE superará os detectores EQUINOX em quase todos os aspectos, pois a tecnologia MULTI-IQ+ usada no MANTICORE fornece mais potência e processamento mais rápido, o que equivale a melhor profundidade de detecção, maior velocidade de recuperação, mais ajuste de sensibilidade e uma tela de discriminação 2D avançada, fornecendo aos usuários mais informações nos alvos antes de cavarem.
Atualmente não existem outras bobinas compatíveis com o MANTICORE.
Bobinas acessórias podem ser adquiridas no revendedor local da Minelab. Para encontrar a concessionária mais próxima, use nossa ferramenta de localização de concessionárias on-line.
Os fones de ouvido ML105 estão incluídos na caixa com o detector MANTICORE e são fones de ouvido do tipo sobre a orelha, onde a almofada de espuma fica na cabeça, envolvendo a orelha.
Os fones de ouvido ML85 são fones de ouvido do tipo orelha, onde a almofada de espuma fica na parte externa da orelha.
TODO TERRENO GERAL: Excelente desempenho geral para a maioria dos alvos e condições. Fornece ótima separação de alvos e ótima rejeição de lixo.
ALL TERRAIN FAST: Maior velocidade de recuperação proporcionando excelente separação de alvos e boa rejeição de coque.
TODOS OS TERRENOS ALTOS CONDUTORES: Excelente para condutores altos, como pilhas de moedas de prata ou alvos de cobre e fornece boa separação de ID de alvo.
CONDUTORES BAIXOS PARA TODOS OS TERRENOS: Excelentes para objetos pequenos/finos, como moedas marteladas ou joias de ouro fino.
REJEIÇÃO DE LIXO TODO TERRENO: Utilizado em áreas inúteis. Rejeição máxima de ferrosos
GERAL DE PRAIA: Excelente desempenho geral para a maioria dos alvos e condições de praia quando usado em areia seca ou molhada. Fornece ótima separação de alvos e ótima rejeição de lixo.
CONDUTORES BAIXOS DE PRAIA: Excelentes para alvos pequenos ou finos, como correntes de ouro. Adequado para areia seca e molhada.
BEACH DEEP: Menor velocidade de recuperação proporcionando excelente profundidade para alvos pequenos ou finos, como correntes de ouro. Adequado para areia seca e molhada.
PRAIA SURF E ÁGUA DO MAR: Excelente para condições difíceis de água salgada, incluindo detecção subaquática ou de surf.
GOLDFIELD GERAL: Excelente para pequenas pepitas em solos benignos a moderadamente mineralizados. Este modo oferece melhor desempenho geral em pepitas de ouro e inclui áudio de tom contínuo para ajudar os usuários a ouvir respostas fracas do alvo. Este modo não é sugerido para áreas inúteis.
Quando a frequência é definida como MULTI-IQ+, os alvos ferrosos recebem um ID de alvo na mesma escala dos alvos não ferrosos, isso é mostrado na mesma escala que os IDs dos alvos não ferrosos. Quando o processador interno classifica um alvo como ferroso, o detector emitirá um tom de áudio baixo, acompanhando o indicador ferroso vermelho abaixo do número de identificação do alvo e a tela 2D indicará que o alvo aparecerá na parte superior ou inferior da tela, longe do alvo. linha condutora central. 

*Imagens apenas para fins ilustrativos.*
Alvos ferrosos complexos que possuem uma combinação de propriedades ferrosas e condutoras semelhantes a algumas moedas geralmente aparecerão na metade inferior da tela 2D.
Alvos ferrosos maiores aparecerão no topo da tela. 

Também pode haver alguns alvos ferrosos grandes com formatos cilíndricos, como parafusos grandes que possuem altas propriedades condutivas. Esses tipos de alvos podem mostrar um traço de alvo tanto nas regiões ferrosas quanto nas não ferrosas.
*Imagens apenas para fins ilustrativos.*
A discriminação permite que os usuários aceitem ou rejeitem IDs de destino individuais ou de grupos. Quando a discriminação é ajustada, as alterações são feitas nos IDs dos alvos ferrosos e não ferrosos. Isto é mostrado como uma linha vertical acinzentando as partes ferrosas e não ferrosas do ID do alvo selecionado.
Os limites ferrosos permitem que os usuários ajustem os parâmetros do detector para determinar o que é detectado como alvo ferroso ou não ferroso. Eles podem ser ajustados nas seções superior e inferior da tela 2D.
*Imagens apenas para fins ilustrativos.*
Em geral, Multi é superior às frequências únicas quando se utiliza um detector. Contudo, pode haver situações especializadas em que uma determinada frequência tenha uma vantagem única.
*Observe que ao usar frequências únicas, os Limites Ferrosos serão desativados e os alvos ferrosos fornecerão um ID de alvo de 1 a 19 e mostrarão uma indicação ferrosa vermelha na tela*
O tempo de execução típico, a partir de uma carga completa, é de aproximadamente 10 horas . O detector MANTICORE também pode ser alimentado diretamente de qualquer banco de energia USB que suporte capacidade de saída de 0,5A ou 2A (@ 5V). Isto proporciona efetivamente um tempo de execução contínuo limitado apenas pelos bancos de potência usados.
*Você NÃO pode usar seu detector MANTICORE debaixo d’água quando ele estiver conectado a um banco de energia USB*
O detector MANTICORE suporta carregamento de dispositivos que atendem ao padrão USB 2.0. QuickCharge™ é um padrão proprietário desenvolvido pela Qualcomm que utiliza uma voltagem mais alta e não é compatível com detectores MANTICORE.
O tempo de carregamento, de totalmente plano a 100%, é de aproximadamente 7 horas quando carregado com um carregador de alta capacidade (>1,7A a 5V).
Qualquer porta USB padrão compatível com carregamento de bateria USB 1.2 (BC1.2) pode ser usada para carregar sua bateria, no entanto, os tempos de carregamento podem ser mais longos se você usar opções de baixo consumo de energia.
A longevidade de todas as baterias depende de uma série de fatores que muitas vezes são controláveis até certo ponto pelo usuário; como temperatura, níveis de carga quando armazenadas, ciclos de carga, etc. A causa mais comum da redução da vida útil das baterias de íons de lítio é manter uma bateria totalmente carregada em temperaturas elevadas.
Tal como acontece com todos os componentes usados em nossos detectores, adquirimos rigorosamente apenas componentes modernos de alta qualidade de fornecedores responsáveis. Não esperamos que os usuários tenham problemas de bateria ao longo dos anos de uso. Nossa experiência com os detectores CTX 3030 e GPZ 7000, que usam baterias de íons de lítio, mostra que a grande maioria dos usuários nunca precisou comprar uma bateria de reposição.
Use apenas carregadores USB confiáveis e certificados ao carregar a bateria MANTICORE conforme detalhado abaixo:
A bateria Li-ION contida na alça é substituível e coberta pela garantia por um período de 6 meses a partir da data da compra. A Minelab recomenda usar um Centro de Serviço Autorizado para evitar danos potenciais à vedação à prova d'água e anular a garantia do detector.
Sim, na detecção em terra, sem quaisquer limitações. No entanto, o detector não deve ser usado debaixo d'água durante o carregamento ou quando conectado a um banco de energia.
Sim. Se o detector estiver sendo usado, quando alimentado por um banco de energia USB, a bateria poderá carregar mais lentamente se houver capacidade disponível suficiente no banco de energia.
Sim. É uma boa prática lavar o detector com água limpa e doce após a detecção na água ou na praia. Nunca use abrasivos ou solventes para limpar o detector.
Não. Não é necessário lubrificar ou engraxar nenhuma parte do detector, inclusive as vedações à prova d'água. O uso de qualquer graxa à base de petróleo danificará as vedações à prova d’água e anulará a garantia.
Se estiver em águas profundas ou totalmente submerso, recomendamos usar apenas fones de ouvido à prova d'água Minelab . Eles possuem um conector especialmente projetado que forma uma vedação à prova d'água quando usado com o MANTICORE. Esses fones de ouvido estão disponíveis como acessório que pode ser adquirido na concessionária local da Minelab.
Hardwired coils are more reliable for deep diving detectors.
No, 8 x 1.2V is only 9.6V, and these detectors require 12V to function.
Check to ensure the battery is fully charged. A low battery causes the threshold to get very loud and the response becomes erratic.
Salt, sand and grit will accumulate on the Excalibur II. So make sure you thoroughly rinse it with fresh water after use, including the coil cover, shafts and battery pack. Don't forget the vent holes on each headphone diaphragm as these need to be clear if used for diving purposes to allow for ear equalisation.
The Multi-IQ engine in all EQUINOX series is the same, there are however processor enhancements in the EQUINOX 700 and EQUINOX 900 that allow the detector to provide users with better Iron Bias, target separation and discrimination depth.
Park 1 (General/Coins)
Park 1 is optimised for modern coins and larger jewellery with a default discrimination pattern set to reject many common aluminium foil-like targets. Therefore, this is the ideal Profile to start with to learn EQUINOX before experimenting with the other Modes and more specialist settings. Park 1 Multi-IQ processes a lower frequency weighting of the multi-frequency signal, as well as using algorithms that maximise ground balancing for soil to achieve the best signal-to-noise ratio. Hence Park 1 is most suited for general detecting and coin hunting.
Park 2 (Fine jewellery)
Park 2 is ideal for smaller targets in trash-infested (including ferrous trash) locations. It will detect a wider range of targets including low conductor (or higher frequency) targets, e.g. fine jewellery. All non-ferrous targets are accepted by default. Recovery Speed is increased to clearly identify good targets masked by iron trash. Target Tone is set to maximum to provide as much target information as possible via audio. Park 2 Multi-IQ processes a higher frequency weighted multi-frequency signal while ground balancing for soil.
Field 1 (Coins and Artefacts)
Field 1 is for general hunting with high trash rejection. This assists in locating desired targets more easily. The default discrimination pattern is set to reject most coke signals. The first Tone Break is set so that the coke signals will produce the same low tone as ferrous targets. Field 1 Multi-IQ processes a lower frequency weighted multi-frequency signal, as well as using algorithms that maximise ground balancing for soil, to achieve the best signal to noise ratio. Hence being most suited for general detecting and coin hunting.
Field 2 (Fine coins and Artefacts)
Field 2 suits locations with high target and trash densities. It will better detect small hammered coins on their edge or at greater depth. The default discrimination pattern is set to reject most coke signals. Target Tone is set to maximum to enhance audio identification and Recovery Speed is faster. The first Tone Break has been set so that the coke signals will produce the same low tone as ferrous targets. Field 2 Multi-IQ processes a higher frequency weighted multi-frequency signal while ground balancing for soil.
Beach 1
Beach 1 is most useful for detecting in wet or dry beach sand and also in shallow water where conductive salt signals are prevalent. It has good sensitivity to coins and small/large jewellery. Beach 1 reduces the salt signal, while maintaining high transmit power, and still being sensitive to desirable targets. Beach 1 Multi-IQ processes a low frequency weighted multi-frequency signal, and uses special algorithms to maximise ground balancing for salt
Beach 2
Beach 2 gives the best results when either wading or shallow diving with the coil and/or detector fully submerged. In these instances, there is a very strong salt signal present, so Beach 2 has a lower transmit power, which results in much less noise. This profile may also be useful in dry conditions where there are extremely high ground noise levels. Beach 2 Multi-IQ processes a very low weighted multi-frequency combination, using the same algorithms as Beach 1 to maximise ground balancing for salt.
Multi-IQ (EQUINOX 800 & 900 only)
Gold 1
Gold 1 is suitable for searching for small gold nuggets in ‘mild’ ground. Most goldfield locations have a variable level of iron mineralisation that will require an ongoing Ground Balance adjustment, therefore Tracking Ground Balance is the default setting. The audio Threshold Level and Threshold Pitch are optimised for hunting for gold nuggets. Gold 1 Multi-IQ processes a high frequency weighted multi-frequency signal, while ground balancing for mineralised soil.
Gold 2
Gold 2 is best for searching for deeper gold nuggets in ‘difficult’ ground conditions. Gold 2 has a lower Recovery Speed, which will increase detection depth. However, more ground noise in more heavily mineralised grounds may result. Tracking Ground Balance is the default setting. The audio Threshold Level and Threshold Pitch are optimised for hunting for gold nuggets. Gold 2 Multi-IQ processes a high frequency weighted multifrequency signal, while ground balancing for mineralised soil.
EQUINOX 700
• Weight has been decreased to 1.27kg (2.8lb)
• Waterproof to 5m (IP68)
• Three piece collapsible shaft now 144cm - 61cm (56.7" - 24")
• All carbon fibre shafts
• New, easily adjustable armrest
• 119 Target ID Range (-19 to 99)
• 119 discrimination notch segments
• "Depth Pitch" audio option in all modes
• Improved target separation
• Improved ferrous rejection
• Red LCD backlight
• Keypad backlight
• LED flashlight
• Handle vibration target indication
EQUINOX 900
• All above features
• Greater Sensitivity range 1 - 28
• Includes EQX06 6" waterproof DD coil
The new carbon fiber shaft design allows users to pack the detector down to 61cm (24 in) and has a full extension of 144cm (56.7 in)
Depth performance will differ depending on conditions and detector settings. Beach performance is better overall. Enhancements have been made to improve recovery speed, target separation and discrimination depth allowing users to have solid target IDs at better depths. EQUINOX 900 comes with 28 levels of sensitivity allowing more depth where environmental conditions allow the sensitivity to be turned up.
What are the frequency differences between the EQUINOX 600, 700, 800 & 900?
The EQUINOX 600 and 700 offer a choice of 4 single selectable frequencies:
• 4kHz
• 5 kHz
• 10 kHz
• 15 kHz
The EQUINOX 800 and 900 offers the choice of 6 single selectable frequencies:
• 4kHz
• 5 kHz
• 10 kHz
• 15 kHz
• 20 kHz
• 40 kHz
Gold Mode is designed to enhance performance on small gold nuggets in mineralized ground. It does so primarily by using different audio processing so that targets respond both in volume and pitch. The Gold Mode will be of interest to gold prospectors but has less application for other uses.
While the EQUINOX 600 and 700 do not have a dedicated Gold prospecting mode. Multi-IQ is so good in both Park 2 and Field 2, that these profiles are as good, or better, at finding gold nuggets than many dedicated single-frequency gold detectors. Multi-IQ provides very stable ID’s which is great for choosing what targets to dig in a goldfield.
Iron Bias is a setting that lets you choose how you want iron in the ground to sound. If you have a low setting, more of the iron will come through as a good target to dig up. This will also give you the best chance of finding any valuable non-ferrous targets nestled among the iron.
However, if you desire to hear less false audio sounds from the iron in the ground, try increasing the Iron Bias setting.
The Iron Bias in the EQUINOX 700 and EQUINOX 900 has had some changes to improve discrimination depth.
EQUINOX 600 and 800 have the option to choose either FE Iron Bias or F2 Iron Bias. FE Iron Bias will provide control over the target ID response. F2 Iron Bias will provide tone and target ID response adjustment for a wider range of ferrous targets.
Iron Bias in the EQUINOX 700 and EQUINOX 900 is based off the F2 Iron Bias in the EQUINOX 600 and EQUINOX 800 but allows even better overall depth detection and target separation. Because of this there is no F2 option available in the EQUINOX 700 or EQUINOX 900.
Yes, Coiltek Coils manufacture Minelab approved aftermarket coils for the EQUINOX and X-TERRA-PRO detectors.
No, they have different technology requirements and are not compatible. Only Minelab EQX coils are compatible with EQUINOX series detectors.
Having a larger target ID scale allows the detector to provide the user with more information on the target prior to digging it. This allows users to identify more targets individually which will help determine if the target is valuable or trash.
In general, Multi is superior to the single frequencies when using an EQUINOX. However, there may be specialised situations where a particular frequency has a unique advantage. The EQUINOX Series offers users simultaneous Multi-Frequency plus a wide range of single selectable frequencies for specialist situations.
Yes, there is no need to perform a full factory reset. Individual Search Profiles can easily be returned to their factory preset settings. Only the local settings will be reset and any global settings will remain in their last-use state.
Beach Mode automatically senses black sand and reduces the transmit power to ensure that targets can still be detected without overloading occurring. When black sand is sensed, the Beach Overload Indicator will appear on the LCD. When this icon disappears, full transmit power automatically resumes.
Depth Pitch is an audio mode that provides a continuous pitch audio with no threshold tone. It provides separate audio for ferrous and non-ferrous targets with a variable pitch.
Small or deep targets providing a weaker signal will have a lower pitch.
Large or shallow targets providing a stronger signal will have a higher pitch.
EQUINOX 700 and EQUINOX 900 have been designed to handle harsh outdoor environments. Our testing includes drop tests up to 1m, flex and water ingress testing. Both models are IP68 rated and can be submerged up to 5m (16ft)
Middle and Lower shafts can be mixed. They are not identical in size so they may not provide an exact fit. Upper shafts cannot be changed as the physical mounting point of the control pod is different.
Yes. The supplied magnetic USB charge cable can be used on all EQUINOX models, MANTICORE and X-TERRA PRO detectors.
The charge time, from completely flat to 100%, is approximately 4 hours when charged with a high capacity charger (>1.7A @ 5V).
Longevity for all batteries depends on a number of factors that are often controllable to some degree by the user; such as temperature, charge levels when stored, charge cycles etc. The most common cause of reduced life of Li-ION batteries is keeping a fully charged battery at elevated temperatures.
As with all components used in our detectors, we stringently source only modern high quality components from responsible vendors. We do not expect users to experience any battery issues over years of use. Our experience with the CTX 3030 and GPZ 7000 detectors which both use Li-ION batteries is that the vast majority of users have never needed to purchase a replacement battery.
• Avoid charging or using in extreme temperatures.
• Avoid rapid extreme temperature swings.
• Use only Minelab or Minelab recommended USB chargers and avoid so-called ultrafast chargers from third-parties that claim to fully charge Li-ION batteries in less than one hour.
• Before storing the detector for prolonged periods, the battery should be charged to approximately 50-60%. On the EQUINOX Battery Status Indicator, 2-bars is the optimum charge for prolonged storage. Maintaining the 2-bar charge periodically during extended storage is also advisable. Extended storage in temperatures less than 30oC (86’F) will also minimize degradation to Li-ION battery life
Use only reputable and certified USB Chargers when charging the EQUINOX battery as detailed below:
Typical runtime, from a full charge using wired headphones, is approximately 12 hours. The EQUINOX Series detectors can also be powered directly from any USB Power Bank that supports 0.5A or 2A (@ 5V) output capability. This effectively gives a continuous runtime only limited by the power banks being used.
The EQUINOX detectors support charging from devices that comply to the USB 2.0 standard. QuickCharge™ is a proprietary standard develop by Qualcomm that uses a higher voltage and is not compatible with EQUINOX detectors.
A bateria Li-ION contida na alça é substituível e coberta pela garantia por um período de 6 meses a partir da data de compra. A Minelab recomenda usar um Centro de Serviço Autorizado para evitar danos potenciais à vedação à prova d’água e anular a garantia do detector.
*As baterias EQUINOX 600 e EQUINOX 800 não são compatíveis com o EQUINOX 700 ou EQUINOX 900.
Yes, when detecting on land, without any limitations. However, the detector must not be used underwater whilst charging or when connected to a power bank.
Yes. If the detector is being used, when powered by a USB power bank, the battery may charge at a slower rate if there is enough spare capacity in the power bank.
Yes. Connecting the WM 08 to a power bank will allow you to continue to use it even if the battery is low/flat. The power bank will charge the WM 08, which will continue operating as normal.
*Please note that the WM08 is not compatible with the EQUINOX 700 OR EQUINOX 900
No. They are separate wireless technologies and only one can be used at any one time.
*Please note that the WM08 and Bluetooth headphones are not compatible with the EQUINOX 700 OR EQUINOX 900
Re-pairing will be required if a different wireless device has been connected to the Equinox 600 or Equinox 800 (e.g. WM 08), or following a detector factory reset.
AUDIO
Bluetooth® Hearing Aids are largely intended to allow the wearer to intentionally connect to other Bluetooth® compatible devices, such as phones and audio streams. They enable the wearer to stream audio on-the-go without having to remove the hearing aid and insert earbuds.
The EQUINOX 600 and EQUINOX 800 detectors are Bluetooth® compatible devices.
While there are various different types of streaming audio hearing aids available on the market, if the hearing aid supports Bluetooth® A2DP or Bluetooth® aptX-Low Latency™ then it will be compatible with the EQUINOX 600 and EQUINOX 800 detectors.
Pairing with the EQUINOX 600 or EQUINOX 800 is achieved by pressing and holding the Wireless button on the side of the Control Unit for 5 seconds.
While pairing is being performed the Wireless icon on the LCD will flash rapidly for 15 seconds. After 15 seconds the Bluetooth® icon will start flashing on the LCD to indicate a Bluetooth device is being paired.
The initial pairing may take up to 5 minutes. During the pairing process the user should not press the Wireless button as this will stop the pairing process.
Once paired, the EQUINOX 600 or EQUINOX 800 will display a solid Bluetooth® icon on the top right of the LCD. If the hearing aid is aptX-Low Latency™ Bluetooth compatible the ‘+’ icon will also be displayed.
Consult your Hearing Aid User Manual for additional pairing instructions specific to your hearing aid.
*Please note that EQUINOX 700 and EQUINOX 900 are not currently compatible with hearing aids.
Yes, the Equinox 600 can still pair to Bluetooth A2DP or Bluetooth aptX-Low Latency headphones.
Yes. It is good practice to wash the detector with clean fresh water after detecting in water or on the beach. Never use abrasives or solvents to clean the detector.
Whenever washing or using your detector underwater always ensure that the plastic bung on the rear of the control pod is firmly screwed into the headphone jack.
No. It is not necessary to lubricate or grease any part of the detector, including the waterproof seals. Using any petroleum-based grease will damage the waterproof seals and void the warranty.
If deep wading or fully submerged, we recommend using only Minelab Waterproof EQUINOX Headphones. These have a specially engineered connector that forms a waterproof seal when used with the EQUINOX. These headphones are available as an accessory from your local Minelab authorised dealership (Part Number: 3011-0372)
Yes, the MULTI-IQ technology in the X-TERRA ELITE is the same as the MULTI-IQ technology used in other MINELAB metal detectors.
X-TERRA ELITE includes a 15kHz single frequency option for the Park and Field modes.
O X-TERRA ELITE foi projetado para o detectorista mais comprometido que procura um detector com bom preço e excelente desempenho. Os usuários têm mais controle e ajustes de configurações, permitindo que os detectoristas ajustem o desempenho da detecção. O X-TERRA ELITE é à prova d'água até 5 metros (15 pés) e oferece desempenho superior quando comparado a qualquer outro detector de frequência única atualmente no mercado.
A série VANQUISH é um detector do tipo ligar e usar projetado para ter ótimo desempenho, mas ainda assim ser muito fácil de usar com ajustes mínimos de configuração. Isto é possível porque o processador MULTI-IQ faz todo o trabalho pesado para você.
Os detectores VANQUISH são sugeridos para iniciantes e o detector X-TERRA ELITE é sugerido para detectoristas intermediários que desejam atualizar de um detector de nível iniciante.
As bobinas das séries V*X ou EQUINOX podem ser usadas com o X-TERRA ELITE, mas nenhuma outra bobina da marca Minelab pode ser usada, incluindo as bobinas das séries X-TERRA 305, 505 e 705 anteriores.
O X-TERRA ELITE vem com uma bobina elíptica Double-D V12X de 12” na caixa. Você pode adquirir as bobinas acessórias abaixo em seu revendedor local da Minelab.
X-TERRA ELITE will out-perform the VANQUISH and X-TERRA PRO detectors in all terrains on most targets. Performance may be similar in some circumstances but will differ depending on ground mineralisation levels but more specifically the type of metal each target consists of.
The X-TERRA ELITE provides unprecedented performance in salty conditions. There are 2 beach modes to ensure stability in both wet and dry salty environments.
Yes, you can purchase the Minelab WM09 wireless module, ML85 headphones or ML105 headphones as all of these are compatible with the X-TERRA ELITE. (note that the X-TERRA ELITE EXPEDITION model includes the ML85 headphones in the box)
O X-TERRA ELITE usa áudio sem fio proprietário que não é compatível com nenhuma versão atual do BLUETOOTH. Os fones de ouvido Minelab ML85 ou ML105 e o módulo sem fio WM09 são compatíveis com o X-TERRA ELITE e estão disponíveis em seu revendedor local autorizado da Minelab.
Park 1 provides a default MULTI-IQ transmit frequency and is optimised for detecting modern coins and larger jewellery. This is a good mode to learn the X-TERRA ELITE before experimenting with other settings.
Park 2 provides a default MULTI-IQ transmit frequency and is optimised for detecting fine jewellery and smaller targets in trash infested areas. Recovery speed in Park 2 is increased to clearly identify good targets masked by iron trash.
Field 1 provides a default MULTI-IQ transmit frequency and is optimised for detecting modern coins and general detecting. It has a high trash rejection which makes it an ideal detect mode for areas containing coke.
Field 2 provides a default MULTI-IQ transmit frequency and is optimised for locations with high target and trash densities. This mode is great for coins on edge or sitting at greater depths. It has a high trash rejection which makes it an ideal detect mode for areas containing coke.
Beach 1 provides a default MULTI-IQ transmit frequency and is optimised for dry and wet sand. Beach 1 mode has a lower recovery speed for better depth across all targets and is good for detecting coins and small to large jewellery.
Beach 2 provides a default MULTI-IQ transmit frequency and is optimised for underwater usage where a very strong salt signal is present. To compensate for the high salt content Beach 2 has a lower transmit power. Beach 2 can also be used in dry soils that have a high salt content.
Yes, there is no need to perform a full factory reset. Individual Search Profiles can easily be returned to their factory preset settings. Only the local settings will be reset and any global settings will remain in their last-use state.
Typical runtime, from a full charge using wired headphones, is approximately 12 hours. The X-TERRA ELITE detector can also be powered directly from any USB Power Bank that supports 0.5A or 2A (@ 5V) output capability. This effectively gives a continuous runtime only limited by the capacity of the power bank.
The X-TERRA ELITE detector supports charging from devices that comply to the USB 2.0 standard. QuickCharge™ is a proprietary standard develop by Qualcomm that uses a higher voltage and is not compatible with X-TERRA ELITE detectors.
The charge time, from completely flat to 100%, is approximately 4 hours when charged with a high capacity charger (>1.7A @ 5V).
Longevity for all batteries depends on a number of factors that are often controllable to some degree by the user; such as temperature, charge levels when stored, charge cycles etc. The most common cause of reduced life of Li-ION batteries is keeping a fully charged battery at elevated temperatures.
As with all components used in our detectors, we stringently source only modern high quality components from responsible vendors. We do not expect users to experience any battery issues over years of use. Our experience with the CTX 3030 and GPZ 7000 detectors which both use Li-ION batteries is that the vast majority of users have never needed to purchase a replacement battery.
Use only reputable and certified USB Chargers when charging the X-TERRA ELITE battery as detailed below:
The Li-ION battery contained in the handle is replaceable and covered under warranty for a period of 6 months from the date of purchase. Minelab recommends using an Authorised Service Centre to avoid potentially damaging the waterproof seal and voiding the detector warranty.
Yes, when detecting on land, without any limitations. However, the detector must not be used underwater whilst charging or when connected to a power bank.
Yes. If the detector is being used, when powered by a USB power bank, the battery may charge at a slower rate if there is enough spare capacity in the power bank.
Yes. Connecting the X-TERRA ELITE to a USB power bank will allow you to continue to use the detector even if the battery is low/flat. The power bank will charge the detector if there is any residue power to charge the battery.
Sim. É uma boa prática lavar o detector com água limpa e doce após a detecção na água ou na praia. Nunca use abrasivos ou solventes para limpar o detector.
Sempre que lavar seu detector debaixo d'água, certifique-se de que a tampa de plástico na parte traseira do painel de controle esteja firmemente parafusada na entrada do fone de ouvido.
No. It is not necessary to lubricate or grease any part of the detector, including the waterproof seals. Using any petroleum-based grease will damage the waterproof seals and void the warranty.
If deep wading or fully submerged, we recommend using only Minelab Waterproof Headphones. These have a specially engineered connector that forms a waterproof seal when used with the X-TERRA ELITE.
VANQUISH depth performance is similar but not quite as deep as the EQUINOX. However, EQUINOX detectors are more configurable for varying conditions.
Minelab does not publish the exact frequencies of Multi-IQ technology used in the VANQUISH Series. These frequencies are similar to the Multi-IQ mode in the EQUINOX Series.
The VANQUISH Series detectors only use Multi-IQ (simultaneous multi-frequency) technology.
Target IDs on VANQUISH are the same as the Target IDs on EQUINOX.
Recovery speed varies depending on the mode selected.
The Custom mode is programmable. If you program custom mode, it will adopt the recovery speed from the mode you program it to, e.g. coin mode = fast recovery speed, jewellery = medium recovery speed, relic = slow recovery speed.
When the detector is switched off, discrimination patterns in coin, jewellery & relic modes are all reset. Custom mode will keep its saved discrimination pattern.
There are three coils available for VANQUISH. These are:
The VANQUISH Series requires x4 AA batteries and is compatible with both rechargeable and non-rechargeable batteries. The battery level indicator shows the current battery level. Lift the battery cover off the control box to replace the batteries.
The VANQUISH 540 and 540 Pro-Pack come with x4 AA NiMH rechargeable cells and a charger. The VANQUISH 340 and 440 can also operate with rechargeable batteries. Minelab recommends only NiMH rechargeable batteries or non-rechargeable AA alkaline batteries. Batteries rated between 1.2v – 1.5v are acceptable. If the battery has a voltage higher than 1.5v, it can damage the detector.
AA rechargeable NiMH batteries provide a run-time of approximately 11 hours using factory default settings.
Non-rechargeable, high-quality AA alkaline batteries provide a run-time of approximately 10 hours.
No. VANQUISH coils cannot be used on EQUINOX, and EQUINOX coils cannot be used on VANQUISH.
The VANQUISH control box is not submersible. The coils are fully waterproof up to 1 m (3 ft).
The temperature specification for the VANQUISH Series is -10C – 40 C (14F – 104 F). The coil is waterproof to 1 m (3 ft), but the control pod cannot be submerged.
No. Pitch or tone breakpoints cannot be adjusted on the VANQUISH Series.
The VANQUISH 540 has a red backlight for detecting in low light situations. The backlight is 'Off' by default at each start-up to reduce battery consumption.
The Multi-IQ technology used in VANQUISH allows the detector to provide stable and reliable target IDs in light of medium mineralised soils found in beaches or parks. As a result, there is no ground balance function available in the VANQUISH Series.
Multi-IQ technology allows VANQUISH to operate on wet beach sand and salt water with much higher performance than a single frequency VLF detector.
VANQUISH 540 can operate with Bluetooth V4.2 or later and Bluetooth aptX Low Latency headphones. VANQUISH 340 & 440 do not have wireless capability.
Yes. Software updates can be found on the Minelab website on the VANQUISH product page 'downloads' section.
VANQUISH Series detectors are under warranty for three years (36 months) from the Date of Purchase. Detailed product warranty information can be found under SUPPORT at minelab.com.
Including battery weight, the VANQUISH 340 and 440 weigh 1.2 kg (2.6 lbs), whereas VANQUISH 540 weighs 1.3 kg (2.9 lbs), as it includes the larger V12 coil.
VANQUISH 540 Pro-Pack contains the same VANQUISH 540 detector but includes the smaller V8 coil and the ML80 Bluetooth aptX Low Latency wireless headphones.
Depois de desligar o detector, aguarde pelo menos 2 s antes de tentar reiniciá-lo.
A configuração Iron Bias é a mesma em todos os modos em todos os detectores VANQUISH.
Nota: VANQUISH 540 tem uma polarização de ferro ajustável que tem uma resposta de polarização de ferro semelhante ao EQUINOX.
PRO-SWITCH technology is a single frequency VLF technology that allows the user to switch transmit frequencies at the touch of a button to optimise performance.
Changing frequency gives detectorists the ability to adjust frequencies to move away from noise or optimise detection ability when hunting for specific metal targets.
Park and Field modes have 5kHz, 10kHz and 15kHz selectable frequencies. Beach modes have an 8kHz single frequency for high salt mineralisation.
MULTI-IQ will provide superior results when compared to PRO-SWITCH. There may be situations where the PRO-SWITCH technology can perform equally as well as MULTI-IQ. This will depend on how the user has optimised the detector settings.
Multi-IQ will provide maximum performance in all situations as the internal processor does all the hard work. PRO-SWITCH relies on the user to ensure the detector is set to its optimal performance capability.
VANQUISH detectors with MULTI-IQ are a switch-on and go type detector designed to have excellent performance but still be very easy to use with minimal setting adjustments. This is possible as the MULTI-IQ processor does all the hard work for you.
X-TERRA PRO is a high performing single frequency detector designed for the more committed detectorist looking for a well-priced detector with great performance. Users have the ability to adjust transmit frequency which provides more control allowing detectorists to tune the detection performance when hunting for specific targets. The X-TERRA PRO is waterproof to 5 meters (15 feet) and provides superior performance when compared to any other single frequency detector currently on the market.
Target ID’s on the X-TERRA PRO will generally not be quite as stable as MULTI-IQ target ID’s and MULTI-IQ detectors will generally provide superior performance when in conductive (salty) soils.
The X-TERRA PRO comes with a V12X 12” Elliptical Double-D coil in the box, you can purchase the below accessory coils from your local Minelab dealership. Any coil that is compatible with the EQUINOX detectors is also compatible with the X-TERRA PRO.
10kHz is the best all-round frequency to start detecting with as it provides good depth and sensitivity across a range of different targets.
It is expected when running a lower transmit frequency on the X-TERRA PRO that performance on high conductors containing silver or copper will provide similar depths to MULTI-IQ detectors.
It is expected when running a higher transmit frequency on the X-TERRA PRO that performance on lower conductors containing gold will provide similar depths to MULTI-IQ detectors.
At the beach in salty conditions most single frequency detectors struggle with the mineralisation. The X-TERRA PRO provides unprecedented performance for a single frequency VLF detector in salty conditions.
Yes, there is no need to perform a full factory reset. Individual Search Profiles can easily be returned to their factory preset settings. Only the local settings will be reset and any global settings will remain in their last-use state.
Yes, you can purchase the Minelab ML85 headphones, ML105 headphones or the WM09 wireless module. These are all compatible with the X-TERRA PRO.
There are currently no aftermarket wireless headphones available for the X-TERRA PRO.
The X-TERRA PRO uses a proprietary wireless audio that is not compatible with any current versions of BLUETOOTH. The Minelab ML85 or ML105 headphones and WM09 wireless module are compatible with the X-TERRA PRO and are available from your local authorised Minelab dealership.
Park 1 provides a default 10kHz transmit frequency and is optimised for detecting modern coins and larger jewellery. This is a good mode to learn the X-TERRA PRO before experimenting with other settings.
Park 2 provides a default 15kHz transmit frequency and is optimised for detecting fine jewellery and smaller targets in trash infested areas. Recovery speed in Park 2 is increased to clearly identify good targets masked by iron trash.
Field 1 provides a default 10kHz transmit frequency and is optimised for detecting modern coins and general detecting. It has a high trash rejection which makes it an ideal detect mode for areas containing coke.
Field 2 provides a default 15kHz transmit frequency and is optimised for locations with high target and trash densities. This mode is great for coins on edge or sitting at greater depths. It has a high trash rejection which makes it an ideal detect mode for areas containing coke.
Beach 1 provides a default 8kHz transmit frequency and is optimised for dry and wet sand. Beach 1 mode has a lower recovery speed for better depth across all targets and is good for detecting coins and small to large jewellery.
Beach 2 provides a default 8kHz transmit frequency and is optimised for underwater usage where a very strong salt signal is present. To compensate for the high salt content Beach 2 has a lower transmit power. Beach 2 has a higher recovery speed to aid in saltwater rejection. It can also be used in dry soils that are conductive (salty).
Typical runtime, from a full charge using wired headphones, is approximately 16 hours. The X-TERRA PRO detector can also be powered directly from any USB Power Bank that supports 0.5A or 2A (@ 5V) output capability. This effectively gives a continuous runtime only limited by the capacity of the power bank.
The X-TERRA PRO detector supports charging from devices that comply to the USB 2.0 standard. QuickCharge™ is a proprietary standard develop by Qualcomm that uses a higher voltage and is not compatible with X-TERRA PRO detectors.
The charge time, from completely flat to 100%, is approximately 4 hours when charged with a high capacity charger (>1.7A @ 5V).
Longevity for all batteries depends on a number of factors that are often controllable to some degree by the user; such as temperature, charge levels when stored, charge cycles etc. The most common cause of reduced life of Li-ION batteries is keeping a fully charged battery at elevated temperatures.
As with all components used in our detectors, we stringently source only modern high quality components from responsible vendors. We do not expect users to experience any battery issues over years of use. Our experience with the CTX 3030 and GPZ 7000 detectors which both use Li-ION batteries is that the vast majority of users have never needed to purchase a replacement battery.
Use only reputable and certified USB Chargers when charging the X-TERRA PRO battery as detailed below:
A bateria Li-ION contida na alça é substituível e coberta pela garantia por um período de 6 meses a partir da data da compra. A Minelab recomenda usar um Centro de Serviço Autorizado para evitar danos potenciais à vedação à prova d'água e anular a garantia do detector.
Yes, when detecting on land, without any limitations. However, the detector must not be used underwater whilst charging or when connected to a power bank.
Yes. If the detector is being used, when powered by a USB power bank, the battery may charge at a slower rate if there is enough spare capacity in the power bank.
Yes. It is good practice to wash the detector with clean fresh water after detecting in water or on the beach. Never use abrasives or solvents to clean the detector.
Whenever washing or using your detector underwater always ensure that the plastic bung on the rear of the control pod is firmly screwed into the headphone jack.
No. It is not necessary to lubricate or grease any part of the detector, including the waterproof seals. Using any petroleum-based grease will damage the waterproof seals and void the warranty.
If deep wading or fully submerged, we recommend using only Minelab Waterproof Headphones. These have a specially engineered connector that forms a waterproof seal when used with the X-TERRA PRO. These headphones are available as an accessory (Part Number: 3011-0372)
No, the detection coil that is included with your GO-FIND detector is designed to provide the best performance for that specific model and cannot be changed.
The battery compartment is in the handle of the GO-FIND. On the rear of the handle, you will see a small tab. Gently pull this tab down and then lift the battery compartment lid to access the batteries.
Yes, the GO-FIND series can operate with rechargeable 1.2volt Ni-MH rechargeable batteries. You can only use batteries that have a 1.2 volt or 1.5volt rating. Most AA Lithium batteries have a higher voltage and cannot be used as they exceed the maximum voltage rating for the detector. Using Lithium batteries that exceed the maximum voltage rating can damage the internal electronics of the detector. This type of damage is not covered under warranty.
The detection coil on the GO-FIND series is waterproof to 60cm (2ft) and can be washed. The screen pod should never be washed or submerged in water as it is not waterproof. To clean the screen pod wipe it with a damp cloth.
Yes, the GO-FIND detectors utilise Minelab’s Easy-Trak ground balance technology which automatically senses salt mineralisation in the ground and adjusts the detector to ensure constant smooth usage when detecting in beaches or parks.
Wireless headphones can be used but they cannot be paired directly to your detector. You will need to connect your wireless headphones to your smartphone and then connect your GO-FIND 44 or 66 to your smartphone via the GO-FIND app. GO-FIND 11 or 22 do not have Bluetooth capability and cannot connect to the GO-FIND app or wireless headphones.

In your Android phone Google Play Store & Apple iPhone App Store Search for Minelab GO-FIND
GO-FIND by Minelab Electronics Pty Ltd will be 1st – 2nd in search result.
The Pro App function is FREE for GO-FIND 66 detectors. Download the same GO-FIND App for FREE. When this GO-FIND App is paired with a GO-FIND 66, the App will activate full Pro App functions.
Download the same GO-FIND App for FREE. When this GO-FIND App is paired with a GO-FIND 44, the App will activate basic App functions.
Download the same GO-FIND App for FREE. When this GO-FIND App is paired with a GO-FIND 44, the App will activate basic App functions. It is optional to upgrade your Basic App functions to Pro App functions, just like how it used on a GO-FIND 66. In-app purchase is available for upgrading.
Pela primeira vez, você precisa emparelhar o GO-FIND 44/66 com o seu dispositivo móvel:
Veja também:
No GO-FIND App, o botão é ajudar (?) No canto inferior direito. Clique para ver o guia de pareamento Bluetooth e o guia de conexão Bluetooth.
Não, após o emparelhamento pela primeira vez, use. Seu uso da próxima vez deve exigir apenas um toque curto para ativar a função Bluetooth.
Agora você pode usar o aplicativo com o detector
Android 11 or later with Bluetooth Lower Energy hardware
iPhone iOS 8.0 or later with Bluetooth Lower Energy hardware
No, the X-TERRA VOYAGER uses different technology to other detectors. You can only use the coil that is supplied in the box with the detector.
The X-TERRA VOYAGER does not have any accessory coils currently available.
The depth gauge will provide an approximate indication of depth and should only be used as a guide as large or small metals will cause the gauge to become inaccurate. A coin sized object will provide the below estimated depths.
1 arrow = 1” (25mm)
2 arrows = 3” (75mm)
3 arrows = 5” (125mm)
4 arrows = 6” (150mm)
5 arrows = >6” (>150mm)
The X-TERRA VOYAGER does not have wireless capability. You can use a Bluetooth wireless transmit module with the detector. These are not available from Minelab and will have to be purchased separately.
All Metal allows the detector to detect all metal types. When in all metal mode there will be no discrimination of any metal types.
Custom provides users the ability to discriminate any of the target group icons at the top of the screen. You simply navigate through to the desired target group and the icon will flash for a few seconds and then it will disappear. All target ID’s in this target group will now be discriminated out.
To detect the discriminated target group simply navigate away from the target group and then navigate back to the desired target group. The icon will flash for a few seconds and then appear. All target ID’s in the target group will now detect again.
Jewelry provides discrimination pattern that ignores most iron/ferrous junk. You will also find coins, relics and other non-ferrous metals. This mode is good for trashy environments.
Learn allows users to detect 1 specific target group. You simply need to wave the desired metal over the detection coil, the detector will then learn this target ID and accept only targets ID’s within that target group.
Typical runtime, when using new high quality 9-volt alkaline batteries is 20 hours.
It is good practice to clean your detector after each use. Only fresh water should be used when cleaning. Never use abrasives or solvents to clean the detector. The detection coil is waterproof and can be washed with the hose. The Screen pod should only be carefully wiped with a clean damp cloth to avoid any water or moisture ingress.
No. It is not necessary to lubricate or grease any part of the detector. Using any petroleum-based grease can damage the plastics and void the warranty.
To disable the audio tones, you simply need to push and hold the "minus" button when powering the PRO-FIND 40 on.
To enable the audio tones, you simply need to push and hold the "plus" button when powering the PRO-FIND 40 on.
To disable the ferrous tones OFF simply push and hold the "minus" button when the PRO-FIND 40 is powered on and then wait for the long beep.
To enable the ferrous tones ON simply push and hold the "plus" button when the PRO-FIND 40 is powered on and then wait for the long beep.
No, the LED flashlight cannot be adjusted.
No, the vibration cannot be toggled ON/OFF.
The Rapid Re-tune feature was designed so that users do not have to power cycle the pin-pointers to re-tune the PRO-FIND to the environment.
To re-tune the PRO-FIND 40 simply short-press the power button when the PRO-FIND 40 is powered on.
At maximum Sensitivity the PRO-FIND 40 can detect targets at greater distances which can be both an advantage and a disadvantage. To pinpoint a target sometimes it’s better to have a less sensitive probe to reduce the search area, so we have given you the ability to adjust it how you see fit. The Sensitivity may also need to be reduced in mineralised or salty soils, so that you are only detecting metal and not the minerals in the ground.
Side detection occurring with the target (or multiple) in the side of the hole. Use the tip of the probe to check around the sides of the hole. Reducing the Sensitivity can also help.
Yes, but be aware that the PRO-FIND 40 won’t have the same sensitivity to very small nuggets as a quality Minelab metal detector. It will be a good aid in target recovery for larger nuggets.
Yes, the PRO-FIND 40 is waterproof to 3 meters (10ft) and can be washed. When washing always use clean fresh water.
If no targets are detected or buttons pressed for 5 minutes, then the PRO-FIND 40 will start a slow constant beep (Lost Alarm) this alarm will sound for 5 minutes and then the PRO-FIND 40 will power off to save battery life.
The battery may be flat or inserted incorrectly. Replace the battery and/or check the battery orientation. If you are still having issues, contact your closest Minelab Service Centre.
The PRO-FIND 40 has a 3rd beep that notifies you that the pin-pointer has calibrated to the environment. This can sometimes take up to 30 seconds to occur depending on environmental conditions. You can short press the power button to perform a rapid re-tune. You should then hear a confirmation beep and the PRO-FIND 40 should now detect metals.
Tips for switching on:
*Calibration usually takes less than a second when the unit has been used recently.*
In highly mineralised soils:
Se nenhum alvo for detectado ou se os botões forem pressionados por alguns minutos, a unidade iniciará um alarme perdido, isso soará um bipe longo para que você possa encontrar o ponteiro dos pinos. Após alguns minutos, o ponteiro de pinos se desligará para preservar a vida útil da bateria.
Isso permite que você encontre a unidade se ela for deixada para trás no chão depois de cavar um buraco. O sinal sonoro não ocorre se estiver no modo somente vibração. Após 5 minutos de sinal sonoro lento, a unidade será desligada automaticamente.
A bateria pode ser inserida da maneira errada se a tampa for aberta, mas é difícil apertar. O plástico com chave impede que as guias da bateria toquem nos contatos - gire as baterias para corrigir isso.
Depois de ativar o Pro-Find, você ouvirá dois bipes seguidos por um terceiro bipe de calibração mais curto. Às vezes, essa calibração pode demorar de 15 a 20 segundos. Aguarde até que este sinal aconteça antes de colocar o Pro-Find próximo a objetos metálicos. Se você tiver o Pro-Find próximo ao metal ao trocá-lo, ele não será calibrado e será necessário reiniciar o Pro-Find.
Detecção lateral que ocorre com o alvo (ou múltiplos) no lado do furo. Use a ponta da sonda para verificar as laterais do furo. Reduzir a sensibilidade também pode ajudar.
Sim, mas saiba que ele não terá a mesma sensibilidade a pepitas muito pequenas que um Minelab Gold Detector de qualidade. Será uma boa ajuda na recuperação de alvos para pepitas maiores.
Na sensibilidade máxima, o PRO-FIND 35 pode detectar alvos a distâncias maiores, o que pode ser uma vantagem e uma desvantagem. Às vezes, para identificar um alvo, é melhor ter uma sonda menos sensível para reduzir a área de pesquisa, por isso oferecemos a capacidade de ajustá-lo da maneira que você achar melhor. A sensibilidade também pode precisar ser reduzida em solos mineralizados ou salgados, para que você esteja detectando apenas metal e não o solo.
O PRO-FIND 35 é totalmente à prova d'água até 3 metros, para que você possa submergir o ponteiro do pino para limpá-lo. Verifique se a tampa da bateria foi totalmente apertada antes de submergir o ponteiro dos pinos.
O PRO-FIND 15 é resistente apenas à água. Se você cobrir a ventilação do alto-falante com o polegar, poderá lavá-lo em água corrente.
Dicas para ativar:
A calibração geralmente leva menos de um segundo quando a unidade foi usada recentemente
Em solos altamente mineralizados:
Áudio ligado e desligado (somente Pro-Find 35):
Tom ferroso ativado e desativado (somente Pro-Find 35):
O CTX 3030, o GPZ 7000 e o XChange 2 usam SQLite para armazenamento de dados. Usar uma ferramenta como SQLiteSpy pode ajudar a extrair os arquivos. Não há necessidade de instalar o SQLiteSpy, pois o arquivo extraído é executado diretamente.
1. Conecte o detector a um PC e navegue até a nova unidade removível criada.

2. Abra a unidade.

3. Dentro de você encontrará um arquivo. Copie isso para um local para usá-lo. Este arquivo é o banco de dados de armazenamento que precisa ser aberto.
1. Em XChange 2 selecione os pontos que deseja extrair.
2. Arraste-os para a pasta “Arquivo”.

3. Abra a pasta 'arquivo' clicando nela.
4. Clique no botão 'exportar um arquivo Minelab'.

5. O arquivo deve estar na pasta 'Downloads'.
6. Este arquivo baixado é compactado, então você precisará usar uma ferramenta como 7zip para extrair o arquivo 'shareData' dentro dele.
7. Copie 'shareData' para um local para usá-lo. Este arquivo está no banco de dados de armazenamento que precisa ser aberto.
SQLiteSpy é usado neste exemplo, mas um processo semelhante se aplica a outras ferramentas.
1. Abra SQLiteSpy
2. Selecione 'arquivo'> 'Abrir banco de dados ...'

3. Navegue até o local do banco de dados.
4. Altere o tipo de arquivo para 'Qualquer arquivo (*. *)'

5. Selecione o banco de dados e selecione 'Abrir'
6. À esquerda, existem várias tabelas, dependendo do arquivo de banco de dados utilizado.
uma. "findpoint": contém cada um dos FindPoints salvos
b. "waypoint": contém cada um dos WayPoints salvos
c. "ponto": contém cada um dos pontos usados para criar uma trilha em todos os GeoHunts. Observe que cada GeoHunt é identificado por um UUID na coluna "geohunt_fk".
d. "geohunt": contém o UUID que é usado na tabela de "pontos" para identificar cada um dos GeoHunts.

7. Suponhamos também que você deseja extrair alguns FindPoints (o mesmo procedimento é usado para os outros pontos também).
8. Clique duas vezes na tabela “findpoint”. Isso exibirá todos os FindPoints extraídos.
9. Clique em uma linha na tabela e pressione a tecla “Ctrl + A” para selecionar todas as linhas.
10. Pressione a tecla “Ctrl + C” para copiar todos os dados.
11. Abra o Excel
12. Cole os dados na planilha.
13. Em alguns arquivos de banco de dados, a latitude e a longitude precisam ser divididas por 10.000.000 para colocá-los no formato correto para uso.
14. Faça o que você precisa com os pontos daqui.


