Les détectives expérimentés de Minelab ont dressé une liste complète de FAQ sur l’utilisation d’un détecteur de métal. Ceux-ci contiennent également de nombreux conseils professionnels pour la détection des métaux.
Vous pouvez trouver les réponses à vos questions en lisant la FAQ ici et dans les articles correspondants de la base de connaissances . Bien sûr, si, après avoir recherché ces informations, vous avez encore une question, n'hésitez pas à contacter notre service clientèle .
Oui, les détecteurs de métaux Minelab ont la capacité de " discriminer " entre différents types de cibles . La fonction de discrimination des détecteurs Minelab permet de mesurer deux propriétés de cible, les propriétés ferreuses et les propriétés conductrices .
Les propriétés ferreuses font référence à la quantité de fer contenue dans une cible et, par conséquent, à sa force d'attraction sur un aimant. Les cibles ferreuses ont tendance à être des déchets, elles peuvent donc être discriminées / masquées en fonction de leurs propriétés ferreuses uniquement par le détecteur. Les propriétés conductrices font référence à la capacité d'une cible à conduire le courant électrique et donc à réagir au champ magnétique du détecteur de métal. Les déchets comme les ongles et les feuilles ont des propriétés conductrices différentes de celles des cibles de valeur, comme les pièces de monnaie et les bagues. Dans ce cas, le détecteur de métal peut déterminer si la cible est un déchet en fonction de la conductivité.
Le processus de configuration des paramètres de discrimination et la méthode utilisée pour indiquer un trésor ou une corbeille varient selon la gamme de détecteurs Minelab.
En règle générale, plus la fréquence utilisée par le détecteur est basse, plus il peut pénétrer dans le sol. Aux basses fréquences cependant, la sensibilité aux petites cibles à faible conductivité est réduite. Plus la fréquence est élevée, plus la sensibilité aux petites cibles est élevée, mais ne pénétrera pas aussi profondément. En général, les détecteurs d’or fonctionnent à des fréquences plus élevées (pour trouver de petites pépites), tandis que les détecteurs de pièces et de trésors fonctionnent à des fréquences plus basses pour une pénétration plus profonde. Les détecteurs de métaux de type MPS, à la fois sensibles et profonds, font figure d'exception.
Taille
La taille d'une bobine de recherche peut influencer la profondeur de détection ou la sensibilité d'un détecteur de métal. Plus la bobine est grande, plus elle est détectée en profondeur, mais aura moins de sensibilité aux petites cibles. Inversement, plus le diamètre de la bobine de recherche est petit, plus il devient sensible, mais perd la profondeur de détection.
Les petites bobines sont plus légères, plus faciles à contrôler et peuvent être choisies pour leur capacité à négocier des terrains difficiles ou des sous-bois. Ils sont également un avantage dans les zones de grande poubelle.
Forme
Les formes de bobines les plus courantes sont les bobines rondes pleines conventionnelles, les bobines de forme elliptique et les bobines en bande ouverte. La raison principale du changement de forme est de se conformer à une exigence physique, c’est-à-dire qu’une bobine elliptique peut être poussée autour des arbustes ou entre les rochers plus facilement qu’une bobine ronde et que les bobines à âme ouverte se déplacent plus facilement dans l’eau et sont plus légères. Les bobines rondes conventionnelles sont souvent plus stables et performantes et sont particulièrement populaires pour la prospection aurifère.
Configuration
Les trois types les plus courants d’enroulements de bobines sont Concentric, Double-D et Monoloop. La différence entre ces types de bobines est le motif selon lequel le fil est enroulé dans la bobine de recherche.
Bobine concentrique
Une bobine concentrique a un cercle interne et un enroulement de fil de cercle externe. Son motif de recherche est en forme de cône et peut être utile pour localiser avec précision une cible. Les enroulements concentriques ont tendance à être plus bruyants dans les sols fortement minéralisés et nécessitent plus de temps de balayage pour une couverture complète du sol.
Bobine double-D
Les bobines à double D sont les bobines préférées pour la plupart des activités de détection. Ils donnent un signal en forme de lame ou de burin qui couvre le sol de manière plus uniforme et une fois que l'opérateur est habitué au signal, le repérage peut être très précis. Les bobines double-D sont également préférées pour leur capacité d’équilibrage au sol supérieure.
Bobine Monoloop
Les bobines monoloop ont un enroulement de fil autour de la circonférence de la bobine, qui est utilisé à la fois pour transmettre et recevoir. Le signal de la bobine Monoloop est en forme de cône, ce qui nécessite davantage de chevauchement. Dans les sols extrêmement fortement minéralisés, ils peuvent être plus difficiles à équilibrer, mais ils ont tendance à fournir une profondeur légèrement supérieure à celle des bobines Double-D.
De la saleté, de la poussière et de l'humidité peuvent être emprisonnées dans la plaque de protection, ce qui peut générer de faux signaux et de mauvaises performances. Pour maintenir les performances optimales de votre détecteur Minelab, il est recommandé de nettoyer la plaque de protection assez régulièrement.
Consultez le guide de sélection de bobine pour trouver la bobine la plus adaptée à vos besoins de détection.
Les spécifications des écouteurs ne sont pas vraiment critiques dans un détecteur de métal car leurs circuits audio ne produisent pas un son de qualité Hi-Fi. Par exemple, la plage de fréquence de sortie de nos détecteurs est d'environ 75-1200 Hz.
Nos circuits audio piloteront la plupart des casques de 16 - 100 + ohms.
L'optimisation audio est également très subjective car tout le monde entend différemment.
Nous nous efforçons de ne pas confondre nos clients avec des spécifications techniques superflues, car en réalité, il n’existe aucun moyen honnête de déterminer quel casque vous convient le mieux, à part de l’essayer.
Si vous avez un détecteur avec des tonalités audio réglables, tel qu'un CTX 3030, nous vous recommandons également de passer un peu de temps pour vous assurer que les tonalités de détection sont optimisées pour vos besoins auditifs.
Il n’ya pas de réponse spécifique à cette question car elle dépend de la taille de la cible, de son orientation, de son contenu métallique, des minéraux et de la conductivité du sol, du bruit électrique et ambiant dans la région, etc.
Cependant, nous entendons souvent parler des détecteurs de la série GPX qui détectent de grosses pépites d’or à 3 et parfois 4 pieds de profondeur, et du CTX 3030 qui recherche des pièces et des anneaux à plus de 12 pouces.
Seulement si cela devient défectueux.
Sur certains détecteurs, vous n'avez pas du tout besoin d'équilibrer le terrain. Sur d’autres, il est recommandé aux utilisateurs débutant en détection d’utiliser la fonction de suivi de l’équilibre du sol.
En mode Suivi, le détecteur établira automatiquement l’équilibre au sol et restera en équilibre même si les minéraux au sol varient. Sur les détecteurs d'équilibre au sol manuels tels que les X-TERRA 305 et X-TERRA 505, vous devez équilibrer le sol au début de chaque chasse et rééquilibrer périodiquement selon les besoins. Toujours équilibrer le sol sur un sol propre, à l'écart d'objets métalliques.
Les chaînes en or sont très difficiles à détecter, en particulier les chaînes très fines. Chaque maillon d'une chaîne peut être très petit et le détecteur considère chaque maillon comme une cible distincte, de sorte qu'il peut facilement être manqué. Vous êtes plus susceptible de détecter le fermoir ou les pendentifs qui peuvent encore se trouver sur la chaîne, car ils sont beaucoup plus gros que les maillons individuels. Les détecteurs haute fréquence tels que l'Eureka Gold ou un X-TERRA 705 avec une bobine de 18,75 kHz en mode prospection captureront souvent mieux les chaînes fines que la plupart des détecteurs de pièces.
Le coke est du carbone et en tant que tel peut être très conducteur, tout comme une pièce de monnaie.
Le GPZ 7000 est notre détecteur le plus profond dans toutes les conditions de terrain et peut détecter même des roches très minéralisées.
Non, les caractéristiques du câble sont adaptées aux enroulements de la bobine lors de la fabrication. Une extension du câble réduira donc les performances de la bobine.
Les bobines plus petites conviennent mieux aux sites malpropres, car elles réduisent le nombre d'instances de détection de plusieurs cibles à la fois. Les bobines concentriques sont généralement meilleures que les bobines Double-D pour cette même raison.
Consultez le guide de sélection des bobines pour trouver la bobine la mieux adaptée à vos besoins de détection.
Les détecteurs de métaux captent les signaux électromagnétiques d'objets métalliques souterrains. Des signaux similaires peuvent également être reçus dans l'air par d'autres sources électromagnétiques, telles que des lignes électriques, des émetteurs radio, des générateurs, etc.
Si votre détecteur est bruyant lorsque vous détectez, mais reste silencieux lorsque vous arrêtez de balayer la bobine, il reçoit des signaux du sol minéralisé. Effectuer un équilibre au sol et continuer à détecter.
Série GPX uniquement: si cela reste bruyant, vous devrez peut-être essayer une autre sélection de sol et de synchronisation. Tous les autres détecteurs: s'il est toujours bruyant, vous devrez réduire votre sensibilité au niveau de sensibilité stable le plus élevé.
Le seul moyen garanti d'obtenir toutes les bonnes cibles possibles est de ne faire aucune discrimination. Cependant, creuser chaque cible peut faire perdre beaucoup de temps. Les schémas de discrimination sont toujours un compromis entre creuser la plupart des bonnes cibles et ignorer la plupart des cibles indésirables.
Cela peut être causé par un certain nombre de raisons:
Généralement parce que vous soulevez la bobine à la fin de votre élan. Toujours balayer lentement, bas et de niveau pour toute la balançoire.
Zero Voltage Transmission (ZVT) technology creates ultra‑constant high-power opposite polarity magnetic fields.
ZVT provides users with superior ground balance to enhance detector stability in mineralised soils and will detect gold nuggets at extreme depths that exceed all current competitor products.
The GPZ 7000 is our best performer on the medium to larger nuggets, even in highly mineralised or variable ground. It retains superior depth capabilities compared to any other detector while still providing good sensitivity to smaller, shallower targets.
The GPZ 7000 detector has Minelab branded, and aftermarket coils available for purchase. Minelab branded coils are available from Minelab certified dealerships. You can purchase the 14” or 19” Super-D coils.
NuggetFinder coil have released 2 Minelab approved aftermarket coils. A 12” round Super-D coil and a 17” elliptical Super-D coil which can be purchased by NuggetFinder stockists.
No, the GPZ 7000 does not have any discrimination capability.
The Difficult Ground Type setting is the default setting and is recommended as gold is usually found in areas with highly mineralised soils.
The Normal Ground Type setting will provide the greatest detection depth but can only be used in “quiet” soils where there are lower levels of mineralisation in the soil.
If the detector is running unstable or noisy when using a “Normal” ground type you should switch to “Difficult”.
The Severe Ground Type will provide the lowest detection depth and should only be used when detecting in areas with extremely high levels of mineralisation. This setting should only be used in areas where you need to raise the coil above the ground when using the “Difficult” Ground Type setting.
When ground balancing, the yellow ferrite ring artificially adds additional data to help the GPZ 7000 improve the ground balance accuracy. This should always be used to ensure smooth operation. Sweep the coil over the yellow ferrite ring in a figure 8 motion ground balancing, ensuring that you sweep over the yellow ferrite ring with each figure 8 movement.
When balanced correctly you should hear a smooth audio tone when sweeping the coil over the yellow ferrite ring.
When ground balancing the GPZ 7000 a swinging or figure-8 movement is recommended as the GPZ 7000 constantly monitors the changes in the soil. Sweeping the coil over as much ground as possible ensuring that you sweep over the yellow ferrite ring with each swing/figure-8 motion when ground balancing allows the detector to gain as much information as possible about the local ground conditions which provides a superior ground balance.
Wireless audio is susceptible to audio dropouts when the signal is blocked. Audio dropouts can be reduced by ensuring a direct line of sight between the WM12 and the detector. It is best to wear the WM12 as close as possible to the detector. This minimises the path to the wireless transmitter and makes it less likely that the operator's body will block the signal path between the WM12 and the detector.
The GPZ 7000 will operate for approximately 8 hours when commencing with a fully charged battery. Charging the battery will typically take 5 – 6 hours.
The WM12 wireless module will operate for approximately 12 hours on a fully charged battery and takes around 12 hours to charge when charging via the BC10 charger.
Yes, the GPZ 7000 can be charged from a nominal 24V battery system. The BC10 charger can will function between 11 – 30 volts DC.
You can also use the supplied 240V AC plug-pack if your vehicle is fitted with an inverter.
No, Minelab currently has no plans to release a replaceable cell or alkaline battery pack.
There are 2 USB cables supplied in the box with your GPZ 7000. The USB-A to Mini-USB cable is used for charging the WM12 wireless module.
The USB-A to USB-B is used for software updates and is plugged into the rear of the screen pod and a PC.
On the rear of the screen pod is a USB-B port that can be used if a software upgrade is released. Check the downloads section of the GPZ 7000 page on our website for updates.
La technologie GeoSense-PI™ analyse et répond aux signaux au sol avec une grande clarté et précision, afin que vous puissiez détecter dans des environnements difficiles que l'on croyait indétectables. Il supprime rapidement les signaux indésirables via trois systèmes de rétroaction qui se chevauchent pour une détection ultra-rapide même des plus petites pièces d'or.
Le GPX 6000 est notre meilleur interprète sur les plus petites pépites plus abondantes, même dans un sol très minéralisé ou variable. Il conserve une excellente profondeur, juste derrière le GPZ 7000 sur des pépites plus grosses et plus profondes.
Les bobines GPX 6000 sont une nouvelle gamme de bobines légères et hautes performances qui ne sont pas compatibles avec les anciens détecteurs de la série GPX.
La bobine Double-D 14" du GPX 6000 ne peut être utilisée que pour l'annulation EMI ou l'annulation des signaux de sol conducteurs. Elle n'est pas capable de discrimination ferreuse.
The following Minelab coils are currently available to operate with the GPX 6000:
Minelab approved aftermarket coils are available from Coiltek and NuggetFinder.
Le premier enroulement du câble de la bobine doit toujours passer sur l'arbre. Le câble de la bobine doit ensuite être enroulé étroitement autour de l'arbre et maintenu en place avec les deux bandes velcro. Vous devez laisser suffisamment d'espace pour que la bobine puisse se déplacer librement lors de la détection.
Le GPX 6000 ne suit pas la composante ferrite du sol. GeoSense-PI utilise d'autres techniques pour supprimer la réponse « X » qui est invisible pour l'opérateur.
Vous n'avez pas besoin d'une ferrite jaune pour équilibrer le sol du GPX 6000.
La tonalité de seuil peut être activée et désactivée dans n'importe quel réglage de sensibilité en appuyant longuement sur le bouton Type de sol.
Notez que la tonalité de seuil est activée dans les plages de sensibilité manuelle et désactivée dans les plages de sensibilité automatique. Lors de la prochaine mise sous tension du GPX 6000, la tonalité de seuil reviendra à sa valeur par défaut.
Le paramètre Type de sol difficile est mieux utilisé dans les sols plus fortement minéralisés, en particulier avec des roches chaudes ou un sol très variable.
Le paramètre Type de sol normal a la plus grande profondeur sur les pépites plus grosses ; il est préférable de l'utiliser dans la mesure du possible et toujours dans des sols avec des niveaux de minéralisation inférieurs ou des sols moins variables. Le type de sol normal peut ramasser des roches chaudes comme cible. Si les roches chaudes ne peuvent pas être équilibrées au sol, vous devrez utiliser le paramètre Type de sol difficile.
The GPX 6000 with GeoSense-PI is continually tracking the ground, so either technique would work. Minelab recommends pumping the GPX 6000 up and down above the ground with the Quick-Trak button depressed to achieve the fastest Ground Balance.
La terre conductrice ne doit pas nécessairement être associée à du sel visible. Par exemple, les pluies récentes peuvent rendre le sol plus conducteur et augmenter la réponse conductrice indésirable du sol.
L'audio sans fil est sensible aux pertes audio lorsque le signal est bloqué. Les pertes audio peuvent être réduites en assurant une ligne de vue directe entre le casque et le détecteur. Il est préférable de porter le casque avec les commandes Bluetooth les plus proches du détecteur. Cela minimise le chemin vers l'émetteur Bluetooth et rend moins probable que le corps de l'opérateur bloque le chemin du signal entre le casque et le détecteur.
Le GPX 6000 fonctionnera pendant environ 8 heures au démarrage avec une batterie complètement chargée. Le chargement de la batterie prend généralement 5 à 6 heures.
Le casque ML 100 fonctionnera pendant environ 24 heures sur une batterie complètement chargée et prendra environ 3,5 heures pour se charger.
La batterie GPX 6000 ne doit être chargée qu'à partir d'un système de batterie de voiture 12 V nominal lors de la charge à partir d'un véhicule.
Minelab n'a actuellement pas l'intention de sortir une pile remplaçable ou une batterie alcaline.
Le câble USB est utilisé pour charger les écouteurs Bluetooth et serait utilisé si une mise à niveau logicielle était disponible pour le GPX 6000.
Derrière la grille du haut-parleur se trouve un port USB qui peut être utilisé si une mise à niveau logicielle est publiée. Consultez la section téléchargements de la page GPX 6000 sur notre site Web pour les mises à jour.
Vous ne pouvez jamais prédire quel niveau de minéralisation du sol sera présent dans un endroit donné, c'est pourquoi Normal est le moment recommandé pour commencer. Ensuite, vous pouvez laisser le détecteur vous dire quel Timing utiliser en balayant la bobine et en écoutant la stabilité du seuil.
Après avoir effectué un Auto Tune et Ground Balance, vous devez commencer la recherche, et si le détecteur est trop bruyant ou signale sur beaucoup de roches chaudes, alors le timing que vous utilisez est trop agressif pour le sol sur lequel vous vous trouvez. Vous devez sélectionner un autre timing plus proche de l'extrémité sombre de l'échelle ci-dessous, par exemple Enhance.
Le GPX 5000 est connu pour souffrir d'interférences électromagnétiques (EMI), en particulier par temps orageux. Il y a trois raisons connues pour cette interférence :
Les mauvais jours EMI, voici quelques conseils qui peuvent faire ronronner votre seuil :
Assurez-vous que vous n'utilisez pas une bobine Monoloop avec le commutateur Coil Rx réglé sur Annuler.
Les bobines Monoloop ont un câble parfaitement rond.
Les bobines Double-D ont un câble plus plat en raison des deux noyaux internes.
Mettez le commutateur Coil/Rx sur Annuler. Si vous avez une profondeur légèrement réduite par rapport à ce à quoi vous vous attendriez, alors votre bobine est une Double-D. Si vous n'avez pratiquement pas de profondeur, alors vous avez une bobine Monoloop.
La fonction Stabilisateur contrôle le point auquel de faibles variations du seuil commencent à se faire entendre. Ces faibles variations peuvent être soit du bruit ambiant, soit des signaux cibles faibles. Au fur et à mesure que vous augmentez la commande du stabilisateur, les signaux cibles faibles deviennent plus forts, mais le niveau de bruit augmente également, ce qui peut potentiellement masquer un signal cible souhaitable. Le stabilisateur vous permet de masquer ces faibles variations pour fournir un seuil parfaitement stable, améliorant ainsi votre capacité à identifier les faibles signaux cibles.
Il est préférable de laisser le stabilisateur en position FP (réglage d'usine) jusqu'à ce que les conditions du sol à l'emplacement soient déterminées. Une fois que le niveau de gain Rx a été défini pour les conditions locales et que d'autres paramètres audio ont été sélectionnés, le stabilisateur peut alors être utilisé pour affiner la stabilité du seuil.
Pour trouver la position optimale du stabilisateur, assurez-vous que la bobine est balayée sur le sol. Un nombre en dessous du point auquel le seuil commence à bavarder est généralement le meilleur réglage.
L'effet du stabilisateur pourrait être considéré comme ayant un effet similaire à celui de la commande de gain Rx. Cependant, le stabilisateur affecte uniquement le traitement audio et ne modifie pas le signal de réception (Rx), il doit donc être utilisé comme réglage fin de l'étape finale. Après avoir effectué des réglages sur le stabilisateur, si les conditions du sol changent ou si vous souhaitez changer les bobines, vous devrez peut-être réinitialiser le gain Rx, mais avant de le faire, remettez d'abord le stabilisateur au réglage d'usine. Cela garantira que vous sélectionnez le niveau de gain Rx le plus approprié en fonction des conditions, puis vous pourrez affiner le réglage à l'aide du stabilisateur.
Astuce : En tournant la commande du stabilisateur près du minimum (dans le sens inverse des aiguilles d'une montre), le seuil sera très stable, mais vous aurez perdu beaucoup de sensibilité aux cibles plus petites. Cela peut être une fonctionnalité souhaitable dans certains scénarios tels que la recherche de grosses pépites dans une zone à haut niveau de déchets, ou l'utilisation du GPX 5000 et du GPX 4800 pour rechercher des pièces ou des trésors.
Astuce : Nous recommandons que le meilleur ordre pour régler ces commandes soit :
Le volume cible contrôle la force des signaux cibles et, avec des réglages supérieurs à 8, il augmentera également légèrement le volume du seuil. Ceci est utile dans des conditions très venteuses, pour les personnes souffrant de perte auditive ou lors de l'utilisation de haut-parleurs externes. Avec l'amplificateur audio intégré à la batterie Li-Ion, vous pouvez brancher un haut-parleur directement dans la batterie et définir un niveau d'amplification approprié à l'aide du volume cible. Sachez que lorsque vous passez du casque à un haut-parleur externe, vous devrez peut-être apporter des ajustements mineurs à vos commandes de seuil et de limite de volume.
Le volume cible peut être utilisé comme amplification audio dans des conditions calmes et peut également être utilisé pour réduire ou atténuer les signaux de bruit au sol dans les sols très minéralisés. Il s'agit d'une fonctionnalité puissante qui fonctionnera en conjonction avec la commande du stabilisateur, vous offrant ainsi le nec plus ultra en matière de capacité de réglage fin. Un peu d'expérimentation peut être nécessaire pour trouver la combinaison optimale dans différentes conditions.
REMARQUE : chaque fois que des ajustements du gain sont nécessaires, en raison d'un changement de bobine ou d'emplacement, assurez-vous d'abord que le volume cible est ramené au réglage FP. Vous pouvez ensuite affiner les réglages en fonction des nouvelles conditions.
The SDC 2300 is our compact and waterproof gold prospecting detector. It uses Multi Period Fast (MPF) Pulse Induction (PI) technology that provides excellent sensitivity when detecting small to medium sized nuggets in highly mineralised or variable ground. The SDC 2300 provides good depth on larger deeper nuggets.
No, there are no other Minelab branded coils available for the SDC 2300. The supplied 8” round coil provides excellent overall performance for the SDC 2300 and keeps the detector waterproof and compact
No, there is no discrimination function available for the SDC 2300.
Having no constant threshold audio emit through the speaker or headphones indicates that the threshold audio is in the OFF or minimum setting.
The threshold volume can be adjusted by pushing the threshold button on the right side of the handle.
There are 9 levels of Threshold audio which are indicated by the LED display. With each press of the threshold button, you will notice the LEDs on the display incrementally move to the right, the threshold audio will also start increasing. When the threshold level is at maximum, pressing the Threshold button will cycle the threshold level back to the OFF or minimum setting.

The SDC 2300 has 2 Audio pitch settings, Low or High. High pitch is the default, to change to the low setting switch the detector off then push and hold the Threshold button while switching the detector on.

The SDC 2300 will remember its previous setting so you will need to push and hold the Threshold button whilst switching the detector on to toggle back to the High pitch setting.
The SDC 2300 is waterproof to 3m (10ft) This is the complete detector including the control box.
Yes, the SDC 2300 has a salt mode in the sensitivity adjustment, however Minelab does not recommend using the SDC 2300 on the beach as the SDC 2300 does not have a discrimination or target ID feature so you will dig a lot of trash.
The salt mode in your SDC 2300 is designed to be used on conductive ground such as salt lakes or wet mineralised soils found in gold fields where a high salt content is apparent. For example, recent rains may make the soil more conductive and increase the unwanted conductive soil response. If the soil is conductive or you are detecting on a salt lake, then adjust the sensitivity dial to a salt setting.

To check the battery level on your SDC 2300 simply push and hold the Noise Cancel button then press and release the Threshold button. The Noise Cancel button can now be released.
An indication of the battery level will be displayed by the LED's for approximately 3 seconds.

The SDC 2300 will operate for approximately 8 hours when commencing with a fully charged Li-Ion battery. Charging the battery will typically take 5 – 6 hours. When using C-Cell Alkaline batteries you will generally have a longer use time (10-14 hours) but this will depend on the quality of the C-Cell batteries you are using.
No, The SDC 2300 battery should only be charged from a nominal 12V car battery system when charging from a vehicle.
The SDC 2300 includes a rechargeable Li-Ion battery pack inside the box. The battery compartment can also accept C-Cell Alkaline batteries or C-Cell NiMH rechargeable batteries. You can see the polarity for the C-Cell batteries on the side of the control box.

No, the software on the SDC 2300 cannot be upgraded.
The GOLD MONSTER 1000 is Minelab’s entry level gold prospecting detector, designed to find the smallest of nuggets in moderately mineralised ground. It retains excellent sensitivity to smaller shallow nuggets and can detect some larger nuggets at depth.
The Gold Chance Indicator at the top of the screen indicates if the target has a ferrous or non-ferrous content. If the indicator is consistently pointing to the right, it is indicating a high non-ferrous content and is likely a non-ferrous metal such as: gold, silver, brass, copper, aluminium, lead, zinc or other alloys that do not have any iron (ferrous) content.

If the indicator is pointing to the left, it is showing a high ferrous content and is likely steel or iron.

Large steel and iron (ferrous) targets can indicate on the right. This happens when the conductive properties of the large ferrous target dominate the signal and mask the magnetic properties of the target.
The GM05 and GM10 are the only compatible coils that can be used with the GOLD MONSTER 1000. The GM05 is included in the box and the GM10 coil can be purchased as an accessory from Minelab dealerships.
There are currently no aftermarket coils available for the GOLD MONSTER 1000.
The first winding of the coil cable from the coil should always go over the shaft. Winding the coil cable over the shaft provides minimal stress on the coil cable which will help avoid damage. The coil cable should then be wound closely around the shaft, allowing enough room for the coil to be able to move freely when detecting.

Press the coil cable into the clip on the rear of the screen pod and then carefully screw the coil connector into the rear of the screen pod.


There are 10 manual and 2 auto sensitivity levels.
Auto is located in position 11 on the sensitivity dial and will be indicated with a black dot in the centre of the sensitivity dial.
When in Auto the detector will function smoothly in most soil types and will continually adjust the detector’s sensitivity level to maintain smooth operation.

Auto + is located in position 12 on the sensitivity dial and will be indicated with a black dot in the centre of the sensitivity dial.
Auto + is a more aggressive sensitivity which provides users with additional sensitivity for extra depth performance. Auto+ should only be used in moderately mineralised soils as this setting may provide more ground noise.

Manual sensitivity adjustments (1 – 10) are for the expert user who has a good understanding of soil mineralisation and electro-magnetic interference (EMI).
Manual sensitivity allows the user to adjust the detector’s performance manually, when you have selected a sensitivity setting in the manual range the detector will not adjust levels like it does in the Auto or Auto+ modes. You may need to keep adjusting the manual sensitivity when in variable or heavily mineralised soil types.

The GOLD MONSTER 1000 is very sensitive, when you wave your hand over the coil the detector can detect the salt in your blood.
When you are retrieving a target, you should always use the supplied plastic scoop to ensure you detect the desired target and not your hand.
Because the GOLD MONSTER 1000 is highly sensitive to salt detection it is not recommended for beach use.
Chattering, or inconsistent audio is generally a sign that the detector is picking up interference from ground mineralisation or electro-magnetic interference (EMI). If you are in Auto +, try adjusting the sensitivity to Auto or a lower manual sensitivity. If lowering the sensitivity doesn’t fix the issue, then you should move away from sources of EMI. (power lines, cellular phone towers, power generators, thunder/electrical storms, etc.)
Random detection beeps can be caused by mineralisation in the soil. The GOLD MONSTER 1000 has an auto-tracking ground balance feature that continually monitors the minerals in the soil and adjusts the detectors’ ground balance. Rapid changes or high levels of mineralisation in the soil can cause the detector to false signal, if this happens, pump the coil up and down (0.5 - 10cm / 0.2 - 4”) over the areas that are giving false signals. This will help ground balance the detector to the mineralisation in the soil.
If the mineralisation level is too high, then lower the sensitivity to compensate for the mineralisation level.
Lifting your coil into the air will amplify any noise that is in the area. Minelab does not suggest doing this as this is not how our products are designed to be used. Lifting the coil slightly into the air is acceptable when performing a Noise Cancel, once the Noise Cancel is complete the coil should always be kept near the surface of the soil to avoid interference.
No, the GOLD MONSTER 1000 does not have any wireless capability. You can plug in any 3.5mm (1/8”) stereo headphones to the rear of the control pod.
The GOLD MONSTER 1000 will operate for approximately 12 hours when commencing with a fully charged Li-Ion battery. Charging the battery will typically take 5 to 6 hours.
No, the GOLD MONSTER 1000 battery should only be charged from a nominal 12V car battery system when charging from a vehicle.
No, the software in the GOLD MONSTER 1000 cannot be upgraded.
Le logiciel de protection antivirus sur certains ordinateurs place l'e-mail Minelab dans un fichier / dossier de spam, veuillez vérifier votre email pour cet email. Si vous n'avez pas reçu l'e-mail, veuillez contacter votre centre de service agréé Minelab le plus proche .
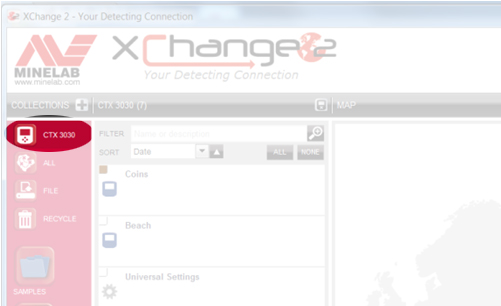
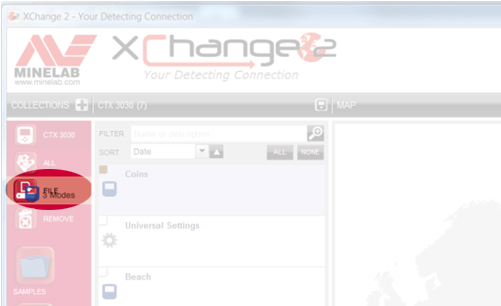
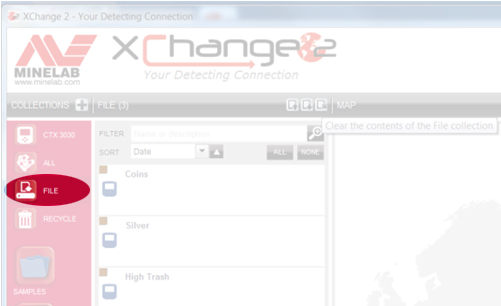
Lorsque XChange 2 est installé pour la première fois, l’icône «Fichier» n’apparaîtra que lorsque le logiciel aura reconnu que le CTX 3030 est connecté pour la première fois. C'est la seule fois que cela se produira. Après la connexion initiale, l'icône 'FILE' apparaîtra et restera. Vous n'aurez plus besoin de connecter le CTX 3030 pour y accéder.
Le réglage d'usine pour GeoTrails est désactivé, vous devrez donc l'activer. Allumez d’abord le GPS, puis allumez GeoTrails. Sur l’écran Carte, maintenez le bouton Carte enfoncé pour accéder à cette option. Utilisez les flèches pour sélectionner 'Voir GeoTrails' et appuyez sur le bouton Sélectionner.
Enhanced tourne SBAS ou Satellite Based Augmentation System, terme générique désignant WAAS utilisé aux États-Unis et EGNOS en Europe. Ces systèmes utilisent un satellite géostationnaire pour sonder l'atmosphère et l'envoyer à votre récepteur GPS. Cela fonctionne bien aux États-Unis, mais en Europe, cela semble être mieux pour les avions que sur le sol. En Australie, vous recevez des signaux d'un satellite au-dessus du Japon, ce qui aggrave votre situation. Je ne sais pas à quel point l'Europe a cela comme problème.
La valeur par défaut du bouton 'Utilisateur' est le contrôle du rétroéclairage. Ainsi, si un utilisateur modifie ce paramètre, le contrôle du rétroéclairage s’effectue dans Menu / Options / Rétro-éclairage - ON / OFF / TIME.
Vous avez terminé et votre fuseau horaire est défini.
Si vous ne connaissez pas votre fuseau horaire UTC, veuillez vous reporter au lien suivant: http://www.timeanddate.com/time/map/
Lors d'une session, si le module sans fil WM 10 est activé et que le détecteur y est connecté, vous entendrez les tonalités comme prévu. Si vous éteignez le WM 10, le détecteur sera mis en sourdine. Redémarrez le détecteur et vous pourrez entendre les tonalités.
Le CTX 3030 possède une fonction de compensation du sol similaire à celle des modèles Explorer SE Pro et E-TRAC, qui fonctionne très bien dans la plupart des conditions de terrain. Il n’est donc pas nécessaire d’équilibrer le CTX 3030 au sol dans la plupart des conditions. L'équilibre du sol ne doit être effectué que dans un «sol extrêmement minéralisé». N'effectuez pas d'équilibrage du sol sur la plage, cela «embrouillerait» le détecteur.
Il s'agit d'une fonctionnalité standard. Lorsque vous effectuez une 'modification du profil d'identification de tonalité' et que vous sélectionnez Lire la tonalité ou Lire tout, les tonalités ne retentissent pas si le module sans fil WM 10 est connecté.
Il y a 4 réglages de volume différents. Le CTX 3030 mémorise chaque paramètre. Si vous baissez le volume lorsque vous utilisez un casque, puis débranchez-le, le volume du haut-parleur externe ne sera pas modifié par rapport à votre réglage précédent.
Avant de placer l'accoudoir de type twist-lock sur la tige, tournez le verrou à fond dans le sens inverse des aiguilles d'une montre. Il n'est pas nécessaire de tourner le verrou complètement à 90 degrés pour le verrouiller. Environ 30 à 45 degrés est souvent suffisant.
Cela a été corrigé dans une mise à jour logicielle. Connectez votre détecteur à XChange 2 et vérifiez les mises à jour logicielles. Nous recommandons toujours d'utiliser la mise à jour logicielle la plus récente. Si vous êtes sur la dernière mise à jour ou si la mise à jour n'a pas corrigé le problème, veuillez contacter votre centre de service agréé Minelab régional.
Les modes changeront (ou seront traduits) UNIQUEMENT lors du passage de l’ANGLAIS à une autre langue et non en sens inverse. Si le détecteur est initialement configuré dans une langue autre que l'anglais, les modes apparaîtront dans cette langue. Mais si vous changez la langue en anglais plus tard, les modes resteront dans la langue d'origine.
La gâchette annulera tout réglage en cours et remontera d’un niveau dans le menu.
Si vous avez beaucoup utilisé le détecteur depuis la dernière fois que vous l'avez connecté à XChange 2, de nombreuses données sont stockées. Le téléchargement des données peut prendre plusieurs minutes. S'il vous plaît soyez patient.
Cela peut être lié au masquage, au réglage de sensibilité faible, à la surcharge de la bobine, etc. Effectuez une "Réinitialisation usine" et testez à nouveau le détecteur.
Pour connecter le module sans fil WM 10 à votre détecteur:
Si la liaison échoue, essayez de sélectionner un autre canal.
L'emplacement du WM 10 peut être un problème pour la perte de chemin. Le corps humain étant très atténué, le fait de placer le WM 10 à l’arrière du détecteur peut poser problème. Si vous rencontrez des problèmes, placez le WM 10 dans une ligne de mire dégagée par rapport au détecteur pour obtenir les meilleurs résultats.
Les instantanés ne sont sauvegardés que lorsque le détecteur est activé. Les instantanés sont supprimés lorsque le détecteur est désactivé.
Lors de votre première utilisation du GPS, le détecteur mettra un certain temps à créer des données locales. À partir d'un démarrage à froid, il faut quelques minutes pour «mémoriser» l'emplacement des satellites, etc. Ces données peuvent être utilisées pour obtenir une meilleure résolution et une utilisation du ciel ombragé.
C’est aussi simple que de sauvegarder les modes et / ou les données souhaités sous forme de fichier et de les envoyer par courrier électronique. Voici la procédure:
Tous les modes et autres données de votre CTX 3030 seront affichés dans la liste.
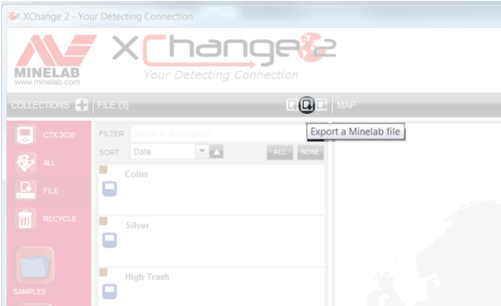
L'ensemble de la collection FILE sera exporté sous forme de fichier unique et enregistré dans le dossier Téléchargements de votre PC. Vous pouvez ensuite enregistrer le fichier ailleurs ou l'envoyer par courrier électronique à qui vous voulez.
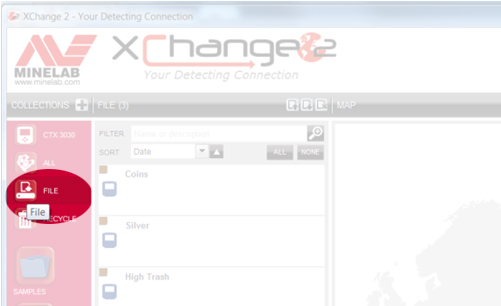
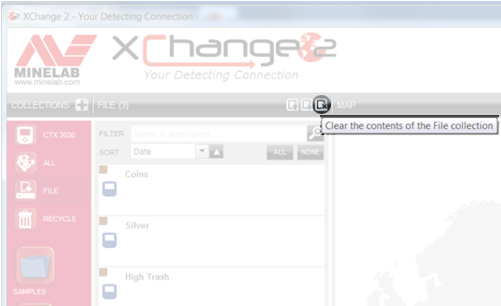
Si vous recevez un FICHIER Minelab de quelqu'un d'autre, ouvrez simplement XChange 2, sélectionnez la collection FILE, puis cliquez sur l'icône "Effacer le contenu de votre collection de fichiers".
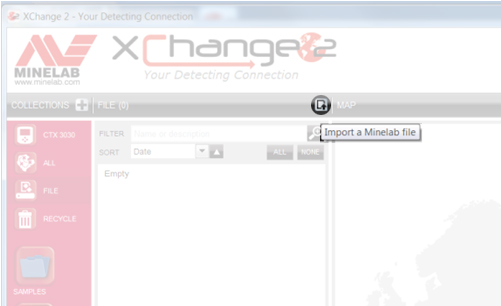
Cliquez ensuite sur l'icône 'Importer un fichier Minelab'.
Puis cliquez sur 'Choisir le fichier',
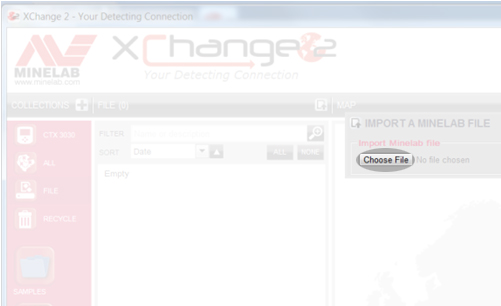
et recherchez l’emplacement du fichier. Mettez en surbrillance le fichier et cliquez sur 'Ouvrir' et les éléments qu'il contient seront affichés dans la collection de fichiers.
Faites glisser les éléments que vous souhaitez conserver dans l'une de vos propres collections ou directement dans votre CTX 3030.
L’audio combiné produit différentes tonalités pour les objets très ferreux et les objets de conductivité variable. Commencez par définir la ligne ferreuse (ligne horizontale) à l'endroit où vous souhaitez que les cibles ferreuses fournissent la réponse audio. Par exemple, si vous le définissez à 21, toute cible avec une lecture ferreuse égale ou supérieure à 21 (nombre plus élevé) produira la tonalité audio que vous programmez pour les cibles ferreuses. Par contre, si la cible a une lecture ferreuse inférieure à 21, la réponse audio sera basée sur ses propriétés conductrices. Dans Combined audio, vous avez quatre "bacs" représentant des groupes conducteurs avec des nombres conducteurs allant de 01 à 50. Vous déplacez simplement les lignes pour représenter différents groupes cibles et assignez une tonalité à chaque groupe. Par exemple, vous pouvez définir le bin un avec les lignes 01 et 14. Toute cible ayant une valeur ferreuse inférieure à 21 et une valeur conductrice de 14 ou moins tomberait dans ce bin et fournirait le son que vous lui avez associé via la programmation. .
Par exemple, le deuxième niveau peut représenter des cibles comprises entre 15 et 28 ans. Le troisième type peut représenter des cibles comprises entre 29 et 40 ans et le quatrième peut être le reste des cibles conductrices avec des valeurs de CO comprises entre 41 et 50. Avec les nombres utilisés dans ces exemples, si Si vous avez dépassé une cible avec une valeur FE de 12 et une valeur CO de 44, cela donnerait la tonalité conductrice que vous avez affectée à la case conductrice quatre. Si vous passez sur une cible dont l’ID est compris entre 11 et 22, la tonalité attribuée au casier conducteur 2 sera transmise. Là encore, l’utilisateur peut redimensionner et attribuer des tonalités à chaque groupe cible (bin). Pour ceux d'entre vous qui ont aimé chasser en Two Tone Ferrous avec le E-TRAC, cela va encore plus loin en vous permettant d'ajuster la ligne FE et de diviser les cibles de CO en quatre groupes distincts.
Gold peut identifier n'importe où dans la plage de 10-09 à 13-30, et éventuellement en dehors de cette plage. Parfois, la lecture conductive peut être très basse, comme 02, donc pour améliorer vos chances, vous devez vraiment tout creuser, y compris le papier aluminium et les tirettes.
En ce qui concerne les réglages, le mode Beach standard est tout à fait approprié. Vous pouvez par exemple changer le profil Tone ID en Ferrous 35. Cela permettra aux bijoux peu conducteurs de produire une tonalité plus haute que dans le profil Conducteur, ce qui facilitera leur reconnaissance. Vous pouvez également sélectionner Combiner et personnaliser les tonalités en fonction de vos préférences personnelles.
Pour les plages d’eau salée, la sensibilité manuelle est recommandée, sauf si vos plages présentent des niveaux élevés de minéralisation magnétique. Si votre appareil fonctionne bien et stable avec Sensitivity 18, essayez de le pousser un peu plus haut. Dans les situations où vous détectez réellement de l'eau salée, activez le paramètre Seawater.
Une autre chose que font souvent les peigneurs de plage est d’ouvrir un peu le schéma de discrimination. Principalement, déposez légèrement la réjection ferreuse ou recherchez simplement dans le Pattern 2 (appuyez et relâchez simplement le bouton Detect). Ceci est fortement recommandé sur les plages où le niveau de cibles indésirables est faible. Dans ce cas, vous pouvez également essayer de changer la réponse audio en LONG. Cela peut améliorer votre capacité à entendre la très faible réponse que les bijoux peuvent produire.
Regardez la vidéo d' instruction communautaire approuvée sur la modification de FindPoints et de WayPoints.
Regardez la vidéo d' instruction communautaire approuvée sur la façon de lier des photos de votre téléphone à FindPoints.
Regardez la vidéo d' instruction communautaire approuvée qui comprend comment enregistrer un GeoHunt.
Regardez la vidéo d' instruction communautaire approuvée qui comprend comment enregistrer un FindPoint ou un WayPoint.
Regardez la vidéo d' instruction communautaire approuvée qui inclut Comment activer la fonction GPS.
Regardez la vidéo d' instruction communautaire approuvée comprenant les options de l'écran Activer la détection.
Regardez la vidéo d' instruction communautaire approuvée incluant l'activation du panneau d'identification des grandes cibles.
Regardez la vidéo d' instruction communautaire approuvée comprenant l'activation du panneau Sensibilité.
Regardez la vidéo d' instruction communautaire approuvée incluant l'activation de l'outil de navigation à l'écran de détection.
Regardez la vidéo d' instruction communautaire approuvée comprenant la sélection d'un mode de recherche sur le CTX 3030.
Regardez la vidéo d' instruction communautaire approuvée incluant le montage d'un mode de recherche sur le CTX 3030.
Regardez la vidéo d' instruction communautaire approuvée qui inclut le transfert de données d'un CTX 3030 vers XChange 2.
Regardez la vidéo d' instruction communautaire approuvée comprenant la création d'une nouvelle collection sur XChange 2.
Regardez la vidéo d' instruction communautaire approuvée qui inclut les préférences Modification de XChange 2.
Regardez la vidéo d' instruction communautaire approuvée qui inclut le réglage des paramètres universels.
Regardez la vidéo d' instruction communautaire approuvée qui inclut Création d'un nouveau mode de recherche dans XChange 2.
Non, les bobines FBS 2 ne peuvent être utilisées que sur le CTX 3030, tandis que les bobines FBS ne peuvent être utilisées que sur les détecteurs E-TRAC, Safari et Explorer.
MULTI-IQ+ is the next generation of MULTI-IQ technology and provides more power with lower electromagnetic interference (EMI) in built up areas.
This provides superior performance and depth allowing users to find previously undetectable targets in most locations.
MANTICORE surpassera les détecteurs EQUINOX dans presque tous les domaines, car la technologie MULTI-IQ+ utilisée dans le MANTICORE offre plus de puissance et un traitement plus rapide, ce qui équivaut à une meilleure profondeur de détection, une vitesse de récupération améliorée, un réglage plus poussé de la sensibilité et un écran de discrimination 2D avancé offrant aux utilisateurs plus d'informations. sur les cibles avant de creuser.
Actuellement, il n’existe aucune autre bobine compatible avec le MANTICORE.
Les bobines accessoires peuvent être achetées auprès de votre concessionnaire Minelab local. Pour trouver votre concessionnaire le plus proche, veuillez utiliser notre outil de recherche de concessionnaires en ligne.
Les écouteurs ML105 sont inclus dans la boîte avec votre détecteur MANTICORE et sont des écouteurs de type supra-auriculaire où le coussinet en mousse repose sur votre tête, entourant l'oreille.
Les écouteurs ML85 sont des écouteurs de type intra-auriculaire dont le coussinet en mousse repose sur la partie externe de votre oreille.
TOUT TERRAIN GÉNÉRAL : Excellentes performances globales pour la plupart des cibles et des conditions. Fournit une excellente séparation des cibles et un excellent rejet des déchets.
TOUT TERRAIN RAPIDE : Vitesse de récupération accrue offrant une excellente séparation des cibles et un bon rejet du coke.
CONDUCTEURS ÉLEVÉS TOUT TERRAIN : Excellent pour les conducteurs élevés tels que les piles de pièces d'argent ou les cibles en cuivre et offre une bonne séparation de l'identification des cibles.
CONDUCTEURS BAS TOUT TERRAIN : Excellent pour les objets petits/fins tels que les pièces de monnaie martelées ou les bijoux en or fin.
REJET DES DÉCHETS TOUT TERRAIN : Utilisé dans les zones poubelles. Rejet ferreux maximum
PLAGE GÉNÉRAL : Excellentes performances globales pour la plupart des cibles et des conditions de plage lorsqu'il est utilisé sur du sable sec ou humide. Fournit une excellente séparation des cibles et un excellent rejet des déchets.
CONDUCTEURS BAS DE PLAGE : Excellent pour les cibles petites ou fines telles que les chaînes en or. Convient au sable sec et humide.
BEACH DEEP : vitesse de récupération inférieure offrant une excellente profondeur pour les cibles petites ou minces telles que les chaînes en or. Convient au sable sec et humide.
Surf de plage et eau de mer : excellent pour les conditions d'eau salée difficiles, y compris la détection sous l'eau ou les vagues.
GOLDFIELD GENERAL : Excellent pour les petites pépites dans les sols bénins à modérément minéralisés. Ce mode offre de meilleures performances globales sur les pépites d'or et inclut un son continu pour aider les utilisateurs à entendre les faibles réponses des cibles. Ce mode n'est pas suggéré pour les zones poubelles.
Lorsque la fréquence est réglée sur MULTI-IQ+, les cibles ferreuses se voient attribuer un ID de cible sur la même échelle que les cibles non ferreuses, celui-ci s'affichant sur la même échelle que les ID de cibles non ferreux. Lorsque le processeur interne classe une cible comme ferreuse, le détecteur émet une tonalité faible, accompagnée d'un indicateur ferreux rouge sous le numéro d'identification de la cible et l'écran 2D indique que la cible apparaît en haut ou en bas de l'écran, loin de la cible. ligne conductrice centrale. 

*Images pour fins d'illustration seulement.*
Les cibles ferreuses complexes présentant une combinaison de propriétés ferreuses et conductrices similaires à celles de certaines pièces de monnaie apparaîtront généralement dans la moitié inférieure de l'écran 2D.
Les cibles ferreuses plus grandes apparaîtront en haut de l’écran. 

Il peut également y avoir de grandes cibles ferreuses de forme cylindrique, telles que de gros boulons qui ont des propriétés conductrices élevées. Ces types de cibles peuvent montrer une trace de cible dans les régions ferreuses et non ferreuses.
*Images pour fins d'illustration seulement.*
La discrimination permet aux utilisateurs d'accepter ou de rejeter des identifiants individuels ou des groupes d'identifiants cibles. Lorsque la discrimination est ajustée, les modifications sont apportées aux ID cibles ferreux et non ferreux. Ceci est représenté par une ligne verticale grisant à la fois la partie ferreuse et non ferreuse de l'ID cible sélectionné.
Les limites ferreuses permettent aux utilisateurs d'ajuster les paramètres du détecteur pour déterminer ce qui est détecté comme cible ferreuse ou non ferreuse. Ceux-ci peuvent être ajustés dans les sections supérieure et inférieure de l'écran 2D.
*Images pour fins d'illustration seulement.*
En général, Multi est supérieur aux fréquences uniques lors de l'utilisation d'un détecteur. Cependant, il peut exister des situations spécialisées dans lesquelles une fréquence particulière présente un avantage unique.
*Veuillez noter que lors de l'utilisation de fréquences uniques, les limites ferreuses seront désactivées et les cibles ferreuses fourniront un ID de cible de 1 à 19 et afficheront une indication ferreuse rouge à l'écran*
L'autonomie typique, à partir d'une charge complète, est d'environ 10 heures . Le détecteur MANTICORE peut également être alimenté directement à partir de n'importe quelle banque d'alimentation USB prenant en charge une capacité de sortie de 0,5 A ou 2 A (@ 5 V). Cela donne effectivement une durée de fonctionnement continue limitée uniquement par les banques d'alimentation utilisées.
*Vous ne pouvez PAS utiliser votre détecteur MANTICORE sous l'eau lorsqu'il est connecté à une banque d'alimentation USB*
Le détecteur MANTICORE prend en charge la recharge à partir d'appareils conformes à la norme USB 2.0. QuickCharge™ est une norme propriétaire développée par Qualcomm qui utilise une tension plus élevée et n'est pas compatible avec les détecteurs MANTICORE.
Le temps de charge, de complètement plat à 100 %, est d'environ 7 heures lorsqu'il est chargé avec un chargeur haute capacité (>1,7 A à 5 V).
N'importe quel port USB standard compatible avec le chargement de batterie USB 1.2 (BC1.2) peut être utilisé pour charger votre batterie, mais les temps de charge peuvent être plus longs si vous utilisez des options à faible consommation.
La longévité de toutes les batteries dépend d'un certain nombre de facteurs qui sont souvent contrôlables dans une certaine mesure par l'utilisateur ; telles que la température, les niveaux de charge lors du stockage, les cycles de charge, etc. La cause la plus courante de réduction de la durée de vie des batteries Li-ION est le maintien d'une batterie complètement chargée à des températures élevées.
Comme pour tous les composants utilisés dans nos détecteurs, nous nous approvisionnons strictement uniquement en composants modernes de haute qualité auprès de fournisseurs responsables. Nous ne nous attendons pas à ce que les utilisateurs rencontrent des problèmes de batterie au fil des années d'utilisation. Notre expérience avec les détecteurs CTX 3030 et GPZ 7000, qui utilisent tous deux des batteries Li-ION, montre que la grande majorité des utilisateurs n'ont jamais eu besoin d'acheter une batterie de remplacement.
Utilisez uniquement des chargeurs USB réputés et certifiés lors du chargement de la batterie MANTICORE comme détaillé ci-dessous :
La batterie Li-ION contenue dans la poignée est remplaçable et couverte par une garantie pour une période de 6 mois à compter de la date d'achat. Minelab recommande d'utiliser un centre de service agréé pour éviter d'endommager le joint étanche et d'annuler la garantie du détecteur.
Oui, lors de la détection à terre, sans aucune limitation. Cependant, le détecteur ne doit pas être utilisé sous l'eau pendant le chargement ou lorsqu'il est connecté à une batterie externe.
Oui. Si le détecteur est utilisé, lorsqu'il est alimenté par une banque d'alimentation USB, la batterie peut se charger plus lentement s'il y a suffisamment de capacité libre dans la banque d'alimentation.
Oui. Il est recommandé de laver le détecteur avec de l'eau douce et propre après une détection dans l'eau ou sur la plage. N'utilisez jamais d'abrasifs ou de solvants pour nettoyer le détecteur.
Non. Il n’est pas nécessaire de lubrifier ou de graisser aucune partie du détecteur, y compris les joints étanches. L'utilisation de graisse à base de pétrole endommagera les joints d'étanchéité et annulera la garantie.
Si vous pataugez profondément ou complètement immergé, nous vous recommandons d'utiliser uniquement des écouteurs étanches Minelab . Ceux-ci sont dotés d'un connecteur spécialement conçu qui forme un joint étanche lorsqu'il est utilisé avec le MANTICORE. Ces écouteurs sont disponibles comme accessoire achetable auprès de votre concessionnaire Minelab local.
Hardwired coils are more reliable for deep diving detectors.
No, 8 x 1.2V is only 9.6V, and these detectors require 12V to function.
Check to ensure the battery is fully charged. A low battery causes the threshold to get very loud and the response becomes erratic.
Salt, sand and grit will accumulate on the Excalibur II. So make sure you thoroughly rinse it with fresh water after use, including the coil cover, shafts and battery pack. Don't forget the vent holes on each headphone diaphragm as these need to be clear if used for diving purposes to allow for ear equalisation.
The Multi-IQ engine in all EQUINOX series is the same, there are however processor enhancements in the EQUINOX 700 and EQUINOX 900 that allow the detector to provide users with better Iron Bias, target separation and discrimination depth.
Park 1 (General/Coins)
Park 1 is optimised for modern coins and larger jewellery with a default discrimination pattern set to reject many common aluminium foil-like targets. Therefore, this is the ideal Profile to start with to learn EQUINOX before experimenting with the other Modes and more specialist settings. Park 1 Multi-IQ processes a lower frequency weighting of the multi-frequency signal, as well as using algorithms that maximise ground balancing for soil to achieve the best signal-to-noise ratio. Hence Park 1 is most suited for general detecting and coin hunting.
Park 2 (Fine jewellery)
Park 2 is ideal for smaller targets in trash-infested (including ferrous trash) locations. It will detect a wider range of targets including low conductor (or higher frequency) targets, e.g. fine jewellery. All non-ferrous targets are accepted by default. Recovery Speed is increased to clearly identify good targets masked by iron trash. Target Tone is set to maximum to provide as much target information as possible via audio. Park 2 Multi-IQ processes a higher frequency weighted multi-frequency signal while ground balancing for soil.
Field 1 (Coins and Artefacts)
Field 1 is for general hunting with high trash rejection. This assists in locating desired targets more easily. The default discrimination pattern is set to reject most coke signals. The first Tone Break is set so that the coke signals will produce the same low tone as ferrous targets. Field 1 Multi-IQ processes a lower frequency weighted multi-frequency signal, as well as using algorithms that maximise ground balancing for soil, to achieve the best signal to noise ratio. Hence being most suited for general detecting and coin hunting.
Field 2 (Fine coins and Artefacts)
Field 2 suits locations with high target and trash densities. It will better detect small hammered coins on their edge or at greater depth. The default discrimination pattern is set to reject most coke signals. Target Tone is set to maximum to enhance audio identification and Recovery Speed is faster. The first Tone Break has been set so that the coke signals will produce the same low tone as ferrous targets. Field 2 Multi-IQ processes a higher frequency weighted multi-frequency signal while ground balancing for soil.
Beach 1
Beach 1 is most useful for detecting in wet or dry beach sand and also in shallow water where conductive salt signals are prevalent. It has good sensitivity to coins and small/large jewellery. Beach 1 reduces the salt signal, while maintaining high transmit power, and still being sensitive to desirable targets. Beach 1 Multi-IQ processes a low frequency weighted multi-frequency signal, and uses special algorithms to maximise ground balancing for salt
Beach 2
Beach 2 gives the best results when either wading or shallow diving with the coil and/or detector fully submerged. In these instances, there is a very strong salt signal present, so Beach 2 has a lower transmit power, which results in much less noise. This profile may also be useful in dry conditions where there are extremely high ground noise levels. Beach 2 Multi-IQ processes a very low weighted multi-frequency combination, using the same algorithms as Beach 1 to maximise ground balancing for salt.
Multi-IQ (EQUINOX 800 & 900 only)
Gold 1
Gold 1 is suitable for searching for small gold nuggets in ‘mild’ ground. Most goldfield locations have a variable level of iron mineralisation that will require an ongoing Ground Balance adjustment, therefore Tracking Ground Balance is the default setting. The audio Threshold Level and Threshold Pitch are optimised for hunting for gold nuggets. Gold 1 Multi-IQ processes a high frequency weighted multi-frequency signal, while ground balancing for mineralised soil.
Gold 2
Gold 2 is best for searching for deeper gold nuggets in ‘difficult’ ground conditions. Gold 2 has a lower Recovery Speed, which will increase detection depth. However, more ground noise in more heavily mineralised grounds may result. Tracking Ground Balance is the default setting. The audio Threshold Level and Threshold Pitch are optimised for hunting for gold nuggets. Gold 2 Multi-IQ processes a high frequency weighted multifrequency signal, while ground balancing for mineralised soil.
EQUINOX 700
• Weight has been decreased to 1.27kg (2.8lb)
• Waterproof to 5m (IP68)
• Three piece collapsible shaft now 144cm - 61cm (56.7" - 24")
• All carbon fibre shafts
• New, easily adjustable armrest
• 119 Target ID Range (-19 to 99)
• 119 discrimination notch segments
• "Depth Pitch" audio option in all modes
• Improved target separation
• Improved ferrous rejection
• Red LCD backlight
• Keypad backlight
• LED flashlight
• Handle vibration target indication
EQUINOX 900
• All above features
• Greater Sensitivity range 1 - 28
• Includes EQX06 6" waterproof DD coil
The new carbon fiber shaft design allows users to pack the detector down to 61cm (24 in) and has a full extension of 144cm (56.7 in)
Depth performance will differ depending on conditions and detector settings. Beach performance is better overall. Enhancements have been made to improve recovery speed, target separation and discrimination depth allowing users to have solid target IDs at better depths. EQUINOX 900 comes with 28 levels of sensitivity allowing more depth where environmental conditions allow the sensitivity to be turned up.
What are the frequency differences between the EQUINOX 600, 700, 800 & 900?
The EQUINOX 600 and 700 offer a choice of 4 single selectable frequencies:
• 4kHz
• 5 kHz
• 10 kHz
• 15 kHz
The EQUINOX 800 and 900 offers the choice of 6 single selectable frequencies:
• 4kHz
• 5 kHz
• 10 kHz
• 15 kHz
• 20 kHz
• 40 kHz
Gold Mode is designed to enhance performance on small gold nuggets in mineralized ground. It does so primarily by using different audio processing so that targets respond both in volume and pitch. The Gold Mode will be of interest to gold prospectors but has less application for other uses.
While the EQUINOX 600 and 700 do not have a dedicated Gold prospecting mode. Multi-IQ is so good in both Park 2 and Field 2, that these profiles are as good, or better, at finding gold nuggets than many dedicated single-frequency gold detectors. Multi-IQ provides very stable ID’s which is great for choosing what targets to dig in a goldfield.
Iron Bias is a setting that lets you choose how you want iron in the ground to sound. If you have a low setting, more of the iron will come through as a good target to dig up. This will also give you the best chance of finding any valuable non-ferrous targets nestled among the iron.
However, if you desire to hear less false audio sounds from the iron in the ground, try increasing the Iron Bias setting.
The Iron Bias in the EQUINOX 700 and EQUINOX 900 has had some changes to improve discrimination depth.
EQUINOX 600 and 800 have the option to choose either FE Iron Bias or F2 Iron Bias. FE Iron Bias will provide control over the target ID response. F2 Iron Bias will provide tone and target ID response adjustment for a wider range of ferrous targets.
Iron Bias in the EQUINOX 700 and EQUINOX 900 is based off the F2 Iron Bias in the EQUINOX 600 and EQUINOX 800 but allows even better overall depth detection and target separation. Because of this there is no F2 option available in the EQUINOX 700 or EQUINOX 900.
Yes, Coiltek Coils manufacture Minelab approved aftermarket coils for the EQUINOX and X-TERRA-PRO detectors.
No, they have different technology requirements and are not compatible. Only Minelab EQX coils are compatible with EQUINOX series detectors.
Having a larger target ID scale allows the detector to provide the user with more information on the target prior to digging it. This allows users to identify more targets individually which will help determine if the target is valuable or trash.
In general, Multi is superior to the single frequencies when using an EQUINOX. However, there may be specialised situations where a particular frequency has a unique advantage. The EQUINOX Series offers users simultaneous Multi-Frequency plus a wide range of single selectable frequencies for specialist situations.
Yes, there is no need to perform a full factory reset. Individual Search Profiles can easily be returned to their factory preset settings. Only the local settings will be reset and any global settings will remain in their last-use state.
Beach Mode automatically senses black sand and reduces the transmit power to ensure that targets can still be detected without overloading occurring. When black sand is sensed, the Beach Overload Indicator will appear on the LCD. When this icon disappears, full transmit power automatically resumes.
Depth Pitch is an audio mode that provides a continuous pitch audio with no threshold tone. It provides separate audio for ferrous and non-ferrous targets with a variable pitch.
Small or deep targets providing a weaker signal will have a lower pitch.
Large or shallow targets providing a stronger signal will have a higher pitch.
EQUINOX 700 and EQUINOX 900 have been designed to handle harsh outdoor environments. Our testing includes drop tests up to 1m, flex and water ingress testing. Both models are IP68 rated and can be submerged up to 5m (16ft)
Middle and Lower shafts can be mixed. They are not identical in size so they may not provide an exact fit. Upper shafts cannot be changed as the physical mounting point of the control pod is different.
Yes. The supplied magnetic USB charge cable can be used on all EQUINOX models, MANTICORE and X-TERRA PRO detectors.
The charge time, from completely flat to 100%, is approximately 4 hours when charged with a high capacity charger (>1.7A @ 5V).
Longevity for all batteries depends on a number of factors that are often controllable to some degree by the user; such as temperature, charge levels when stored, charge cycles etc. The most common cause of reduced life of Li-ION batteries is keeping a fully charged battery at elevated temperatures.
As with all components used in our detectors, we stringently source only modern high quality components from responsible vendors. We do not expect users to experience any battery issues over years of use. Our experience with the CTX 3030 and GPZ 7000 detectors which both use Li-ION batteries is that the vast majority of users have never needed to purchase a replacement battery.
• Avoid charging or using in extreme temperatures.
• Avoid rapid extreme temperature swings.
• Use only Minelab or Minelab recommended USB chargers and avoid so-called ultrafast chargers from third-parties that claim to fully charge Li-ION batteries in less than one hour.
• Before storing the detector for prolonged periods, the battery should be charged to approximately 50-60%. On the EQUINOX Battery Status Indicator, 2-bars is the optimum charge for prolonged storage. Maintaining the 2-bar charge periodically during extended storage is also advisable. Extended storage in temperatures less than 30oC (86’F) will also minimize degradation to Li-ION battery life
Use only reputable and certified USB Chargers when charging the EQUINOX battery as detailed below:
Typical runtime, from a full charge using wired headphones, is approximately 12 hours. The EQUINOX Series detectors can also be powered directly from any USB Power Bank that supports 0.5A or 2A (@ 5V) output capability. This effectively gives a continuous runtime only limited by the power banks being used.
The EQUINOX detectors support charging from devices that comply to the USB 2.0 standard. QuickCharge™ is a proprietary standard develop by Qualcomm that uses a higher voltage and is not compatible with EQUINOX detectors.
La batterie Li-ION contenue dans la poignée est remplaçable et couverte par une garantie d'une durée de 6 mois à compter de la date d'achat. Minelab recommande d'utiliser un centre de service agréé pour éviter d'endommager le joint étanche et d'annuler la garantie du détecteur.
*Les batteries EQUINOX 600 et EQUINOX 800 ne sont pas compatibles avec l'EQUINOX 700 ou l'EQUINOX 900.
Yes, when detecting on land, without any limitations. However, the detector must not be used underwater whilst charging or when connected to a power bank.
Yes. If the detector is being used, when powered by a USB power bank, the battery may charge at a slower rate if there is enough spare capacity in the power bank.
Yes. Connecting the WM 08 to a power bank will allow you to continue to use it even if the battery is low/flat. The power bank will charge the WM 08, which will continue operating as normal.
*Please note that the WM08 is not compatible with the EQUINOX 700 OR EQUINOX 900
No. They are separate wireless technologies and only one can be used at any one time.
*Please note that the WM08 and Bluetooth headphones are not compatible with the EQUINOX 700 OR EQUINOX 900
Re-pairing will be required if a different wireless device has been connected to the Equinox 600 or Equinox 800 (e.g. WM 08), or following a detector factory reset.
AUDIO
Bluetooth® Hearing Aids are largely intended to allow the wearer to intentionally connect to other Bluetooth® compatible devices, such as phones and audio streams. They enable the wearer to stream audio on-the-go without having to remove the hearing aid and insert earbuds.
The EQUINOX 600 and EQUINOX 800 detectors are Bluetooth® compatible devices.
While there are various different types of streaming audio hearing aids available on the market, if the hearing aid supports Bluetooth® A2DP or Bluetooth® aptX-Low Latency™ then it will be compatible with the EQUINOX 600 and EQUINOX 800 detectors.
Pairing with the EQUINOX 600 or EQUINOX 800 is achieved by pressing and holding the Wireless button on the side of the Control Unit for 5 seconds.
While pairing is being performed the Wireless icon on the LCD will flash rapidly for 15 seconds. After 15 seconds the Bluetooth® icon will start flashing on the LCD to indicate a Bluetooth device is being paired.
The initial pairing may take up to 5 minutes. During the pairing process the user should not press the Wireless button as this will stop the pairing process.
Once paired, the EQUINOX 600 or EQUINOX 800 will display a solid Bluetooth® icon on the top right of the LCD. If the hearing aid is aptX-Low Latency™ Bluetooth compatible the ‘+’ icon will also be displayed.
Consult your Hearing Aid User Manual for additional pairing instructions specific to your hearing aid.
*Please note that EQUINOX 700 and EQUINOX 900 are not currently compatible with hearing aids.
Yes, the Equinox 600 can still pair to Bluetooth A2DP or Bluetooth aptX-Low Latency headphones.
Yes. It is good practice to wash the detector with clean fresh water after detecting in water or on the beach. Never use abrasives or solvents to clean the detector.
Whenever washing or using your detector underwater always ensure that the plastic bung on the rear of the control pod is firmly screwed into the headphone jack.
No. It is not necessary to lubricate or grease any part of the detector, including the waterproof seals. Using any petroleum-based grease will damage the waterproof seals and void the warranty.
If deep wading or fully submerged, we recommend using only Minelab Waterproof EQUINOX Headphones. These have a specially engineered connector that forms a waterproof seal when used with the EQUINOX. These headphones are available as an accessory from your local Minelab authorised dealership (Part Number: 3011-0372)
Yes, the MULTI-IQ technology in the X-TERRA ELITE is the same as the MULTI-IQ technology used in other MINELAB metal detectors.
X-TERRA ELITE includes a 15kHz single frequency option for the Park and Field modes.
X-TERRA ELITE est conçu pour les détecteurs les plus engagés à la recherche d'un détecteur à un prix abordable et offrant d'excellentes performances. Les utilisateurs disposent de davantage de contrôles et d'ajustements de paramètres permettant aux détecteurs d'ajuster les performances de détection. Le X-TERRA ELITE est étanche jusqu'à 5 mètres (15 pieds) et offre des performances supérieures par rapport à tout autre détecteur monofréquence actuellement sur le marché.
La série VANQUISH est un détecteur de type marche/arrêt conçu pour offrir d'excellentes performances tout en restant très facile à utiliser avec des ajustements de réglage minimes. Ceci est possible car le processeur MULTI-IQ fait tout le travail à votre place.
Les détecteurs VANQUISH sont suggérés pour les débutants et le détecteur X-TERRA ELITE est suggéré pour les détecteurs intermédiaires cherchant à passer d'un détecteur de niveau débutant à un niveau supérieur.
Les bobines des séries V*X ou EQUINOX peuvent être utilisées avec le X-TERRA ELITE, mais aucune autre bobine de marque Minelab ne peut être utilisée, y compris les précédentes bobines des séries X-TERRA 305, 505 et 705.
Le X-TERRA ELITE est livré avec une bobine elliptique Double-D V12X 12" dans la boîte, vous pouvez acheter les bobines accessoires ci-dessous auprès de votre concessionnaire Minelab local.
X-TERRA ELITE will out-perform the VANQUISH and X-TERRA PRO detectors in all terrains on most targets. Performance may be similar in some circumstances but will differ depending on ground mineralisation levels but more specifically the type of metal each target consists of.
The X-TERRA ELITE provides unprecedented performance in salty conditions. There are 2 beach modes to ensure stability in both wet and dry salty environments.
Yes, you can purchase the Minelab WM09 wireless module, ML85 headphones or ML105 headphones as all of these are compatible with the X-TERRA ELITE. (note that the X-TERRA ELITE EXPEDITION model includes the ML85 headphones in the box)
Le X-TERRA ELITE utilise un système audio sans fil propriétaire qui n'est compatible avec aucune version actuelle de BLUETOOTH. Les écouteurs Minelab ML85 ou ML105 et le module sans fil WM09 sont compatibles avec le X-TERRA ELITE et sont disponibles auprès de votre revendeur Minelab agréé local.
Park 1 provides a default MULTI-IQ transmit frequency and is optimised for detecting modern coins and larger jewellery. This is a good mode to learn the X-TERRA ELITE before experimenting with other settings.
Park 2 provides a default MULTI-IQ transmit frequency and is optimised for detecting fine jewellery and smaller targets in trash infested areas. Recovery speed in Park 2 is increased to clearly identify good targets masked by iron trash.
Field 1 provides a default MULTI-IQ transmit frequency and is optimised for detecting modern coins and general detecting. It has a high trash rejection which makes it an ideal detect mode for areas containing coke.
Field 2 provides a default MULTI-IQ transmit frequency and is optimised for locations with high target and trash densities. This mode is great for coins on edge or sitting at greater depths. It has a high trash rejection which makes it an ideal detect mode for areas containing coke.
Beach 1 provides a default MULTI-IQ transmit frequency and is optimised for dry and wet sand. Beach 1 mode has a lower recovery speed for better depth across all targets and is good for detecting coins and small to large jewellery.
Beach 2 provides a default MULTI-IQ transmit frequency and is optimised for underwater usage where a very strong salt signal is present. To compensate for the high salt content Beach 2 has a lower transmit power. Beach 2 can also be used in dry soils that have a high salt content.
Yes, there is no need to perform a full factory reset. Individual Search Profiles can easily be returned to their factory preset settings. Only the local settings will be reset and any global settings will remain in their last-use state.
Typical runtime, from a full charge using wired headphones, is approximately 12 hours. The X-TERRA ELITE detector can also be powered directly from any USB Power Bank that supports 0.5A or 2A (@ 5V) output capability. This effectively gives a continuous runtime only limited by the capacity of the power bank.
The X-TERRA ELITE detector supports charging from devices that comply to the USB 2.0 standard. QuickCharge™ is a proprietary standard develop by Qualcomm that uses a higher voltage and is not compatible with X-TERRA ELITE detectors.
The charge time, from completely flat to 100%, is approximately 4 hours when charged with a high capacity charger (>1.7A @ 5V).
Longevity for all batteries depends on a number of factors that are often controllable to some degree by the user; such as temperature, charge levels when stored, charge cycles etc. The most common cause of reduced life of Li-ION batteries is keeping a fully charged battery at elevated temperatures.
As with all components used in our detectors, we stringently source only modern high quality components from responsible vendors. We do not expect users to experience any battery issues over years of use. Our experience with the CTX 3030 and GPZ 7000 detectors which both use Li-ION batteries is that the vast majority of users have never needed to purchase a replacement battery.
Use only reputable and certified USB Chargers when charging the X-TERRA ELITE battery as detailed below:
The Li-ION battery contained in the handle is replaceable and covered under warranty for a period of 6 months from the date of purchase. Minelab recommends using an Authorised Service Centre to avoid potentially damaging the waterproof seal and voiding the detector warranty.
Yes, when detecting on land, without any limitations. However, the detector must not be used underwater whilst charging or when connected to a power bank.
Yes. If the detector is being used, when powered by a USB power bank, the battery may charge at a slower rate if there is enough spare capacity in the power bank.
Yes. Connecting the X-TERRA ELITE to a USB power bank will allow you to continue to use the detector even if the battery is low/flat. The power bank will charge the detector if there is any residue power to charge the battery.
Oui. Il est recommandé de laver le détecteur avec de l'eau douce et propre après une détection dans l'eau ou à la plage. N'utilisez jamais d'abrasifs ou de solvants pour nettoyer le détecteur.
Chaque fois que vous lavez votre détecteur sous l'eau, assurez-vous toujours que le bouchon en plastique à l'arrière du module de commande est fermement vissé dans la prise casque.
No. It is not necessary to lubricate or grease any part of the detector, including the waterproof seals. Using any petroleum-based grease will damage the waterproof seals and void the warranty.
If deep wading or fully submerged, we recommend using only Minelab Waterproof Headphones. These have a specially engineered connector that forms a waterproof seal when used with the X-TERRA ELITE.
VANQUISH depth performance is similar but not quite as deep as the EQUINOX. However, EQUINOX detectors are more configurable for varying conditions.
Minelab does not publish the exact frequencies of Multi-IQ technology used in the VANQUISH Series. These frequencies are similar to the Multi-IQ mode in the EQUINOX Series.
The VANQUISH Series detectors only use Multi-IQ (simultaneous multi-frequency) technology.
Target IDs on VANQUISH are the same as the Target IDs on EQUINOX.
Recovery speed varies depending on the mode selected.
The Custom mode is programmable. If you program custom mode, it will adopt the recovery speed from the mode you program it to, e.g. coin mode = fast recovery speed, jewellery = medium recovery speed, relic = slow recovery speed.
When the detector is switched off, discrimination patterns in coin, jewellery & relic modes are all reset. Custom mode will keep its saved discrimination pattern.
There are three coils available for VANQUISH. These are:
The VANQUISH Series requires x4 AA batteries and is compatible with both rechargeable and non-rechargeable batteries. The battery level indicator shows the current battery level. Lift the battery cover off the control box to replace the batteries.
The VANQUISH 540 and 540 Pro-Pack come with x4 AA NiMH rechargeable cells and a charger. The VANQUISH 340 and 440 can also operate with rechargeable batteries. Minelab recommends only NiMH rechargeable batteries or non-rechargeable AA alkaline batteries. Batteries rated between 1.2v – 1.5v are acceptable. If the battery has a voltage higher than 1.5v, it can damage the detector.
AA rechargeable NiMH batteries provide a run-time of approximately 11 hours using factory default settings.
Non-rechargeable, high-quality AA alkaline batteries provide a run-time of approximately 10 hours.
No. VANQUISH coils cannot be used on EQUINOX, and EQUINOX coils cannot be used on VANQUISH.
The VANQUISH control box is not submersible. The coils are fully waterproof up to 1 m (3 ft).
The temperature specification for the VANQUISH Series is -10C – 40 C (14F – 104 F). The coil is waterproof to 1 m (3 ft), but the control pod cannot be submerged.
No. Pitch or tone breakpoints cannot be adjusted on the VANQUISH Series.
The VANQUISH 540 has a red backlight for detecting in low light situations. The backlight is 'Off' by default at each start-up to reduce battery consumption.
The Multi-IQ technology used in VANQUISH allows the detector to provide stable and reliable target IDs in light of medium mineralised soils found in beaches or parks. As a result, there is no ground balance function available in the VANQUISH Series.
Multi-IQ technology allows VANQUISH to operate on wet beach sand and salt water with much higher performance than a single frequency VLF detector.
VANQUISH 540 can operate with Bluetooth V4.2 or later and Bluetooth aptX Low Latency headphones. VANQUISH 340 & 440 do not have wireless capability.
Yes. Software updates can be found on the Minelab website on the VANQUISH product page 'downloads' section.
VANQUISH Series detectors are under warranty for three years (36 months) from the Date of Purchase. Detailed product warranty information can be found under SUPPORT at minelab.com.
Including battery weight, the VANQUISH 340 and 440 weigh 1.2 kg (2.6 lbs), whereas VANQUISH 540 weighs 1.3 kg (2.9 lbs), as it includes the larger V12 coil.
VANQUISH 540 Pro-Pack contains the same VANQUISH 540 detector but includes the smaller V8 coil and the ML80 Bluetooth aptX Low Latency wireless headphones.
Après avoir éteint le détecteur, veuillez attendre au moins 2 s avant d'essayer de redémarrer le détecteur.
Le réglage Iron Bias est le même dans tous les modes de tous les détecteurs VANQUISH.
Remarque : le VANQUISH 540 a une polarisation de fer réglable qui a une réponse de polarisation de fer similaire à celle de l'EQUINOX.
PRO-SWITCH technology is a single frequency VLF technology that allows the user to switch transmit frequencies at the touch of a button to optimise performance.
Changing frequency gives detectorists the ability to adjust frequencies to move away from noise or optimise detection ability when hunting for specific metal targets.
Park and Field modes have 5kHz, 10kHz and 15kHz selectable frequencies. Beach modes have an 8kHz single frequency for high salt mineralisation.
MULTI-IQ will provide superior results when compared to PRO-SWITCH. There may be situations where the PRO-SWITCH technology can perform equally as well as MULTI-IQ. This will depend on how the user has optimised the detector settings.
Multi-IQ will provide maximum performance in all situations as the internal processor does all the hard work. PRO-SWITCH relies on the user to ensure the detector is set to its optimal performance capability.
VANQUISH detectors with MULTI-IQ are a switch-on and go type detector designed to have excellent performance but still be very easy to use with minimal setting adjustments. This is possible as the MULTI-IQ processor does all the hard work for you.
X-TERRA PRO is a high performing single frequency detector designed for the more committed detectorist looking for a well-priced detector with great performance. Users have the ability to adjust transmit frequency which provides more control allowing detectorists to tune the detection performance when hunting for specific targets. The X-TERRA PRO is waterproof to 5 meters (15 feet) and provides superior performance when compared to any other single frequency detector currently on the market.
Target ID’s on the X-TERRA PRO will generally not be quite as stable as MULTI-IQ target ID’s and MULTI-IQ detectors will generally provide superior performance when in conductive (salty) soils.
The X-TERRA PRO comes with a V12X 12” Elliptical Double-D coil in the box, you can purchase the below accessory coils from your local Minelab dealership. Any coil that is compatible with the EQUINOX detectors is also compatible with the X-TERRA PRO.
10kHz is the best all-round frequency to start detecting with as it provides good depth and sensitivity across a range of different targets.
It is expected when running a lower transmit frequency on the X-TERRA PRO that performance on high conductors containing silver or copper will provide similar depths to MULTI-IQ detectors.
It is expected when running a higher transmit frequency on the X-TERRA PRO that performance on lower conductors containing gold will provide similar depths to MULTI-IQ detectors.
At the beach in salty conditions most single frequency detectors struggle with the mineralisation. The X-TERRA PRO provides unprecedented performance for a single frequency VLF detector in salty conditions.
Yes, there is no need to perform a full factory reset. Individual Search Profiles can easily be returned to their factory preset settings. Only the local settings will be reset and any global settings will remain in their last-use state.
Yes, you can purchase the Minelab ML85 headphones, ML105 headphones or the WM09 wireless module. These are all compatible with the X-TERRA PRO.
There are currently no aftermarket wireless headphones available for the X-TERRA PRO.
The X-TERRA PRO uses a proprietary wireless audio that is not compatible with any current versions of BLUETOOTH. The Minelab ML85 or ML105 headphones and WM09 wireless module are compatible with the X-TERRA PRO and are available from your local authorised Minelab dealership.
Park 1 provides a default 10kHz transmit frequency and is optimised for detecting modern coins and larger jewellery. This is a good mode to learn the X-TERRA PRO before experimenting with other settings.
Park 2 provides a default 15kHz transmit frequency and is optimised for detecting fine jewellery and smaller targets in trash infested areas. Recovery speed in Park 2 is increased to clearly identify good targets masked by iron trash.
Field 1 provides a default 10kHz transmit frequency and is optimised for detecting modern coins and general detecting. It has a high trash rejection which makes it an ideal detect mode for areas containing coke.
Field 2 provides a default 15kHz transmit frequency and is optimised for locations with high target and trash densities. This mode is great for coins on edge or sitting at greater depths. It has a high trash rejection which makes it an ideal detect mode for areas containing coke.
Beach 1 provides a default 8kHz transmit frequency and is optimised for dry and wet sand. Beach 1 mode has a lower recovery speed for better depth across all targets and is good for detecting coins and small to large jewellery.
Beach 2 provides a default 8kHz transmit frequency and is optimised for underwater usage where a very strong salt signal is present. To compensate for the high salt content Beach 2 has a lower transmit power. Beach 2 has a higher recovery speed to aid in saltwater rejection. It can also be used in dry soils that are conductive (salty).
Typical runtime, from a full charge using wired headphones, is approximately 16 hours. The X-TERRA PRO detector can also be powered directly from any USB Power Bank that supports 0.5A or 2A (@ 5V) output capability. This effectively gives a continuous runtime only limited by the capacity of the power bank.
The X-TERRA PRO detector supports charging from devices that comply to the USB 2.0 standard. QuickCharge™ is a proprietary standard develop by Qualcomm that uses a higher voltage and is not compatible with X-TERRA PRO detectors.
The charge time, from completely flat to 100%, is approximately 4 hours when charged with a high capacity charger (>1.7A @ 5V).
Longevity for all batteries depends on a number of factors that are often controllable to some degree by the user; such as temperature, charge levels when stored, charge cycles etc. The most common cause of reduced life of Li-ION batteries is keeping a fully charged battery at elevated temperatures.
As with all components used in our detectors, we stringently source only modern high quality components from responsible vendors. We do not expect users to experience any battery issues over years of use. Our experience with the CTX 3030 and GPZ 7000 detectors which both use Li-ION batteries is that the vast majority of users have never needed to purchase a replacement battery.
Use only reputable and certified USB Chargers when charging the X-TERRA PRO battery as detailed below:
La batterie Li-ION contenue dans la poignée est remplaçable et couverte par une garantie pour une période de 6 mois à compter de la date d'achat. Minelab recommande d'utiliser un centre de service agréé pour éviter d'endommager le joint étanche et d'annuler la garantie du détecteur.
Yes, when detecting on land, without any limitations. However, the detector must not be used underwater whilst charging or when connected to a power bank.
Yes. If the detector is being used, when powered by a USB power bank, the battery may charge at a slower rate if there is enough spare capacity in the power bank.
Yes. It is good practice to wash the detector with clean fresh water after detecting in water or on the beach. Never use abrasives or solvents to clean the detector.
Whenever washing or using your detector underwater always ensure that the plastic bung on the rear of the control pod is firmly screwed into the headphone jack.
No. It is not necessary to lubricate or grease any part of the detector, including the waterproof seals. Using any petroleum-based grease will damage the waterproof seals and void the warranty.
If deep wading or fully submerged, we recommend using only Minelab Waterproof Headphones. These have a specially engineered connector that forms a waterproof seal when used with the X-TERRA PRO. These headphones are available as an accessory (Part Number: 3011-0372)
No, the detection coil that is included with your GO-FIND detector is designed to provide the best performance for that specific model and cannot be changed.
The battery compartment is in the handle of the GO-FIND. On the rear of the handle, you will see a small tab. Gently pull this tab down and then lift the battery compartment lid to access the batteries.
Yes, the GO-FIND series can operate with rechargeable 1.2volt Ni-MH rechargeable batteries. You can only use batteries that have a 1.2 volt or 1.5volt rating. Most AA Lithium batteries have a higher voltage and cannot be used as they exceed the maximum voltage rating for the detector. Using Lithium batteries that exceed the maximum voltage rating can damage the internal electronics of the detector. This type of damage is not covered under warranty.
The detection coil on the GO-FIND series is waterproof to 60cm (2ft) and can be washed. The screen pod should never be washed or submerged in water as it is not waterproof. To clean the screen pod wipe it with a damp cloth.
Yes, the GO-FIND detectors utilise Minelab’s Easy-Trak ground balance technology which automatically senses salt mineralisation in the ground and adjusts the detector to ensure constant smooth usage when detecting in beaches or parks.
Wireless headphones can be used but they cannot be paired directly to your detector. You will need to connect your wireless headphones to your smartphone and then connect your GO-FIND 44 or 66 to your smartphone via the GO-FIND app. GO-FIND 11 or 22 do not have Bluetooth capability and cannot connect to the GO-FIND app or wireless headphones.

In your Android phone Google Play Store & Apple iPhone App Store Search for Minelab GO-FIND
GO-FIND by Minelab Electronics Pty Ltd will be 1st – 2nd in search result.
The Pro App function is FREE for GO-FIND 66 detectors. Download the same GO-FIND App for FREE. When this GO-FIND App is paired with a GO-FIND 66, the App will activate full Pro App functions.
Download the same GO-FIND App for FREE. When this GO-FIND App is paired with a GO-FIND 44, the App will activate basic App functions.
Download the same GO-FIND App for FREE. When this GO-FIND App is paired with a GO-FIND 44, the App will activate basic App functions. It is optional to upgrade your Basic App functions to Pro App functions, just like how it used on a GO-FIND 66. In-app purchase is available for upgrading.
Pour la première utilisation, vous devez associer le GO-FIND 44/66 à votre appareil mobile:
Voir également:
Dans l'application GO-FIND, le bouton Aide (?) Est situé dans le coin inférieur droit. Cliquez pour afficher le guide de couplage Bluetooth et le guide de connexion Bluetooth.
Non, après le jumelage pour la première fois. Votre prochaine utilisation ne devrait nécessiter qu'une courte pression pour activer la fonction Bluetooth.
Vous pouvez maintenant utiliser App avec le détecteur
Android 11 or later with Bluetooth Lower Energy hardware
iPhone iOS 8.0 or later with Bluetooth Lower Energy hardware
No, the X-TERRA VOYAGER uses different technology to other detectors. You can only use the coil that is supplied in the box with the detector.
The X-TERRA VOYAGER does not have any accessory coils currently available.
The depth gauge will provide an approximate indication of depth and should only be used as a guide as large or small metals will cause the gauge to become inaccurate. A coin sized object will provide the below estimated depths.
1 arrow = 1” (25mm)
2 arrows = 3” (75mm)
3 arrows = 5” (125mm)
4 arrows = 6” (150mm)
5 arrows = >6” (>150mm)
The X-TERRA VOYAGER does not have wireless capability. You can use a Bluetooth wireless transmit module with the detector. These are not available from Minelab and will have to be purchased separately.
All Metal allows the detector to detect all metal types. When in all metal mode there will be no discrimination of any metal types.
Custom provides users the ability to discriminate any of the target group icons at the top of the screen. You simply navigate through to the desired target group and the icon will flash for a few seconds and then it will disappear. All target ID’s in this target group will now be discriminated out.
To detect the discriminated target group simply navigate away from the target group and then navigate back to the desired target group. The icon will flash for a few seconds and then appear. All target ID’s in the target group will now detect again.
Jewelry provides discrimination pattern that ignores most iron/ferrous junk. You will also find coins, relics and other non-ferrous metals. This mode is good for trashy environments.
Learn allows users to detect 1 specific target group. You simply need to wave the desired metal over the detection coil, the detector will then learn this target ID and accept only targets ID’s within that target group.
Typical runtime, when using new high quality 9-volt alkaline batteries is 20 hours.
It is good practice to clean your detector after each use. Only fresh water should be used when cleaning. Never use abrasives or solvents to clean the detector. The detection coil is waterproof and can be washed with the hose. The Screen pod should only be carefully wiped with a clean damp cloth to avoid any water or moisture ingress.
No. It is not necessary to lubricate or grease any part of the detector. Using any petroleum-based grease can damage the plastics and void the warranty.
To disable the audio tones, you simply need to push and hold the "minus" button when powering the PRO-FIND 40 on.
To enable the audio tones, you simply need to push and hold the "plus" button when powering the PRO-FIND 40 on.
To disable the ferrous tones OFF simply push and hold the "minus" button when the PRO-FIND 40 is powered on and then wait for the long beep.
To enable the ferrous tones ON simply push and hold the "plus" button when the PRO-FIND 40 is powered on and then wait for the long beep.
No, the LED flashlight cannot be adjusted.
No, the vibration cannot be toggled ON/OFF.
The Rapid Re-tune feature was designed so that users do not have to power cycle the pin-pointers to re-tune the PRO-FIND to the environment.
To re-tune the PRO-FIND 40 simply short-press the power button when the PRO-FIND 40 is powered on.
At maximum Sensitivity the PRO-FIND 40 can detect targets at greater distances which can be both an advantage and a disadvantage. To pinpoint a target sometimes it’s better to have a less sensitive probe to reduce the search area, so we have given you the ability to adjust it how you see fit. The Sensitivity may also need to be reduced in mineralised or salty soils, so that you are only detecting metal and not the minerals in the ground.
Side detection occurring with the target (or multiple) in the side of the hole. Use the tip of the probe to check around the sides of the hole. Reducing the Sensitivity can also help.
Yes, but be aware that the PRO-FIND 40 won’t have the same sensitivity to very small nuggets as a quality Minelab metal detector. It will be a good aid in target recovery for larger nuggets.
Yes, the PRO-FIND 40 is waterproof to 3 meters (10ft) and can be washed. When washing always use clean fresh water.
If no targets are detected or buttons pressed for 5 minutes, then the PRO-FIND 40 will start a slow constant beep (Lost Alarm) this alarm will sound for 5 minutes and then the PRO-FIND 40 will power off to save battery life.
The battery may be flat or inserted incorrectly. Replace the battery and/or check the battery orientation. If you are still having issues, contact your closest Minelab Service Centre.
The PRO-FIND 40 has a 3rd beep that notifies you that the pin-pointer has calibrated to the environment. This can sometimes take up to 30 seconds to occur depending on environmental conditions. You can short press the power button to perform a rapid re-tune. You should then hear a confirmation beep and the PRO-FIND 40 should now detect metals.
Tips for switching on:
*Calibration usually takes less than a second when the unit has been used recently.*
In highly mineralised soils:
Si aucune cible n'est détectée ou que vous n'appuyez sur aucun bouton pendant quelques minutes, l'appareil déclenche alors une alarme perdue. Cette alarme retentit pendant une longue durée afin que vous puissiez trouver votre pointeur d'identification. Après quelques minutes, le pointeur de broche s'éteindra pour préserver la durée de vie de la batterie.
Cela vous permet de trouver l'unité si elle est laissée sur le sol après avoir creusé un trou. Le bip ne se produit pas s'il est en mode vibreur uniquement. Après 5 minutes de bip lent, l'appareil s'éteint tout seul.
La pile peut être insérée dans le mauvais sens si le couvercle reste allumé, mais il est difficile de la serrer. La clé en plastique empêche les languettes de la batterie de toucher les contacts - retournez les piles pour résoudre ce problème.
Après avoir allumé le Pro-Find, vous entendrez 2 bips suivis d'un troisième bip plus bref. Cet étalonnage peut parfois prendre entre 15 et 20 secondes. Veuillez attendre que ce bip retentisse avant de placer le Pro-Find à proximité d'objets métalliques. Si vous avez le Pro-Find près du métal lorsque vous changez, il ne sera pas calibré et vous devrez le redémarrer.
Détection latérale survenant avec la cible (ou plusieurs) dans le côté du trou. Utilisez la pointe de la sonde pour vérifier les côtés du trou. Réduire la sensibilité peut aussi aider.
Oui, mais sachez qu'il n'aura pas la même sensibilité aux très petites pépites qu'un détecteur Minelab Gold de qualité. Ce sera une bonne aide pour la récupération ciblée des pépites plus grandes.
Avec une sensibilité maximale, le PRO-FIND 35 peut détecter des cibles sur de plus grandes distances, ce qui peut constituer à la fois un avantage et un inconvénient. Pour cibler une cible, il est parfois préférable d'avoir une sonde moins sensible pour réduire la zone de recherche. Nous vous avons donc donné la possibilité de l'ajuster à votre guise. Il peut également être nécessaire de réduire la sensibilité dans les sols salés ou minéralisés, afin que vous ne détectiez que le métal et non le sol.
Le PRO-FIND 35 est complètement étanche à 3 mètres, vous pouvez donc immerger le pointeur pour le nettoyer. Assurez-vous que le capuchon de la batterie est bien serré avant de plonger le pointeur.
Le PRO-FIND 15 est résistant à l'eau seulement. Si vous couvrez l’aération du haut-parleur avec votre pouce, vous pouvez le laver à l’eau courante.
Conseils pour l'allumage:
L'étalonnage prend généralement moins d'une seconde lorsque l'appareil a été utilisé récemment
Dans les sols hautement minéralisés:
Audio activé et désactivé (Pro-Find 35 uniquement):
Tonalité ferreuse activée et désactivée (Pro-Find 35 uniquement):
Les CTX 3030, GPZ 7000 et XChange 2 utilisent tous SQLite pour leur stockage de données. L'utilisation d'un outil tel que SQLiteSpy peut aider à extraire les fichiers. Il n'est pas nécessaire d'installer SQLiteSpy car le fichier extrait s'exécute directement.
1. Branchez le détecteur sur un PC et accédez au nouveau lecteur amovible créé.

2. Ouvrez le lecteur.

3. À l'intérieur, vous trouverez un fichier. Copiez-le dans un emplacement pour l'utiliser. Ce fichier est la base de données de stockage qui doit être ouverte.
1. Dans XChange 2, sélectionnez les points que vous souhaitez extraire.
2. Faites-les glisser dans le dossier «Fichier».

3. Ouvrez le dossier «fichier» en cliquant dessus.
4. Cliquez sur le bouton «exporter un fichier Minelab».

5. Le fichier doit se trouver dans votre dossier «Téléchargements».
6. Ce fichier téléchargé est compressé, vous devrez donc utiliser un outil tel que 7zip pour extraire le fichier 'shareData' à l'intérieur.
7. Copiez «shareData» dans un emplacement pour l'utiliser. Ce fichier se trouve dans la base de données de stockage qui doit être ouverte.
SQLiteSpy est utilisé dans cet exemple mais un processus similaire s'applique à d'autres outils.
1. Ouvrez SQLiteSpy
2. Sélectionnez "fichier"> "Ouvrir la base de données ..."

3. Accédez à l'emplacement de la base de données.
4. Changez le type de fichier en "Tout fichier (*. *)"

5. Sélectionnez la base de données et sélectionnez «Ouvrir»
6. Sur la gauche, il y a plusieurs tables selon le fichier de base de données utilisé.
une. "findpoint": il contient chacun des FindPoints enregistrés
b. "waypoint": contient chacun des WayPoints enregistrés
c. "point": il contient chacun des points utilisés pour créer une trace dans toutes les GeoHunts. Notez que chaque GeoHunt est identifié par un UUID dans la colonne "geohunt_fk".
ré. "geohunt": il contient l'UUID qui est utilisé dans la table "points" pour identifier chacun des GeoHunts.

7. Supposons également que vous souhaitiez extraire des FindPoints (la même procédure est également utilisée pour les autres points).
8. Double-cliquez sur le tableau «findpoint». Cela affichera tous les FindPoints extraits.
9. Cliquez sur une ligne du tableau puis appuyez sur la touche «Ctrl + A» pour sélectionner toutes les lignes.
10. Appuyez sur la touche «Ctrl + C» pour copier toutes les données.
11. Ouvrez Excel
12. Collez les données dans la feuille de calcul.
13. Dans certains fichiers de base de données, la latitude et la longitude doivent être divisées par 10 000 000 afin de les mettre dans le bon format d'utilisation.
14. Faites ce dont vous avez besoin avec les points d'ici.


