The experienced detectorists at Minelab have put together a comprehensive list of FAQs on how to use a metal detector. These also contain many pro tips for metal detecting.
You may find the answers to your questions by reading the FAQs here and from the related Knowledge Base Articles. Of course, if, after searching through this information you still have a question, there please contact our customer service team.
Yes, Minelab metal detectors have the ability to ‘discriminate’ between different types of targets. The discrimination feature on Minelab detectors measure two target properties, ferrous properties and conductive properties.
Ferrous properties refer to how much iron is in a target and therefore how strongly it’s attracted to a magnet. Ferrous targets tend to be trash, so can be discriminated/masked out based on their ferrous properties alone by the detector. Conductive properties refer to how well a target conducts electrical current and therefore responds to a metal detector’s magnetic field. Trash like nails and foil have different conductive properties to valuable targets like coins and rings. In this case the metal detector can make a judgement as to whether the target is trash based on conductivity.
The process for configuring the discrimination settings and the method used to indicate treasure or trash varies across the Minelab range of detectors.
As a rule of thumb, the lower the frequency used by the detector, the deeper it can penetrate the ground. At low frequencies however, sensitivity to small low conductive targets is reduced. The higher the frequency, the higher the sensitivity to small targets, but will not penetrate as deeply. In general, gold detectors operate at higher frequencies (to find small nuggets), while coin and treasure detectors work at lower frequencies for deeper penetration. The exception to this is MPS type metal detectors that are sensitive and deep seeking simultaneously.
Size
The size of a search coil can influence the detection depth or sensitivity of a metal detector. The larger the coil, the deeper it detects, but will have less sensitivity to small targets. Conversely the smaller the search coil’s diameter, the more sensitive it becomes but looses detection depth.
Smaller coils are lighter, easier to control and may be chosen for their ability to negotiate difficult terrain or undergrowth. They are also an advantage in areas of high trash.
Shape
The most common coil shapes are conventional solid round coils, elliptical shaped coils and the open web coils. The main reason for the change in shape is to conform to a physical requirement, i.e. an elliptical coil can be pushed around bushes or between rocks easier than a round coil and open web coils move through water easier and are lighter. Conventional round coils are often more stable and perform better and are particularly popular for gold prospecting.
Configuration
The three most common types of coil windings are Concentric, Double-D, and Monoloop. The difference between these coil types is the pattern the wire is wound within the search coil.
Concentric coil
A Concentric coil has an inner circle and an outer circle wire winding. Its search pattern is cone shaped and can be useful for accurately pinpointing a target. Concentric coils tend to be noisier in highly mineralised ground and require more over lap of sweep for thorough ground coverage.
Double-D coil
Double-D coils are the preferred coils for most detecting. They give a blade or chisel shaped signal that covers the ground more uniformly and once an operator becomes accustomed to the signal, pinpointing can be very accurate. Double-D coils are also preferred for their superior ground balancing ability.
Monoloop coil
Monoloop coils have one winding of wire around the circumference of the coil, which is used to both transmit and receive. The signal pattern of the Monoloop coil is cone shaped, requiring more overlapping. In extremely heavily mineralised grounds they can be more difficult to ground balance, however they tend to provide slightly better depth than the Double-D coils.
Dirt, dust and moisture can be trapped inside the skidplate leading to false signals and poor performance. To maintain peak performance of your Minelab detector, it is recommended to clean out the skidplate quite regularly.
Überprüfen Sie die Spulenauswahlanleitung , um die für Ihre Erkennungsanforderungen am besten geeignete Spule zu finden.
Headphone specifications are not really critical in a metal detector as their audio circuitry does not produce Hi-Fi quality sound. e.g. Our detectors frequency output range is only circa 75 -1200Hz
Our audio circuits will drive most headphones from 16 - 100 + ohms.
Audio optimisation is also very subjective as everybody hears differently.
We endeavour not to confuse our customers with unnecessary technical specs because in reality there is no honest way to determine what headphones are best for you other than to try them.
If you have a detector with adjustable audio tones, such as a CTX 3030, we would also recommend you spend some time to ensure the detection tones are optimised for your hearing needs.
There is no specific answer to this question as it depends on the target size, orientation, metallic content, ground minerals and conductivity, electrical and ambient noise in the area and etc.
However we commonly hear of GPX Series detectors finding large gold nuggets at 3 and sometimes 4 feet deep, and CTX 3030s finding coins and rings at over 12 inches.
Only if it becomes faulty.
On some detectors you don’t need to ground balance at all. On others, users new to detecting are recommended to use the Ground Balance Tracking function.
In Tracking, the detector will automatically ground balance for you and remain in balance even if the ground minerals vary. On manual ground balance detectors like the X-TERRA 305 and X-TERRA 505, you need to ground balance at the start of every hunt, and re-balance periodically as required. Always ground balance on clean ground, away from metal objects.
Gold chains are very difficult to detect, particularly very fine chains. Each link of a chain can be very small and the detector sees each link as a separate target, so it can easily be missed. You are more likely to detect the actual clasp or any pendants that may still be on the chain as these are much larger than the individual chain links. High frequency detectors such as the Eureka Gold, or an X-TERRA 705 with an 18.75 kHz coil in prospecting mode, will often pick up fine chains better than most coin detectors.
Coke is carbon and as such can be quite conductive, just like a coin.
The GPZ 7000 is our deepest detector in all ground conditions and can detect through even highly mineralised rock.
No, cable characteristics are matched to coil windings at manufacture, so extending the cable will reduce the performance of the coil.
Smaller coils are better for trashy sites, as they reduce the instances of detecting multiple targets at once. Concentric coils are generally better than Double-D coils for this same reason.
Check the coil selection guide to find the most suitable coil for your detecting needs.
Metal detectors pick up electromagnetic signals from underground metal objects. Similar signals can also be received through the air from other electromagnetic sources, such as power lines, radio transmitters, generators, etc.
If your detector is noisy when you are detecting, but goes quiet when you stop sweeping the coil, then it is receiving signals from mineralized ground. Perform a ground balance and continue detecting.
GPX series only: if it is still noisy then you may need to try an alternate soil/timing selection. All other detectors: if it is still noisy you would need to reduce your sensitivity to the highest stable sensitivity level.
The only guaranteed way to get every possible good target is to use no discrimination. However, digging every target can waste lots of time. Discrimination patterns are always a compromise between digging most good targets and ignoring most junk targets.
This can be caused by a number of reasons:
Usually because you are lifting the coil at the end of your swing. Always sweep slow, low and level for the entire swing.
Zero Voltage Transmission (ZVT) technology creates ultra‑constant high-power opposite polarity magnetic fields.
ZVT provides users with superior ground balance to enhance detector stability in mineralised soils and will detect gold nuggets at extreme depths that exceed all current competitor products.
The GPZ 7000 is our best performer on the medium to larger nuggets, even in highly mineralised or variable ground. It retains superior depth capabilities compared to any other detector while still providing good sensitivity to smaller, shallower targets.
The GPZ 7000 detector has Minelab branded, and aftermarket coils available for purchase. Minelab branded coils are available from Minelab certified dealerships. You can purchase the 14” or 19” Super-D coils.
NuggetFinder coil have released 2 Minelab approved aftermarket coils. A 12” round Super-D coil and a 17” elliptical Super-D coil which can be purchased by NuggetFinder stockists.
No, the GPZ 7000 does not have any discrimination capability.
The Difficult Ground Type setting is the default setting and is recommended as gold is usually found in areas with highly mineralised soils.
The Normal Ground Type setting will provide the greatest detection depth but can only be used in “quiet” soils where there are lower levels of mineralisation in the soil.
If the detector is running unstable or noisy when using a “Normal” ground type you should switch to “Difficult”.
The Severe Ground Type will provide the lowest detection depth and should only be used when detecting in areas with extremely high levels of mineralisation. This setting should only be used in areas where you need to raise the coil above the ground when using the “Difficult” Ground Type setting.
When ground balancing, the yellow ferrite ring artificially adds additional data to help the GPZ 7000 improve the ground balance accuracy. This should always be used to ensure smooth operation. Sweep the coil over the yellow ferrite ring in a figure 8 motion ground balancing, ensuring that you sweep over the yellow ferrite ring with each figure 8 movement.
When balanced correctly you should hear a smooth audio tone when sweeping the coil over the yellow ferrite ring.
When ground balancing the GPZ 7000 a swinging or figure-8 movement is recommended as the GPZ 7000 constantly monitors the changes in the soil. Sweeping the coil over as much ground as possible ensuring that you sweep over the yellow ferrite ring with each swing/figure-8 motion when ground balancing allows the detector to gain as much information as possible about the local ground conditions which provides a superior ground balance.
Wireless audio is susceptible to audio dropouts when the signal is blocked. Audio dropouts can be reduced by ensuring a direct line of sight between the WM12 and the detector. It is best to wear the WM12 as close as possible to the detector. This minimises the path to the wireless transmitter and makes it less likely that the operator's body will block the signal path between the WM12 and the detector.
The GPZ 7000 will operate for approximately 8 hours when commencing with a fully charged battery. Charging the battery will typically take 5 – 6 hours.
The WM12 wireless module will operate for approximately 12 hours on a fully charged battery and takes around 12 hours to charge when charging via the BC10 charger.
Yes, the GPZ 7000 can be charged from a nominal 24V battery system. The BC10 charger can will function between 11 – 30 volts DC.
You can also use the supplied 240V AC plug-pack if your vehicle is fitted with an inverter.
No, Minelab currently has no plans to release a replaceable cell or alkaline battery pack.
There are 2 USB cables supplied in the box with your GPZ 7000. The USB-A to Mini-USB cable is used for charging the WM12 wireless module.
The USB-A to USB-B is used for software updates and is plugged into the rear of the screen pod and a PC.
On the rear of the screen pod is a USB-B port that can be used if a software upgrade is released. Check the downloads section of the GPZ 7000 page on our website for updates.
Die GeoSense-PI™-Technologie analysiert und reagiert mit großer Klarheit und Präzision auf Bodensignale, sodass Sie in schwierigen Umgebungen erkennen können, die bisher als nicht nachweisbar galten. Es unterdrückt schnell unerwünschte Signale über drei überlappende Rückkopplungssysteme für eine superschnelle Erkennung selbst kleinster Goldstücke.
Der GPX 6000 ist unser bester Performer bei den zahlreichen kleineren Nuggets, selbst in stark mineralisiertem oder variablem Boden. Es behält eine hervorragende Tiefe, direkt hinter dem GPZ 7000 bei größeren, tieferen Nuggets.
Die GPX 6000-Spulen sind eine neue Reihe leichter Hochleistungsspulen, die nicht mit früheren Detektoren der GPX-Serie kompatibel sind.
Die 14" Doppel-D-Spule im GPX 6000 kann nur zur EMI-Unterdrückung oder Unterdrückung von leitfähigen Bodensignalen verwendet werden. Sie ist nicht in der Lage, eisenhaltige Stoffe zu diskriminieren.
The following Minelab coils are currently available to operate with the GPX 6000:
Minelab approved aftermarket coils are available from Coiltek and NuggetFinder.
Die erste Wicklung des Spulenkabels von der Spule sollte immer über die Welle gehen. Das Spiralkabel sollte dann eng um die Welle gewickelt und mit den beiden Klettbändern fixiert werden. Sie sollten genügend Platz lassen, damit sich die Spule beim Erkennen frei bewegen kann.
Der GPX 6000 verfolgt den Ferritanteil des Bodens nicht. GeoSense-PI verwendet andere Techniken, um die für den Bediener unsichtbare „X“-Antwort zu entfernen.
Sie benötigen keinen gelben Ferrit, um den GPX 6000 zu erden.
Der Schwellenwertton kann in jeder Empfindlichkeitseinstellung durch langes Drücken der Ground Type-Taste ein- und ausgeschaltet werden.
Beachten Sie, dass der Schwellenwertton in den manuellen Empfindlichkeitsbereichen eingeschaltet und in den automatischen Empfindlichkeitsbereichen ausgeschaltet ist. Beim nächsten Einschalten des GPX 6000 wird der Schwellenwertton auf die Standardeinstellung zurückgesetzt.
Die Einstellung Schwieriger Bodentyp wird am besten in stärker mineralisierten Böden verwendet, insbesondere bei heißem Gestein oder stark veränderlichen Böden.
Die Einstellung Normaler Bodentyp hat die größte Tiefe bei größeren Nuggets; Es wird am besten verwendet, wo immer möglich und immer in Böden mit geringeren Mineralisierungsgraden oder weniger variablen Böden. Normaler Bodentyp kann heißes Gestein als Ziel aufnehmen. Wenn heißes Gestein nicht ausgeglichen werden kann, müssen Sie die Einstellung Schwieriger Bodentyp verwenden.
The GPX 6000 with GeoSense-PI is continually tracking the ground, so either technique would work. Minelab recommends pumping the GPX 6000 up and down above the ground with the Quick-Trak button depressed to achieve the fastest Ground Balance.
Leitfähiger Boden muss nicht mit sichtbarem Salz in Verbindung gebracht werden. Beispielsweise können kürzliche Regenfälle den Boden leitfähiger machen und die unerwünschte Reaktion des leitfähigen Bodens verstärken.
Drahtloses Audio ist anfällig für Audioausfälle, wenn das Signal blockiert wird. Audioaussetzer können reduziert werden, indem eine direkte Sichtverbindung zwischen Kopfhörer und Detektor gewährleistet wird. Tragen Sie die Kopfhörer am besten mit den Bluetooth-Bedienelementen, die dem Detektor am nächsten sind. Dadurch wird der Weg zum Bluetooth-Sender minimiert und die Wahrscheinlichkeit verringert, dass der Körper des Bedieners den Signalweg zwischen Kopfhörer und Detektor blockiert.
Der GPX 6000 läuft ungefähr 8 Stunden, wenn er mit einem voll aufgeladenen Akku beginnt. Das Aufladen des Akkus dauert in der Regel 5 – 6 Stunden.
Der ML 100-Kopfhörer funktioniert mit einem vollständig aufgeladenen Akku etwa 24 Stunden lang und das Aufladen dauert etwa 3,5 Stunden.
Die Batterie des GPX 6000 sollte beim Laden von einem Fahrzeug nur über ein nominales 12-V-Autobatteriesystem geladen werden.
Minelab hat derzeit keine Pläne, einen austauschbaren Zellen- oder Alkalibatteriesatz auf den Markt zu bringen.
Das USB-Kabel dient zum Aufladen der Bluetooth-Kopfhörer und würde verwendet, wenn ein Software-Upgrade für den GPX 6000 verfügbar wäre.
Hinter dem Lautsprechergitter befindet sich ein USB-Port, der verwendet werden kann, wenn ein Software-Upgrade veröffentlicht wird. Überprüfen Sie den Download-Bereich der GPX 6000-Seite auf unserer Website auf Updates.
Sie können nie vorhersagen, welches Niveau der Bodenmineralisierung an einem bestimmten Standort vorhanden sein wird, weshalb Normal als Zeitpunkt für den Anfang empfohlen wird. Dann können Sie sich vom Detektor sagen lassen, welches Timing zu verwenden ist, indem Sie die Spule abtasten und auf die Stabilität der Schwelle hören.
Nachdem Sie eine automatische Abstimmung und einen Bodenabgleich durchgeführt haben, sollten Sie mit der Suche beginnen. Wenn der Detektor zu laut ist oder auf vielen heißen Steinen signalisiert, ist das von Ihnen verwendete Timing für den Boden, auf dem Sie sich befinden, zu aggressiv. Sie müssen ein anderes Timing auswählen, das näher am dunklen Ende der unteren Skala liegt, zB Enhance.
Es ist bekannt, dass der GPX 5000 insbesondere bei stürmischem Wetter unter elektromagnetischen Störungen (EMI) leidet. Es gibt drei bekannte Gründe für diese Störung:
An schlechten EMI-Tagen sind hier ein paar Tipps, die Ihre Schwelle am Schnurren halten können:
Stellen Sie sicher, dass Sie keine Monoloop-Spule verwenden, wenn der Coil Rx-Schalter auf Cancel eingestellt ist.
Monoloop-Spulen haben ein perfekt rundes Kabel.
Doppel-D-Spulen haben aufgrund der zwei inneren Adern ein flacheres Kabel.
Stellen Sie den Coil/Rx-Schalter auf Cancel. Wenn Sie eine etwas geringere Tiefe als erwartet haben, ist Ihre Spule ein Double-D. Wenn Sie praktisch keine Tiefe haben, haben Sie eine Monoloop-Spule.
Die Stabilizer-Funktion steuert den Punkt, an dem schwache Variationen des Thresholds zu hören sind. Diese schwachen Variationen können entweder Umgebungsgeräusche oder schwache Zielsignale sein. Wenn Sie den Stabilisator-Regler erhöhen, werden schwache Zielsignale lauter, aber auch der Rauschpegel nimmt zu, wodurch möglicherweise ein wünschenswertes Zielsignal verdeckt wird. Der Stabilisator ermöglicht es Ihnen, diese schwachen Variationen zu maskieren, um einen perfekt stabilen Schwellenwert bereitzustellen, wodurch Ihre Fähigkeit verbessert wird, schwache Zielsignale zu erkennen.
Der Stabilisator wird am besten in der FP-Position (Werksvoreinstellung) belassen, bis die Bodenbedingungen am Standort bestimmt sind. Nachdem der Rx-Gain-Pegel für die lokalen Bedingungen eingestellt und andere Audioeinstellungen ausgewählt wurden, kann der Stabilisator zur Feinabstimmung der Threshold-Stabilität verwendet werden.
Um die optimale Position des Stabilisators zu finden, stellen Sie sicher, dass die Spule über den Boden geschwenkt wird. Eine Zahl unter dem Punkt, an dem die Schwelle zu rattern beginnt, ist im Allgemeinen die beste Einstellung.
Der Effekt des Stabilizers kann als ähnlich angesehen werden wie der des Rx Gain-Reglers. Der Stabilisator wirkt sich jedoch nur auf die Audioverarbeitung aus und ändert nicht das Empfangssignal (Rx) und sollte daher als Feinabstimmung der letzten Stufe verwendet werden. Nachdem Sie den Stabilisator angepasst haben und sich die Bodenbedingungen ändern oder Sie die Spulen wechseln möchten, müssen Sie möglicherweise die Rx-Verstärkung zurücksetzen, aber vorher müssen Sie den Stabilisator zuerst auf die Werkseinstellungen zurücksetzen. Dadurch wird sichergestellt, dass Sie den für die Bedingungen am besten geeigneten Rx-Gain-Pegel auswählen und dann mit dem Stabilisator eine Feinabstimmung vornehmen können.
Tipp: Durch Drehen des Stabilizer-Reglers in die Nähe des Minimums (gegen den Uhrzeigersinn) wird der Schwellenwert sehr stabil, aber Sie haben viel Empfindlichkeit gegenüber kleineren Zielen verloren. Dies kann in bestimmten Szenarien eine wünschenswerte Funktion sein, z. B. bei der Suche nach großen Nuggets in einem Bereich mit hohem Müll oder der Verwendung des GPX 5000 und GPX 4800, um nach Münzen oder Schätzen zu suchen.
Tipp: Wir empfehlen die beste Reihenfolge für die Einstellung dieser Steuerelemente:
Die Ziellautstärke steuert die Stärke der Zielsignale und bei Einstellungen über 8 wird auch die Lautstärke des Schwellenwerts leicht erhöht. Dies ist nützlich bei sehr windigen Bedingungen, für Menschen mit Hörverlust oder bei Verwendung externer Lautsprecher. Mit dem in den Li-Ion-Akku integrierten Audioverstärker können Sie einen Lautsprecher direkt an den Akku anschließen und mithilfe der Ziellautstärke eine geeignete Verstärkungsstufe einstellen. Beachten Sie, dass Sie beim Wechsel von Kopfhörern zu einem externen Lautsprecher möglicherweise geringfügige Anpassungen an den Reglern für Schwellenwert und Lautstärkebegrenzung vornehmen müssen.
Die Ziellautstärke kann unter ruhigen Bedingungen als Audio-Boost verwendet werden und kann auch verwendet werden, um Bodengeräuschsignale in stark mineralisierten Böden zu reduzieren oder zu glätten. Dies ist eine leistungsstarke Funktion, die in Verbindung mit dem Stabilisator-Regler arbeitet und Ihnen die ultimative Feinabstimmung ermöglicht. Um die optimale Kombination unter verschiedenen Bedingungen zu finden, kann ein wenig Experimentieren erforderlich sein.
HINWEIS: Wenn aufgrund eines Spulen- oder Standortwechsels Anpassungen der Verstärkung erforderlich sind, stellen Sie sicher, dass das Zielvolumen zuerst auf die FP-Einstellung zurückgesetzt wird. Anschließend können Sie sich an die neuen Bedingungen anpassen.
The SDC 2300 is our compact and waterproof gold prospecting detector. It uses Multi Period Fast (MPF) Pulse Induction (PI) technology that provides excellent sensitivity when detecting small to medium sized nuggets in highly mineralised or variable ground. The SDC 2300 provides good depth on larger deeper nuggets.
No, there are no other Minelab branded coils available for the SDC 2300. The supplied 8” round coil provides excellent overall performance for the SDC 2300 and keeps the detector waterproof and compact
No, there is no discrimination function available for the SDC 2300.
Having no constant threshold audio emit through the speaker or headphones indicates that the threshold audio is in the OFF or minimum setting.
The threshold volume can be adjusted by pushing the threshold button on the right side of the handle.
There are 9 levels of Threshold audio which are indicated by the LED display. With each press of the threshold button, you will notice the LEDs on the display incrementally move to the right, the threshold audio will also start increasing. When the threshold level is at maximum, pressing the Threshold button will cycle the threshold level back to the OFF or minimum setting.

The SDC 2300 has 2 Audio pitch settings, Low or High. High pitch is the default, to change to the low setting switch the detector off then push and hold the Threshold button while switching the detector on.

The SDC 2300 will remember its previous setting so you will need to push and hold the Threshold button whilst switching the detector on to toggle back to the High pitch setting.
The SDC 2300 is waterproof to 3m (10ft) This is the complete detector including the control box.
Yes, the SDC 2300 has a salt mode in the sensitivity adjustment, however Minelab does not recommend using the SDC 2300 on the beach as the SDC 2300 does not have a discrimination or target ID feature so you will dig a lot of trash.
The salt mode in your SDC 2300 is designed to be used on conductive ground such as salt lakes or wet mineralised soils found in gold fields where a high salt content is apparent. For example, recent rains may make the soil more conductive and increase the unwanted conductive soil response. If the soil is conductive or you are detecting on a salt lake, then adjust the sensitivity dial to a salt setting.

To check the battery level on your SDC 2300 simply push and hold the Noise Cancel button then press and release the Threshold button. The Noise Cancel button can now be released.
An indication of the battery level will be displayed by the LED's for approximately 3 seconds.

The SDC 2300 will operate for approximately 8 hours when commencing with a fully charged Li-Ion battery. Charging the battery will typically take 5 – 6 hours. When using C-Cell Alkaline batteries you will generally have a longer use time (10-14 hours) but this will depend on the quality of the C-Cell batteries you are using.
No, The SDC 2300 battery should only be charged from a nominal 12V car battery system when charging from a vehicle.
The SDC 2300 includes a rechargeable Li-Ion battery pack inside the box. The battery compartment can also accept C-Cell Alkaline batteries or C-Cell NiMH rechargeable batteries. You can see the polarity for the C-Cell batteries on the side of the control box.

No, the software on the SDC 2300 cannot be upgraded.
The GOLD MONSTER 1000 is Minelab’s entry level gold prospecting detector, designed to find the smallest of nuggets in moderately mineralised ground. It retains excellent sensitivity to smaller shallow nuggets and can detect some larger nuggets at depth.
The Gold Chance Indicator at the top of the screen indicates if the target has a ferrous or non-ferrous content. If the indicator is consistently pointing to the right, it is indicating a high non-ferrous content and is likely a non-ferrous metal such as: gold, silver, brass, copper, aluminium, lead, zinc or other alloys that do not have any iron (ferrous) content.

If the indicator is pointing to the left, it is showing a high ferrous content and is likely steel or iron.

Large steel and iron (ferrous) targets can indicate on the right. This happens when the conductive properties of the large ferrous target dominate the signal and mask the magnetic properties of the target.
The GM05 and GM10 are the only compatible coils that can be used with the GOLD MONSTER 1000. The GM05 is included in the box and the GM10 coil can be purchased as an accessory from Minelab dealerships.
There are currently no aftermarket coils available for the GOLD MONSTER 1000.
The first winding of the coil cable from the coil should always go over the shaft. Winding the coil cable over the shaft provides minimal stress on the coil cable which will help avoid damage. The coil cable should then be wound closely around the shaft, allowing enough room for the coil to be able to move freely when detecting.

Press the coil cable into the clip on the rear of the screen pod and then carefully screw the coil connector into the rear of the screen pod.


There are 10 manual and 2 auto sensitivity levels.
Auto is located in position 11 on the sensitivity dial and will be indicated with a black dot in the centre of the sensitivity dial.
When in Auto the detector will function smoothly in most soil types and will continually adjust the detector’s sensitivity level to maintain smooth operation.

Auto + is located in position 12 on the sensitivity dial and will be indicated with a black dot in the centre of the sensitivity dial.
Auto + is a more aggressive sensitivity which provides users with additional sensitivity for extra depth performance. Auto+ should only be used in moderately mineralised soils as this setting may provide more ground noise.

Manual sensitivity adjustments (1 – 10) are for the expert user who has a good understanding of soil mineralisation and electro-magnetic interference (EMI).
Manual sensitivity allows the user to adjust the detector’s performance manually, when you have selected a sensitivity setting in the manual range the detector will not adjust levels like it does in the Auto or Auto+ modes. You may need to keep adjusting the manual sensitivity when in variable or heavily mineralised soil types.

The GOLD MONSTER 1000 is very sensitive, when you wave your hand over the coil the detector can detect the salt in your blood.
When you are retrieving a target, you should always use the supplied plastic scoop to ensure you detect the desired target and not your hand.
Because the GOLD MONSTER 1000 is highly sensitive to salt detection it is not recommended for beach use.
Chattering, or inconsistent audio is generally a sign that the detector is picking up interference from ground mineralisation or electro-magnetic interference (EMI). If you are in Auto +, try adjusting the sensitivity to Auto or a lower manual sensitivity. If lowering the sensitivity doesn’t fix the issue, then you should move away from sources of EMI. (power lines, cellular phone towers, power generators, thunder/electrical storms, etc.)
Random detection beeps can be caused by mineralisation in the soil. The GOLD MONSTER 1000 has an auto-tracking ground balance feature that continually monitors the minerals in the soil and adjusts the detectors’ ground balance. Rapid changes or high levels of mineralisation in the soil can cause the detector to false signal, if this happens, pump the coil up and down (0.5 - 10cm / 0.2 - 4”) over the areas that are giving false signals. This will help ground balance the detector to the mineralisation in the soil.
If the mineralisation level is too high, then lower the sensitivity to compensate for the mineralisation level.
Lifting your coil into the air will amplify any noise that is in the area. Minelab does not suggest doing this as this is not how our products are designed to be used. Lifting the coil slightly into the air is acceptable when performing a Noise Cancel, once the Noise Cancel is complete the coil should always be kept near the surface of the soil to avoid interference.
No, the GOLD MONSTER 1000 does not have any wireless capability. You can plug in any 3.5mm (1/8”) stereo headphones to the rear of the control pod.
The GOLD MONSTER 1000 will operate for approximately 12 hours when commencing with a fully charged Li-Ion battery. Charging the battery will typically take 5 to 6 hours.
No, the GOLD MONSTER 1000 battery should only be charged from a nominal 12V car battery system when charging from a vehicle.
No, the software in the GOLD MONSTER 1000 cannot be upgraded.
Die Virenschutzsoftware auf einigen Computern legt die Minelab-E-Mail in einer Spam-Datei / einem Spam-Ordner ab. Überprüfen Sie Ihren Spam-Ordner auf diese E-Mail. Wenn Sie die E-Mail nicht erhalten haben, wenden Sie sich bitte an das nächstgelegene autorisierte Minelab-Servicecenter.
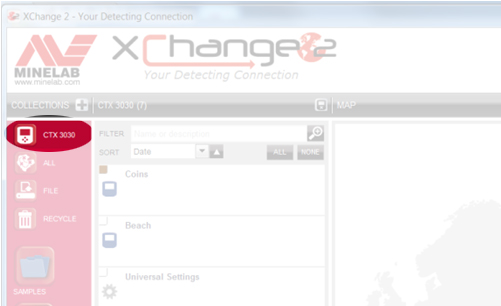
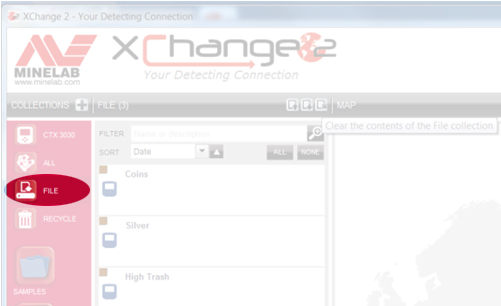
When XChange 2 is first installed the 'file' icon will not appear until the software recognizes the CTX 3030 being connected for the first time. This is the only time this will happen. After the initial connection the 'FILE' icon will appear and remain. You will no longer need to connect the CTX 3030 to access it.
The factory setting for GeoTrails is off, so you will need to turn it on. First turn GPS ON, then turn GeoTrails ON. From the map screen, press and hold the Map button to access this option. Use the arrows to select ‘View GeoTrails’ and press the Select button.
Enhanced turns on SBAS or Satellite Based Augmentation System which is a generic term for WAAS used in the USA and EGNOS in Europe. These systems use a geostationary satellite to probe the atmosphere and TX this to your GPS receiver. It works well in the USA, but in Europe it seems to be better for planes rather than on the ground. In Australia you get signals from a satellite over Japan which makes your fix worse. Not sure how much of Europe has this as an issue.
The default for the 'User' button is to control the backlight, so if a user changes this to something else, then the backlight is controlled in the Menu/Options/Backlight - ON / OFF / TIME
You’re all done and your time zone has been set.
If you don’t know your UTC Time Zone please refer to the following link: http://www.timeanddate.com/time/map/
In a session, if the WM 10 Wireless Module is enabled and the detector is connected to it then you will hear tones as expected. If you turn off the WM 10 it will 'mute' the detector. Power cycle the detector and you will be able to hear the tones.
The CTX 3030 has a similar ground compensation feature to that on the Explorer SE Pro and E-TRAC models which works very well in most ground conditions, so there is no need to ground balance the CTX 3030 in most conditions. Ground balance should only be performed in 'Extremely Mineralised Ground'. Do not perform ground balance on the beach, this will 'confuse' the detector.
This is a standard feature, when you perform 'Tone ID profile edit', and select Play Tone or Play All, the tones will not sound if the WM 10 Wireless Module is connected.
There are 4 different volume settings. The CTX 3030 remembers what each setting is. If you turn the volume down while using the headphones and then unplug your headphones the external speaker volume will not have changed from your previous setting.
Before placing the twist-lock style armrest on the shaft, turn the lock fully counter clockwise. There is no need to turn the lock completely 90 degrees to lock it. Around 30 to 45 degrees is often sufficient.
This was corrected in a software update. Connect your detector to XChange 2 and check for software updates. We always recommend using the most current software update. If you're on the latest update or the update didn’t correct the problem please contact your regional Minelab Authorised Service Centre.
The modes will change (or be translated) ONLY when changing from ENGLISH to another language and not in reverse. If the detector is initially set up in a language other than English, the modes will appear in that language. But if you change the language to English later, the modes will stay in the original language.
The Trigger will Cancel any adjustment being made and go back one level in the menu.
If you’ve been using the detector a lot since the last time you connected it to XChange 2 then there is a lot of data stored. It could take several minutes for the data to upload. Please be patient.
This could be related to masking, low sensitivity setting, coil overload or etc. Perform a 'Factory Reset' and retest the detector.
To connect the WM 10 Wireless Module to your detector:
If Pairing fails, try selecting another channel
The location of the WM 10 can be an issue for path loss. The human body is very attenuating, so having the WM 10 tucked on your backside away from the detector could cause issues. If you’re having issues place the WM 10 in a clear line of sight to the detector to get best results.
Snapshots are only saved while the detector is on. It is a design feature that the snapshots are deleted when the detector is turned off.
During your initial use of GPS the detector will take a while to build up local data. From a cold start the 'locking in' of where satellites are and etc. takes a few minutes, but it can take an hour to build up lots of local data. This data can be used to get better resolution and shaded sky use.
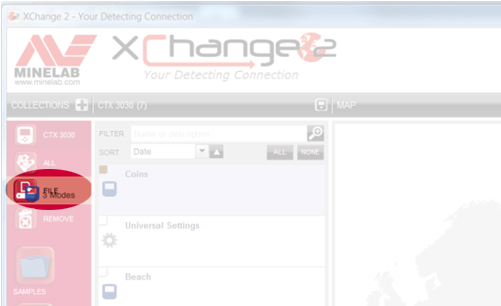
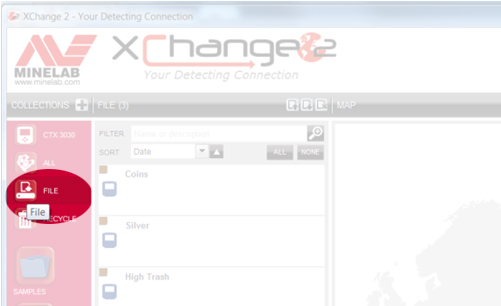
This is as simple as saving the modes and/or data you want as a file and emailing them the file. Here’s the procedure:
All the modes and other data from your CTX 3030 will be displayed in the list.
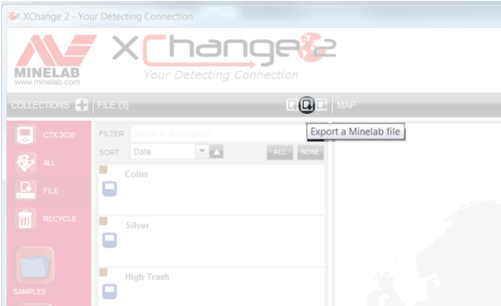
The entire FILE Collection will be exported as a single file, and saved in the Downloads folder of your PC. You can then save the file elsewhere or email it to whoever you want.
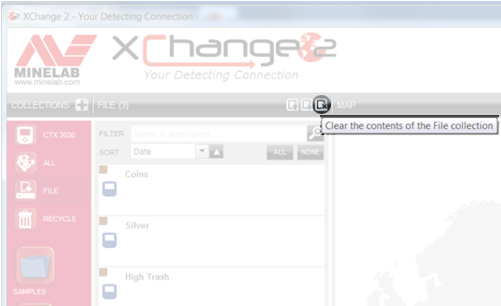
If you receive a Minelab FILE from someone else simply open XChange 2, select the FILE Collection and then click the ‘Clear the contents of your File collection’ icon.
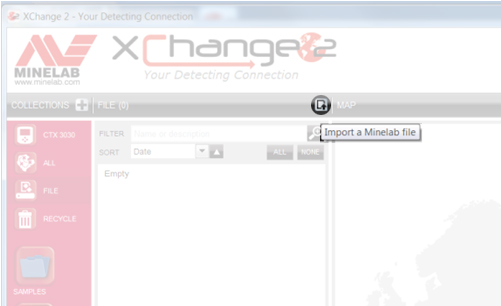
Then click the ‘Import a Minelab file’ icon.
Then click ‘Choose file’,
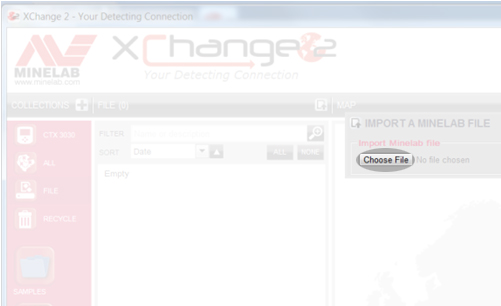
and browse for the file location. Highlight the file and click ‘Open’ and the Items within it will be displayed in the File Collection.
Drag and drop the items you want to keep into one of your own Collections or straight into your CTX 3030.
Combined audio produces different tones for highly ferrous objects, and objects with varying levels of conductivity. First you set the ferrous line (horizontal line) where you want ferrous targets to provide the audio response. For example, if you set it at 21, then any target with a ferrous reading of 21 or higher (larger number) will produce the audio tone that you program for ferrous targets. On the other hand, if the target has a ferrous reading that is less than 21, the audio response will be based on its conductive properties. In Combined audio you have four 'bins' representing conductive groups with conductive numbers running from 01 - 50. You simply move the lines to represent different target groups and assign a tone for each group. For example, you could set bin one with the lines at 01 and 14. Any target with a ferrous value less than 21, and a conductive value of 14 or less would fall into this bin and provide the audio tone you associated with it via programming.
Bin two, for example, could represent targets between 15 and 28. Bin three could represent targets from 29 - 40 and bin four could be the remainder of conductive targets with CO values of 41 - 50. With the numbers used in these examples, if you passed over a target with a FE value of 12 and a CO value of 44, it would provide the conductive tone you assigned to conductive bin four. If you passed over a target with an ID of 11 – 22, it would provide the tone assigned to conductive bin two. Again, the user can resize and assign tones to each target group (bin). For those of you who enjoyed hunting in Two Tone Ferrous with the E-TRAC, this takes it one step further allowing you to adjust the FE line, and break down the CO targets into four separate groups.
Gold can ID anywhere in the range of 10-09 to 13-30, and possibly outside of this range. Sometimes the Conductive reading can be very low, like 02, so to improve your chances you really have to dig everything including aluminium foil and pull-tabs.
Regarding settings, the standard Beach mode is quite suitable. One thing you can do is to change the Tone ID profile to Ferrous 35. What this does is it will make low conductive jewellery produce a higher tone than it would in Conductive profile, making it easier to recognize. You can also select Combine, and customize the tones to suit your personal preference.
For saltwater beaches, Manual Sensitivity is recommended, unless your beaches have high levels of magnetic mineralization. If your unit is running nice and stable on Sensitivity 18, try to push it a bit higher. In situations where you are actually detecting in the salt water, turn the Seawater setting on.
The other thing some beach combers often do is to open up the discrimination pattern a little. Mainly dropping the ferrous rejection slightly or simply search in Pattern 2 (simply press and release the Detect button). This is highly recommended on beaches with low levels of junk targets. In this case another thing you can try is changing the Audio Response to LONG. This can improve your ability to hear the very faint target response which jewellery can produce.
Watch the approved Community Instructional Video on Editing FindPoints and WayPoints.
Watch the approved Community Instructional Video on How to link photos from your phone to FindPoints.
Watch the approved Community Instructional Video that includes How to record a GeoHunt.
Watch the approved Community Instructional Video that includes How to record a FindPoint or WayPoint.
Watch the approved Community Instructional Video that includes How to enable the GPS function.
Watch the approved Community Instructional Video that includes Turning on Detect screen options.
Watch the approved Community Instructional Video that includes Turning on the large target ID panel.
Watch the approved Community Instructional Video that includes Turning on the Sensitivity panel.
Watch the approved Community Instructional Video that includes Turning on the detect screen navigation tool.
Watch the approved Community Instructional Video that includes Selecting a Search Mode on the CTX 3030.
Watch the approved Community Instructional Video that includes Editing a Search Mode on the CTX 3030.
Watch the approved Community Instructional Video that includes transferring data from a CTX 3030 to XChange 2.
Watch the approved Community Instructional Video that includes Creating a new Collection on XChange 2.
Watch the approved Community Instructional Video that includes Changing XChange 2 preferences.
Watch the approved Community Instructional Video that includes Adjusting Universal settings.
Watch the approved Community Instructional Video that includes Making a new Search Mode in XChange 2.
No, The FBS 2 coils can only be used on the CTX 3030, while FBS coils can only be used on the E-TRAC, Safari and Explorer Series detectors.
MULTI-IQ+ is the next generation of MULTI-IQ technology and provides more power with lower electromagnetic interference (EMI) in built up areas.
This provides superior performance and depth allowing users to find previously undetectable targets in most locations.
MANTICORE übertrifft die Leistung von EQUINOX-Detektoren in nahezu jeder Hinsicht, da die im MANTICORE verwendete MULTI-IQ+-Technologie mehr Leistung und eine schnellere Verarbeitung bietet, was einer besseren Erkennungstiefe, einer verbesserten Wiederherstellungsgeschwindigkeit, mehr Empfindlichkeitsanpassungen und einem erweiterten 2D-Unterscheidungsbildschirm entspricht, der den Benutzern mehr Informationen über Ziele liefert, bevor sie graben.
Derzeit sind keine anderen Coils mit dem MANTICORE kompatibel.
Zubehörspulen können Sie bei Ihrem örtlichen Minelab-Händler erwerben. Um Ihren nächstgelegenen Händler zu finden, verwenden Sie bitte unser Online- Händlersuchtool.
Im Lieferumfang Ihres MANTICORE-Detektors sind die ML105-Kopfhörer enthalten. Dabei handelt es sich um Over-Ear-Kopfhörer, bei denen das Schaumstoffpolster auf Ihrem Kopf sitzt und das Ohr umgibt.
Bei den ML85-Kopfhörern handelt es sich um On-Ear-Kopfhörer, bei denen das Schaumstoffpolster auf der Außenseite Ihres Ohrs sitzt.
ALL TERRAIN ALLGEMEIN: Hervorragende Allround-Leistung für die meisten Ziele und Bedingungen. Bietet hervorragende Zieltrennung und hervorragende Abfallabweisung.
SCHNELL IN JEDEM GELÄNDE: Erhöhte Wiederherstellungsgeschwindigkeit sorgt für hervorragende Zieltrennung und gute Koksabweisung.
HOHE LEITER FÜR ALLE GELÄNDE: Hervorragend geeignet für hohe Leiter wie Stapel von Silbermünzen oder Kupferziele und bietet eine gute Ziel-ID-Trennung.
NIEDRIGE LEITER FÜR ALLE TERRAINS: Hervorragend geeignet für kleine/dünne Objekte wie gehämmerte Münzen oder edlen Goldschmuck.
ALL TERRAIN TRASH REJECT: Wird in Bereichen mit viel Müll verwendet. Maximale Eisenabweisung
STRAND ALLGEMEIN: Hervorragende Allround-Leistung für die meisten Ziele und Strandbedingungen bei Verwendung auf trockenem oder nassem Sand. Bietet hervorragende Zieltrennung und hervorragende Müllabweisung.
BEACH LOW CONDUCTORS: Hervorragend geeignet für kleine oder dünne Ziele wie Goldketten. Geeignet für trockenen und nassen Sand.
BEACH DEEP: Geringere Einholgeschwindigkeit bietet hervorragende Tiefe für kleine oder dünne Ziele wie Goldketten. Geeignet für trockenen und nassen Sand.
STRAND-SURF & MEERWASSER: Hervorragend geeignet für schwierige Salzwasserbedingungen, einschließlich Unterwasser- oder Brandungserkennung.
GOLDFIELD ALLGEMEIN: Hervorragend geeignet für kleine Nuggets in gutartigen bis mäßig mineralisierten Böden. Dieser Modus bietet eine bessere Gesamtleistung bei Goldnuggets und enthält kontinuierliche Tonhöhen, damit Benutzer schwache Zielreaktionen hören können. Dieser Modus wird nicht für Bereiche mit Müll empfohlen.
Wenn die Frequenz auf MULTI-IQ+ eingestellt ist, wird eisenhaltigen Zielen eine Ziel-ID auf derselben Skala wie nicht eisenhaltigen Zielen zugewiesen. Diese wird auf derselben Skala wie die nicht eisenhaltigen Ziel-IDs angezeigt. Wenn der interne Prozessor ein Ziel als eisenhaltig klassifiziert, gibt der Detektor einen tiefen Ton aus, begleitet von einem roten Eisenindikator unter der Ziel-ID-Nummer, und der 2D-Bildschirm zeigt an, dass das Ziel oben oder unten auf dem Bildschirm, abseits der zentralen leitfähigen Linie, erscheinen soll. 

*Bilder dienen nur zur Veranschaulichung.*
Komplexe Eisenziele, die eine Kombination aus Eisen- und Leitfähigkeitseigenschaften ähnlich denen einiger Münzen aufweisen, werden im Allgemeinen in der unteren Hälfte des 2D-Bildschirms angezeigt.
Größere Eisenziele werden oben auf dem Bildschirm angezeigt. 

Es kann auch einige große Eisenziele mit zylindrischen Formen geben, wie etwa große Bolzen, die eine hohe Leitfähigkeit aufweisen. Diese Zielarten können sowohl im Eisen- als auch im Nichteisenbereich eine Zielspur aufweisen.
*Bilder dienen nur zur Veranschaulichung.*
Mithilfe der Unterscheidung können Benutzer einzelne oder Gruppen von Ziel-IDs akzeptieren oder ablehnen. Wenn die Unterscheidung angepasst wird, werden die Änderungen sowohl an den eisenhaltigen als auch an den nicht eisenhaltigen Ziel-IDs vorgenommen. Dies wird als vertikale Linie angezeigt, die sowohl den eisenhaltigen als auch den nicht eisenhaltigen Teil der ausgewählten Ziel-ID ausgraut.
Mithilfe der Eisengrenzwerte können Benutzer die Detektorparameter anpassen, um zu bestimmen, was als Eisen- oder Nichteisenziel erkannt wird. Diese können sowohl im oberen als auch im unteren Abschnitt des 2D-Bildschirms angepasst werden.
*Bilder dienen nur zur Veranschaulichung.*
Im Allgemeinen ist Multifrequenz den Einzelfrequenzen bei der Verwendung eines Detektors überlegen. Es kann jedoch spezielle Situationen geben, in denen eine bestimmte Frequenz einen einzigartigen Vorteil bietet.
*Bitte beachten Sie, dass bei Verwendung einzelner Frequenzen die Eisengrenzwerte deaktiviert werden und eisenhaltige Ziele eine Ziel-ID von 1 bis 19 bereitstellen und eine rote Eisenanzeige auf dem Bildschirm anzeigen*
Die typische Laufzeit beträgt bei voller Ladung etwa 10 Stunden . Der MANTICORE-Detektor kann auch direkt von jeder USB-Powerbank mit Strom versorgt werden, die eine Ausgangsleistung von 0,5 A oder 2 A (bei 5 V) unterstützt. Dies ergibt effektiv eine kontinuierliche Laufzeit, die nur durch die verwendeten Powerbanks begrenzt wird.
*Sie können Ihren MANTICORE-Detektor NICHT unter Wasser verwenden, wenn er an eine USB-Powerbank angeschlossen ist*
Der MANTICORE-Detektor unterstützt das Laden von Geräten, die dem USB 2.0-Standard entsprechen. QuickCharge™ ist ein proprietärer Standard von Qualcomm, der eine höhere Spannung verwendet und nicht mit MANTICORE-Detektoren kompatibel ist .
Die Ladezeit von völlig entladen auf 100 % beträgt ungefähr 7 Stunden , wenn mit einem Ladegerät mit hoher Kapazität (> 1,7 A bei 5 V) geladen wird.
Zum Laden Ihres Akkus können Sie jeden Standard-USB-Anschluss verwenden, der mit der USB-Akkuladetechnologie 1.2 (BC1.2) kompatibel ist. Bei Verwendung von Optionen mit geringerem Stromverbrauch kann die Ladezeit jedoch länger sein.
Die Lebensdauer aller Akkus hängt von einer Reihe von Faktoren ab, die oft bis zu einem gewissen Grad vom Benutzer beeinflusst werden können, wie z. B. Temperatur, Ladezustand bei Lagerung, Ladezyklen usw. Die häufigste Ursache für eine verkürzte Lebensdauer von Lithium-Ionen-Akkus ist die Lagerung eines vollständig geladenen Akkus bei erhöhten Temperaturen.
Wie bei allen in unseren Detektoren verwendeten Komponenten beziehen wir ausschließlich moderne, hochwertige Komponenten von verantwortungsbewussten Anbietern. Wir gehen nicht davon aus, dass Benutzer nach jahrelangem Gebrauch Probleme mit der Batterie haben werden. Unsere Erfahrung mit den Detektoren CTX 3030 und GPZ 7000, die beide Lithium-Ionen-Batterien verwenden, zeigt, dass die überwiegende Mehrheit der Benutzer nie eine Ersatzbatterie kaufen musste.
Verwenden Sie zum Laden des MANTICORE-Akkus ausschließlich namhafte und zertifizierte USB-Ladegeräte, wie unten beschrieben:
Der im Griff enthaltene Li-ION-Akku ist austauschbar und hat eine Garantie von 6 Monate ab Kaufdatum. Minelab empfiehlt die Nutzung eines autorisierten Servicecenters, um eine mögliche Beschädigung der wasserdichten Versiegelung und ein Erlöschen der Detektorgarantie zu vermeiden.
Ja, bei der Ortung an Land gibt es keinerlei Einschränkungen. Der Detektor darf jedoch während des Ladevorgangs oder wenn er an eine Powerbank angeschlossen ist, nicht unter Wasser verwendet werden.
Ja. Wenn der Detektor über eine USB-Powerbank mit Strom versorgt wird, wird der Akku möglicherweise langsamer aufgeladen, wenn in der Powerbank noch genügend freie Kapazität vorhanden ist.
Ja. Es empfiehlt sich, den Detektor nach der Erkennung im Wasser oder am Strand mit sauberem Süßwasser abzuwaschen. Verwenden Sie zum Reinigen des Detektors niemals Scheuermittel oder Lösungsmittel.
Nein. Es ist nicht notwendig, Teile des Detektors zu schmieren oder einzufetten, auch nicht die wasserdichten Dichtungen. Die Verwendung von Schmierfett auf Mineralölbasis beschädigt die wasserdichten Dichtungen und führt zum Erlöschen der Garantie.
Beim Waten in tiefes Wasser oder beim vollständigen Untertauchen empfehlen wir ausschließlich die Verwendung wasserdichter Minelab-Kopfhörer . Diese verfügen über einen speziell entwickelten Anschluss, der bei Verwendung mit dem MANTICORE eine wasserdichte Abdichtung bildet. Diese Kopfhörer sind als Zubehör bei Ihrem örtlichen Minelab-Händler erhältlich.
Hardwired coils are more reliable for deep diving detectors.
No, 8 x 1.2V is only 9.6V, and these detectors require 12V to function.
Check to ensure the battery is fully charged. A low battery causes the threshold to get very loud and the response becomes erratic.
Salt, sand and grit will accumulate on the Excalibur II. So make sure you thoroughly rinse it with fresh water after use, including the coil cover, shafts and battery pack. Don't forget the vent holes on each headphone diaphragm as these need to be clear if used for diving purposes to allow for ear equalisation.
The Multi-IQ engine in all EQUINOX series is the same, there are however processor enhancements in the EQUINOX 700 and EQUINOX 900 that allow the detector to provide users with better Iron Bias, target separation and discrimination depth.
Park 1 (General/Coins)
Park 1 is optimised for modern coins and larger jewellery with a default discrimination pattern set to reject many common aluminium foil-like targets. Therefore, this is the ideal Profile to start with to learn EQUINOX before experimenting with the other Modes and more specialist settings. Park 1 Multi-IQ processes a lower frequency weighting of the multi-frequency signal, as well as using algorithms that maximise ground balancing for soil to achieve the best signal-to-noise ratio. Hence Park 1 is most suited for general detecting and coin hunting.
Park 2 (Fine jewellery)
Park 2 is ideal for smaller targets in trash-infested (including ferrous trash) locations. It will detect a wider range of targets including low conductor (or higher frequency) targets, e.g. fine jewellery. All non-ferrous targets are accepted by default. Recovery Speed is increased to clearly identify good targets masked by iron trash. Target Tone is set to maximum to provide as much target information as possible via audio. Park 2 Multi-IQ processes a higher frequency weighted multi-frequency signal while ground balancing for soil.
Field 1 (Coins and Artefacts)
Field 1 is for general hunting with high trash rejection. This assists in locating desired targets more easily. The default discrimination pattern is set to reject most coke signals. The first Tone Break is set so that the coke signals will produce the same low tone as ferrous targets. Field 1 Multi-IQ processes a lower frequency weighted multi-frequency signal, as well as using algorithms that maximise ground balancing for soil, to achieve the best signal to noise ratio. Hence being most suited for general detecting and coin hunting.
Field 2 (Fine coins and Artefacts)
Field 2 suits locations with high target and trash densities. It will better detect small hammered coins on their edge or at greater depth. The default discrimination pattern is set to reject most coke signals. Target Tone is set to maximum to enhance audio identification and Recovery Speed is faster. The first Tone Break has been set so that the coke signals will produce the same low tone as ferrous targets. Field 2 Multi-IQ processes a higher frequency weighted multi-frequency signal while ground balancing for soil.
Beach 1
Beach 1 is most useful for detecting in wet or dry beach sand and also in shallow water where conductive salt signals are prevalent. It has good sensitivity to coins and small/large jewellery. Beach 1 reduces the salt signal, while maintaining high transmit power, and still being sensitive to desirable targets. Beach 1 Multi-IQ processes a low frequency weighted multi-frequency signal, and uses special algorithms to maximise ground balancing for salt
Beach 2
Beach 2 gives the best results when either wading or shallow diving with the coil and/or detector fully submerged. In these instances, there is a very strong salt signal present, so Beach 2 has a lower transmit power, which results in much less noise. This profile may also be useful in dry conditions where there are extremely high ground noise levels. Beach 2 Multi-IQ processes a very low weighted multi-frequency combination, using the same algorithms as Beach 1 to maximise ground balancing for salt.
Multi-IQ (EQUINOX 800 & 900 only)
Gold 1
Gold 1 is suitable for searching for small gold nuggets in ‘mild’ ground. Most goldfield locations have a variable level of iron mineralisation that will require an ongoing Ground Balance adjustment, therefore Tracking Ground Balance is the default setting. The audio Threshold Level and Threshold Pitch are optimised for hunting for gold nuggets. Gold 1 Multi-IQ processes a high frequency weighted multi-frequency signal, while ground balancing for mineralised soil.
Gold 2
Gold 2 is best for searching for deeper gold nuggets in ‘difficult’ ground conditions. Gold 2 has a lower Recovery Speed, which will increase detection depth. However, more ground noise in more heavily mineralised grounds may result. Tracking Ground Balance is the default setting. The audio Threshold Level and Threshold Pitch are optimised for hunting for gold nuggets. Gold 2 Multi-IQ processes a high frequency weighted multifrequency signal, while ground balancing for mineralised soil.
EQUINOX 700
• Weight has been decreased to 1.27kg (2.8lb)
• Waterproof to 5m (IP68)
• Three piece collapsible shaft now 144cm - 61cm (56.7" - 24")
• All carbon fibre shafts
• New, easily adjustable armrest
• 119 Target ID Range (-19 to 99)
• 119 discrimination notch segments
• "Depth Pitch" audio option in all modes
• Improved target separation
• Improved ferrous rejection
• Red LCD backlight
• Keypad backlight
• LED flashlight
• Handle vibration target indication
EQUINOX 900
• All above features
• Greater Sensitivity range 1 - 28
• Includes EQX06 6" waterproof DD coil
The new carbon fiber shaft design allows users to pack the detector down to 61cm (24 in) and has a full extension of 144cm (56.7 in)
Depth performance will differ depending on conditions and detector settings. Beach performance is better overall. Enhancements have been made to improve recovery speed, target separation and discrimination depth allowing users to have solid target IDs at better depths. EQUINOX 900 comes with 28 levels of sensitivity allowing more depth where environmental conditions allow the sensitivity to be turned up.
What are the frequency differences between the EQUINOX 600, 700, 800 & 900?
The EQUINOX 600 and 700 offer a choice of 4 single selectable frequencies:
• 4kHz
• 5 kHz
• 10 kHz
• 15 kHz
The EQUINOX 800 and 900 offers the choice of 6 single selectable frequencies:
• 4kHz
• 5 kHz
• 10 kHz
• 15 kHz
• 20 kHz
• 40 kHz
Gold Mode is designed to enhance performance on small gold nuggets in mineralized ground. It does so primarily by using different audio processing so that targets respond both in volume and pitch. The Gold Mode will be of interest to gold prospectors but has less application for other uses.
While the EQUINOX 600 and 700 do not have a dedicated Gold prospecting mode. Multi-IQ is so good in both Park 2 and Field 2, that these profiles are as good, or better, at finding gold nuggets than many dedicated single-frequency gold detectors. Multi-IQ provides very stable ID’s which is great for choosing what targets to dig in a goldfield.
Iron Bias is a setting that lets you choose how you want iron in the ground to sound. If you have a low setting, more of the iron will come through as a good target to dig up. This will also give you the best chance of finding any valuable non-ferrous targets nestled among the iron.
However, if you desire to hear less false audio sounds from the iron in the ground, try increasing the Iron Bias setting.
The Iron Bias in the EQUINOX 700 and EQUINOX 900 has had some changes to improve discrimination depth.
EQUINOX 600 and 800 have the option to choose either FE Iron Bias or F2 Iron Bias. FE Iron Bias will provide control over the target ID response. F2 Iron Bias will provide tone and target ID response adjustment for a wider range of ferrous targets.
Iron Bias in the EQUINOX 700 and EQUINOX 900 is based off the F2 Iron Bias in the EQUINOX 600 and EQUINOX 800 but allows even better overall depth detection and target separation. Because of this there is no F2 option available in the EQUINOX 700 or EQUINOX 900.
Yes, Coiltek Coils manufacture Minelab approved aftermarket coils for the EQUINOX and X-TERRA-PRO detectors.
No, they have different technology requirements and are not compatible. Only Minelab EQX coils are compatible with EQUINOX series detectors.
Having a larger target ID scale allows the detector to provide the user with more information on the target prior to digging it. This allows users to identify more targets individually which will help determine if the target is valuable or trash.
In general, Multi is superior to the single frequencies when using an EQUINOX. However, there may be specialised situations where a particular frequency has a unique advantage. The EQUINOX Series offers users simultaneous Multi-Frequency plus a wide range of single selectable frequencies for specialist situations.
Yes, there is no need to perform a full factory reset. Individual Search Profiles can easily be returned to their factory preset settings. Only the local settings will be reset and any global settings will remain in their last-use state.
Beach Mode automatically senses black sand and reduces the transmit power to ensure that targets can still be detected without overloading occurring. When black sand is sensed, the Beach Overload Indicator will appear on the LCD. When this icon disappears, full transmit power automatically resumes.
Depth Pitch is an audio mode that provides a continuous pitch audio with no threshold tone. It provides separate audio for ferrous and non-ferrous targets with a variable pitch.
Small or deep targets providing a weaker signal will have a lower pitch.
Large or shallow targets providing a stronger signal will have a higher pitch.
EQUINOX 700 and EQUINOX 900 have been designed to handle harsh outdoor environments. Our testing includes drop tests up to 1m, flex and water ingress testing. Both models are IP68 rated and can be submerged up to 5m (16ft)
Middle and Lower shafts can be mixed. They are not identical in size so they may not provide an exact fit. Upper shafts cannot be changed as the physical mounting point of the control pod is different.
Yes. The supplied magnetic USB charge cable can be used on all EQUINOX models, MANTICORE and X-TERRA PRO detectors.
The charge time, from completely flat to 100%, is approximately 4 hours when charged with a high capacity charger (>1.7A @ 5V).
Longevity for all batteries depends on a number of factors that are often controllable to some degree by the user; such as temperature, charge levels when stored, charge cycles etc. The most common cause of reduced life of Li-ION batteries is keeping a fully charged battery at elevated temperatures.
As with all components used in our detectors, we stringently source only modern high quality components from responsible vendors. We do not expect users to experience any battery issues over years of use. Our experience with the CTX 3030 and GPZ 7000 detectors which both use Li-ION batteries is that the vast majority of users have never needed to purchase a replacement battery.
• Avoid charging or using in extreme temperatures.
• Avoid rapid extreme temperature swings.
• Use only Minelab or Minelab recommended USB chargers and avoid so-called ultrafast chargers from third-parties that claim to fully charge Li-ION batteries in less than one hour.
• Before storing the detector for prolonged periods, the battery should be charged to approximately 50-60%. On the EQUINOX Battery Status Indicator, 2-bars is the optimum charge for prolonged storage. Maintaining the 2-bar charge periodically during extended storage is also advisable. Extended storage in temperatures less than 30oC (86’F) will also minimize degradation to Li-ION battery life
Use only reputable and certified USB Chargers when charging the EQUINOX battery as detailed below:
Typical runtime, from a full charge using wired headphones, is approximately 12 hours. The EQUINOX Series detectors can also be powered directly from any USB Power Bank that supports 0.5A or 2A (@ 5V) output capability. This effectively gives a continuous runtime only limited by the power banks being used.
The EQUINOX detectors support charging from devices that comply to the USB 2.0 standard. QuickCharge™ is a proprietary standard develop by Qualcomm that uses a higher voltage and is not compatible with EQUINOX detectors.
Der im Griff enthaltene Li-ION-Akku ist austauschbar und hat eine Garantie von 6 Monaten ab Kaufdatum. Minelab empfiehlt die Nutzung eines autorisierten Servicecenters, um eine mögliche Beschädigung der wasserdichten Versiegelung und ein Erlöschen der Detektorgarantie zu vermeiden.
*Die Akkus EQUINOX 600 und EQUINOX 800 sind nicht mit dem EQUINOX 700 oder EQUINOX 900 kompatibel.
Yes, when detecting on land, without any limitations. However, the detector must not be used underwater whilst charging or when connected to a power bank.
Yes. If the detector is being used, when powered by a USB power bank, the battery may charge at a slower rate if there is enough spare capacity in the power bank.
Yes. Connecting the WM 08 to a power bank will allow you to continue to use it even if the battery is low/flat. The power bank will charge the WM 08, which will continue operating as normal.
*Please note that the WM08 is not compatible with the EQUINOX 700 OR EQUINOX 900
No. They are separate wireless technologies and only one can be used at any one time.
*Please note that the WM08 and Bluetooth headphones are not compatible with the EQUINOX 700 OR EQUINOX 900
Re-pairing will be required if a different wireless device has been connected to the Equinox 600 or Equinox 800 (e.g. WM 08), or following a detector factory reset.
AUDIO
Bluetooth® Hearing Aids are largely intended to allow the wearer to intentionally connect to other Bluetooth® compatible devices, such as phones and audio streams. They enable the wearer to stream audio on-the-go without having to remove the hearing aid and insert earbuds.
The EQUINOX 600 and EQUINOX 800 detectors are Bluetooth® compatible devices.
While there are various different types of streaming audio hearing aids available on the market, if the hearing aid supports Bluetooth® A2DP or Bluetooth® aptX-Low Latency™ then it will be compatible with the EQUINOX 600 and EQUINOX 800 detectors.
Pairing with the EQUINOX 600 or EQUINOX 800 is achieved by pressing and holding the Wireless button on the side of the Control Unit for 5 seconds.
While pairing is being performed the Wireless icon on the LCD will flash rapidly for 15 seconds. After 15 seconds the Bluetooth® icon will start flashing on the LCD to indicate a Bluetooth device is being paired.
The initial pairing may take up to 5 minutes. During the pairing process the user should not press the Wireless button as this will stop the pairing process.
Once paired, the EQUINOX 600 or EQUINOX 800 will display a solid Bluetooth® icon on the top right of the LCD. If the hearing aid is aptX-Low Latency™ Bluetooth compatible the ‘+’ icon will also be displayed.
Consult your Hearing Aid User Manual for additional pairing instructions specific to your hearing aid.
*Please note that EQUINOX 700 and EQUINOX 900 are not currently compatible with hearing aids.
Yes, the Equinox 600 can still pair to Bluetooth A2DP or Bluetooth aptX-Low Latency headphones.
Yes. It is good practice to wash the detector with clean fresh water after detecting in water or on the beach. Never use abrasives or solvents to clean the detector.
Whenever washing or using your detector underwater always ensure that the plastic bung on the rear of the control pod is firmly screwed into the headphone jack.
No. It is not necessary to lubricate or grease any part of the detector, including the waterproof seals. Using any petroleum-based grease will damage the waterproof seals and void the warranty.
If deep wading or fully submerged, we recommend using only Minelab Waterproof EQUINOX Headphones. These have a specially engineered connector that forms a waterproof seal when used with the EQUINOX. These headphones are available as an accessory from your local Minelab authorised dealership (Part Number: 3011-0372)
Yes, the MULTI-IQ technology in the X-TERRA ELITE is the same as the MULTI-IQ technology used in other MINELAB metal detectors.
X-TERRA ELITE includes a 15kHz single frequency option for the Park and Field modes.
X-TERRA ELITE wurde für den anspruchsvolleren Sondengänger entwickelt, der einen preisgünstigen Detektor mit hervorragender Leistung sucht. Benutzer haben mehr Kontrolle und Einstellungsmöglichkeiten, sodass Sondengänger die Erkennungsleistung optimieren können. Der X-TERRA ELITE ist bis zu 5 Meter (15 Fuß) wasserdicht und bietet im Vergleich zu jedem anderen derzeit auf dem Markt erhältlichen Einzelfrequenzdetektor eine überlegene Leistung.
Die VANQUISH-Serie ist ein Detektor vom Typ „Einschalten und loslegen“, der eine hohe Leistung bietet, aber dennoch mit minimalen Einstellungsanpassungen sehr einfach zu bedienen ist. Dies ist möglich, da der MULTI-IQ-Prozessor die ganze harte Arbeit für Sie übernimmt.
VANQUISH-Detektoren werden für Anfänger empfohlen und der X-TERRA ELITE-Detektor wird für fortgeschrittene Sondengänger empfohlen, die von einem Detektor auf Anfängerniveau aufrüsten möchten.
Spulen der Serien V*X oder EQUINOX können mit dem X-TERRA ELITE verwendet werden, es können jedoch keine anderen Spulen der Marke Minelab verwendet werden, einschließlich früherer Spulen der Serien X-TERRA 305, 505 und 705.
Im Lieferumfang des X-TERRA ELITE ist eine elliptische V12X 12-Zoll-Doppel-D-Spule enthalten. Die folgenden Zubehör-Spulen können Sie bei Ihrem örtlichen Minelab-Händler erwerben.
X-TERRA ELITE will out-perform the VANQUISH and X-TERRA PRO detectors in all terrains on most targets. Performance may be similar in some circumstances but will differ depending on ground mineralisation levels but more specifically the type of metal each target consists of.
The X-TERRA ELITE provides unprecedented performance in salty conditions. There are 2 beach modes to ensure stability in both wet and dry salty environments.
Yes, you can purchase the Minelab WM09 wireless module, ML85 headphones or ML105 headphones as all of these are compatible with the X-TERRA ELITE. (note that the X-TERRA ELITE EXPEDITION model includes the ML85 headphones in the box)
Der X-TERRA ELITE verwendet ein proprietäres drahtloses Audio, das mit keiner aktuellen Version von BLUETOOTH kompatibel ist. Die Minelab-Kopfhörer ML85 oder ML105 und das drahtlose Modul WM09 sind mit dem X-TERRA ELITE kompatibel und bei Ihrem örtlichen autorisierten Minelab-Händler erhältlich.
Park 1 provides a default MULTI-IQ transmit frequency and is optimised for detecting modern coins and larger jewellery. This is a good mode to learn the X-TERRA ELITE before experimenting with other settings.
Park 2 provides a default MULTI-IQ transmit frequency and is optimised for detecting fine jewellery and smaller targets in trash infested areas. Recovery speed in Park 2 is increased to clearly identify good targets masked by iron trash.
Field 1 provides a default MULTI-IQ transmit frequency and is optimised for detecting modern coins and general detecting. It has a high trash rejection which makes it an ideal detect mode for areas containing coke.
Field 2 provides a default MULTI-IQ transmit frequency and is optimised for locations with high target and trash densities. This mode is great for coins on edge or sitting at greater depths. It has a high trash rejection which makes it an ideal detect mode for areas containing coke.
Beach 1 provides a default MULTI-IQ transmit frequency and is optimised for dry and wet sand. Beach 1 mode has a lower recovery speed for better depth across all targets and is good for detecting coins and small to large jewellery.
Beach 2 provides a default MULTI-IQ transmit frequency and is optimised for underwater usage where a very strong salt signal is present. To compensate for the high salt content Beach 2 has a lower transmit power. Beach 2 can also be used in dry soils that have a high salt content.
Yes, there is no need to perform a full factory reset. Individual Search Profiles can easily be returned to their factory preset settings. Only the local settings will be reset and any global settings will remain in their last-use state.
Typical runtime, from a full charge using wired headphones, is approximately 12 hours. The X-TERRA ELITE detector can also be powered directly from any USB Power Bank that supports 0.5A or 2A (@ 5V) output capability. This effectively gives a continuous runtime only limited by the capacity of the power bank.
The X-TERRA ELITE detector supports charging from devices that comply to the USB 2.0 standard. QuickCharge™ is a proprietary standard develop by Qualcomm that uses a higher voltage and is not compatible with X-TERRA ELITE detectors.
The charge time, from completely flat to 100%, is approximately 4 hours when charged with a high capacity charger (>1.7A @ 5V).
Longevity for all batteries depends on a number of factors that are often controllable to some degree by the user; such as temperature, charge levels when stored, charge cycles etc. The most common cause of reduced life of Li-ION batteries is keeping a fully charged battery at elevated temperatures.
As with all components used in our detectors, we stringently source only modern high quality components from responsible vendors. We do not expect users to experience any battery issues over years of use. Our experience with the CTX 3030 and GPZ 7000 detectors which both use Li-ION batteries is that the vast majority of users have never needed to purchase a replacement battery.
Use only reputable and certified USB Chargers when charging the X-TERRA ELITE battery as detailed below:
The Li-ION battery contained in the handle is replaceable and covered under warranty for a period of 6 months from the date of purchase. Minelab recommends using an Authorised Service Centre to avoid potentially damaging the waterproof seal and voiding the detector warranty.
Yes, when detecting on land, without any limitations. However, the detector must not be used underwater whilst charging or when connected to a power bank.
Yes. If the detector is being used, when powered by a USB power bank, the battery may charge at a slower rate if there is enough spare capacity in the power bank.
Yes. Connecting the X-TERRA ELITE to a USB power bank will allow you to continue to use the detector even if the battery is low/flat. The power bank will charge the detector if there is any residue power to charge the battery.
Ja. Es empfiehlt sich, den Detektor nach der Erkennung im Wasser oder am Strand mit sauberem Süßwasser abzuwaschen. Verwenden Sie zum Reinigen des Detektors niemals Scheuermittel oder Lösungsmittel.
Achten Sie beim Waschen Ihres Detektors unter Wasser immer darauf, dass der Kunststoffstopfen auf der Rückseite der Steuereinheit fest in die Kopfhörerbuchse eingeschraubt ist.
No. It is not necessary to lubricate or grease any part of the detector, including the waterproof seals. Using any petroleum-based grease will damage the waterproof seals and void the warranty.
If deep wading or fully submerged, we recommend using only Minelab Waterproof Headphones. These have a specially engineered connector that forms a waterproof seal when used with the X-TERRA ELITE.
VANQUISH depth performance is similar but not quite as deep as the EQUINOX. However, EQUINOX detectors are more configurable for varying conditions.
Minelab does not publish the exact frequencies of Multi-IQ technology used in the VANQUISH Series. These frequencies are similar to the Multi-IQ mode in the EQUINOX Series.
The VANQUISH Series detectors only use Multi-IQ (simultaneous multi-frequency) technology.
Target IDs on VANQUISH are the same as the Target IDs on EQUINOX.
Recovery speed varies depending on the mode selected.
The Custom mode is programmable. If you program custom mode, it will adopt the recovery speed from the mode you program it to, e.g. coin mode = fast recovery speed, jewellery = medium recovery speed, relic = slow recovery speed.
When the detector is switched off, discrimination patterns in coin, jewellery & relic modes are all reset. Custom mode will keep its saved discrimination pattern.
There are three coils available for VANQUISH. These are:
The VANQUISH Series requires x4 AA batteries and is compatible with both rechargeable and non-rechargeable batteries. The battery level indicator shows the current battery level. Lift the battery cover off the control box to replace the batteries.
The VANQUISH 540 and 540 Pro-Pack come with x4 AA NiMH rechargeable cells and a charger. The VANQUISH 340 and 440 can also operate with rechargeable batteries. Minelab recommends only NiMH rechargeable batteries or non-rechargeable AA alkaline batteries. Batteries rated between 1.2v – 1.5v are acceptable. If the battery has a voltage higher than 1.5v, it can damage the detector.
AA rechargeable NiMH batteries provide a run-time of approximately 11 hours using factory default settings.
Non-rechargeable, high-quality AA alkaline batteries provide a run-time of approximately 10 hours.
No. VANQUISH coils cannot be used on EQUINOX, and EQUINOX coils cannot be used on VANQUISH.
The VANQUISH control box is not submersible. The coils are fully waterproof up to 1 m (3 ft).
The temperature specification for the VANQUISH Series is -10C – 40 C (14F – 104 F). The coil is waterproof to 1 m (3 ft), but the control pod cannot be submerged.
No. Pitch or tone breakpoints cannot be adjusted on the VANQUISH Series.
The VANQUISH 540 has a red backlight for detecting in low light situations. The backlight is 'Off' by default at each start-up to reduce battery consumption.
The Multi-IQ technology used in VANQUISH allows the detector to provide stable and reliable target IDs in light of medium mineralised soils found in beaches or parks. As a result, there is no ground balance function available in the VANQUISH Series.
Multi-IQ technology allows VANQUISH to operate on wet beach sand and salt water with much higher performance than a single frequency VLF detector.
VANQUISH 540 can operate with Bluetooth V4.2 or later and Bluetooth aptX Low Latency headphones. VANQUISH 340 & 440 do not have wireless capability.
Yes. Software updates can be found on the Minelab website on the VANQUISH product page 'downloads' section.
VANQUISH Series detectors are under warranty for three years (36 months) from the Date of Purchase. Detailed product warranty information can be found under SUPPORT at minelab.com.
Including battery weight, the VANQUISH 340 and 440 weigh 1.2 kg (2.6 lbs), whereas VANQUISH 540 weighs 1.3 kg (2.9 lbs), as it includes the larger V12 coil.
VANQUISH 540 Pro-Pack contains the same VANQUISH 540 detector but includes the smaller V8 coil and the ML80 Bluetooth aptX Low Latency wireless headphones.
Warten Sie nach dem Ausschalten des Detektors mindestens 2 s, bevor Sie versuchen, den Detektor neu zu starten.
Die Einstellung Iron Bias ist in allen Modi aller VANQUISH-Detektoren gleich.
Hinweis: Der VANQUISH 540 hat einen einstellbaren Iron Bias, der eine ähnliche Iron Bias-Reaktion wie der EQUINOX hat.
PRO-SWITCH technology is a single frequency VLF technology that allows the user to switch transmit frequencies at the touch of a button to optimise performance.
Changing frequency gives detectorists the ability to adjust frequencies to move away from noise or optimise detection ability when hunting for specific metal targets.
Park and Field modes have 5kHz, 10kHz and 15kHz selectable frequencies. Beach modes have an 8kHz single frequency for high salt mineralisation.
MULTI-IQ will provide superior results when compared to PRO-SWITCH. There may be situations where the PRO-SWITCH technology can perform equally as well as MULTI-IQ. This will depend on how the user has optimised the detector settings.
Multi-IQ will provide maximum performance in all situations as the internal processor does all the hard work. PRO-SWITCH relies on the user to ensure the detector is set to its optimal performance capability.
VANQUISH detectors with MULTI-IQ are a switch-on and go type detector designed to have excellent performance but still be very easy to use with minimal setting adjustments. This is possible as the MULTI-IQ processor does all the hard work for you.
X-TERRA PRO is a high performing single frequency detector designed for the more committed detectorist looking for a well-priced detector with great performance. Users have the ability to adjust transmit frequency which provides more control allowing detectorists to tune the detection performance when hunting for specific targets. The X-TERRA PRO is waterproof to 5 meters (15 feet) and provides superior performance when compared to any other single frequency detector currently on the market.
Target ID’s on the X-TERRA PRO will generally not be quite as stable as MULTI-IQ target ID’s and MULTI-IQ detectors will generally provide superior performance when in conductive (salty) soils.
The X-TERRA PRO comes with a V12X 12” Elliptical Double-D coil in the box, you can purchase the below accessory coils from your local Minelab dealership. Any coil that is compatible with the EQUINOX detectors is also compatible with the X-TERRA PRO.
10kHz is the best all-round frequency to start detecting with as it provides good depth and sensitivity across a range of different targets.
It is expected when running a lower transmit frequency on the X-TERRA PRO that performance on high conductors containing silver or copper will provide similar depths to MULTI-IQ detectors.
It is expected when running a higher transmit frequency on the X-TERRA PRO that performance on lower conductors containing gold will provide similar depths to MULTI-IQ detectors.
At the beach in salty conditions most single frequency detectors struggle with the mineralisation. The X-TERRA PRO provides unprecedented performance for a single frequency VLF detector in salty conditions.
Yes, there is no need to perform a full factory reset. Individual Search Profiles can easily be returned to their factory preset settings. Only the local settings will be reset and any global settings will remain in their last-use state.
Yes, you can purchase the Minelab ML85 headphones, ML105 headphones or the WM09 wireless module. These are all compatible with the X-TERRA PRO.
There are currently no aftermarket wireless headphones available for the X-TERRA PRO.
The X-TERRA PRO uses a proprietary wireless audio that is not compatible with any current versions of BLUETOOTH. The Minelab ML85 or ML105 headphones and WM09 wireless module are compatible with the X-TERRA PRO and are available from your local authorised Minelab dealership.
Park 1 provides a default 10kHz transmit frequency and is optimised for detecting modern coins and larger jewellery. This is a good mode to learn the X-TERRA PRO before experimenting with other settings.
Park 2 provides a default 15kHz transmit frequency and is optimised for detecting fine jewellery and smaller targets in trash infested areas. Recovery speed in Park 2 is increased to clearly identify good targets masked by iron trash.
Field 1 provides a default 10kHz transmit frequency and is optimised for detecting modern coins and general detecting. It has a high trash rejection which makes it an ideal detect mode for areas containing coke.
Field 2 provides a default 15kHz transmit frequency and is optimised for locations with high target and trash densities. This mode is great for coins on edge or sitting at greater depths. It has a high trash rejection which makes it an ideal detect mode for areas containing coke.
Beach 1 provides a default 8kHz transmit frequency and is optimised for dry and wet sand. Beach 1 mode has a lower recovery speed for better depth across all targets and is good for detecting coins and small to large jewellery.
Beach 2 provides a default 8kHz transmit frequency and is optimised for underwater usage where a very strong salt signal is present. To compensate for the high salt content Beach 2 has a lower transmit power. Beach 2 has a higher recovery speed to aid in saltwater rejection. It can also be used in dry soils that are conductive (salty).
Typical runtime, from a full charge using wired headphones, is approximately 16 hours. The X-TERRA PRO detector can also be powered directly from any USB Power Bank that supports 0.5A or 2A (@ 5V) output capability. This effectively gives a continuous runtime only limited by the capacity of the power bank.
The X-TERRA PRO detector supports charging from devices that comply to the USB 2.0 standard. QuickCharge™ is a proprietary standard develop by Qualcomm that uses a higher voltage and is not compatible with X-TERRA PRO detectors.
The charge time, from completely flat to 100%, is approximately 4 hours when charged with a high capacity charger (>1.7A @ 5V).
Longevity for all batteries depends on a number of factors that are often controllable to some degree by the user; such as temperature, charge levels when stored, charge cycles etc. The most common cause of reduced life of Li-ION batteries is keeping a fully charged battery at elevated temperatures.
As with all components used in our detectors, we stringently source only modern high quality components from responsible vendors. We do not expect users to experience any battery issues over years of use. Our experience with the CTX 3030 and GPZ 7000 detectors which both use Li-ION batteries is that the vast majority of users have never needed to purchase a replacement battery.
Use only reputable and certified USB Chargers when charging the X-TERRA PRO battery as detailed below:
Der im Griff enthaltene Li-ION-Akku ist austauschbar und hat eine Garantie von 6 Monate ab Kaufdatum. Minelab empfiehlt die Nutzung eines autorisierten Servicecenters, um eine mögliche Beschädigung der wasserdichten Versiegelung und ein Erlöschen der Detektorgarantie zu vermeiden.
Yes, when detecting on land, without any limitations. However, the detector must not be used underwater whilst charging or when connected to a power bank.
Yes. If the detector is being used, when powered by a USB power bank, the battery may charge at a slower rate if there is enough spare capacity in the power bank.
Yes. It is good practice to wash the detector with clean fresh water after detecting in water or on the beach. Never use abrasives or solvents to clean the detector.
Whenever washing or using your detector underwater always ensure that the plastic bung on the rear of the control pod is firmly screwed into the headphone jack.
No. It is not necessary to lubricate or grease any part of the detector, including the waterproof seals. Using any petroleum-based grease will damage the waterproof seals and void the warranty.
If deep wading or fully submerged, we recommend using only Minelab Waterproof Headphones. These have a specially engineered connector that forms a waterproof seal when used with the X-TERRA PRO. These headphones are available as an accessory (Part Number: 3011-0372)
No, the detection coil that is included with your GO-FIND detector is designed to provide the best performance for that specific model and cannot be changed.
The battery compartment is in the handle of the GO-FIND. On the rear of the handle, you will see a small tab. Gently pull this tab down and then lift the battery compartment lid to access the batteries.
Yes, the GO-FIND series can operate with rechargeable 1.2volt Ni-MH rechargeable batteries. You can only use batteries that have a 1.2 volt or 1.5volt rating. Most AA Lithium batteries have a higher voltage and cannot be used as they exceed the maximum voltage rating for the detector. Using Lithium batteries that exceed the maximum voltage rating can damage the internal electronics of the detector. This type of damage is not covered under warranty.
The detection coil on the GO-FIND series is waterproof to 60cm (2ft) and can be washed. The screen pod should never be washed or submerged in water as it is not waterproof. To clean the screen pod wipe it with a damp cloth.
Yes, the GO-FIND detectors utilise Minelab’s Easy-Trak ground balance technology which automatically senses salt mineralisation in the ground and adjusts the detector to ensure constant smooth usage when detecting in beaches or parks.
Wireless headphones can be used but they cannot be paired directly to your detector. You will need to connect your wireless headphones to your smartphone and then connect your GO-FIND 44 or 66 to your smartphone via the GO-FIND app. GO-FIND 11 or 22 do not have Bluetooth capability and cannot connect to the GO-FIND app or wireless headphones.

In your Android phone Google Play Store & Apple iPhone App Store Search for Minelab GO-FIND
GO-FIND by Minelab Electronics Pty Ltd will be 1st – 2nd in search result.
The Pro App function is FREE for GO-FIND 66 detectors. Download the same GO-FIND App for FREE. When this GO-FIND App is paired with a GO-FIND 66, the App will activate full Pro App functions.
Download the same GO-FIND App for FREE. When this GO-FIND App is paired with a GO-FIND 44, the App will activate basic App functions.
Download the same GO-FIND App for FREE. When this GO-FIND App is paired with a GO-FIND 44, the App will activate basic App functions. It is optional to upgrade your Basic App functions to Pro App functions, just like how it used on a GO-FIND 66. In-app purchase is available for upgrading.
For the first time use, you need to pair GO-FIND 44/66 with your mobile device:
See also:
In GO-FIND App, the is help (?) button on the bottom right corner. Click to view Bluetooth pairing guide and Bluetooth connection guide.
No, after the pairing for the first time use. Your next time use should just require a short press to turn on Bluetooth function.
You can now use App with the detector
Android 11 or later with Bluetooth Lower Energy hardware
iPhone iOS 8.0 or later with Bluetooth Lower Energy hardware
No, the X-TERRA VOYAGER uses different technology to other detectors. You can only use the coil that is supplied in the box with the detector.
The X-TERRA VOYAGER does not have any accessory coils currently available.
The depth gauge will provide an approximate indication of depth and should only be used as a guide as large or small metals will cause the gauge to become inaccurate. A coin sized object will provide the below estimated depths.
1 arrow = 1” (25mm)
2 arrows = 3” (75mm)
3 arrows = 5” (125mm)
4 arrows = 6” (150mm)
5 arrows = >6” (>150mm)
The X-TERRA VOYAGER does not have wireless capability. You can use a Bluetooth wireless transmit module with the detector. These are not available from Minelab and will have to be purchased separately.
All Metal allows the detector to detect all metal types. When in all metal mode there will be no discrimination of any metal types.
Custom provides users the ability to discriminate any of the target group icons at the top of the screen. You simply navigate through to the desired target group and the icon will flash for a few seconds and then it will disappear. All target ID’s in this target group will now be discriminated out.
To detect the discriminated target group simply navigate away from the target group and then navigate back to the desired target group. The icon will flash for a few seconds and then appear. All target ID’s in the target group will now detect again.
Jewelry provides discrimination pattern that ignores most iron/ferrous junk. You will also find coins, relics and other non-ferrous metals. This mode is good for trashy environments.
Learn allows users to detect 1 specific target group. You simply need to wave the desired metal over the detection coil, the detector will then learn this target ID and accept only targets ID’s within that target group.
Typical runtime, when using new high quality 9-volt alkaline batteries is 20 hours.
It is good practice to clean your detector after each use. Only fresh water should be used when cleaning. Never use abrasives or solvents to clean the detector. The detection coil is waterproof and can be washed with the hose. The Screen pod should only be carefully wiped with a clean damp cloth to avoid any water or moisture ingress.
No. It is not necessary to lubricate or grease any part of the detector. Using any petroleum-based grease can damage the plastics and void the warranty.
To disable the audio tones, you simply need to push and hold the "minus" button when powering the PRO-FIND 40 on.
To enable the audio tones, you simply need to push and hold the "plus" button when powering the PRO-FIND 40 on.
To disable the ferrous tones OFF simply push and hold the "minus" button when the PRO-FIND 40 is powered on and then wait for the long beep.
To enable the ferrous tones ON simply push and hold the "plus" button when the PRO-FIND 40 is powered on and then wait for the long beep.
No, the LED flashlight cannot be adjusted.
No, the vibration cannot be toggled ON/OFF.
The Rapid Re-tune feature was designed so that users do not have to power cycle the pin-pointers to re-tune the PRO-FIND to the environment.
To re-tune the PRO-FIND 40 simply short-press the power button when the PRO-FIND 40 is powered on.
At maximum Sensitivity the PRO-FIND 40 can detect targets at greater distances which can be both an advantage and a disadvantage. To pinpoint a target sometimes it’s better to have a less sensitive probe to reduce the search area, so we have given you the ability to adjust it how you see fit. The Sensitivity may also need to be reduced in mineralised or salty soils, so that you are only detecting metal and not the minerals in the ground.
Side detection occurring with the target (or multiple) in the side of the hole. Use the tip of the probe to check around the sides of the hole. Reducing the Sensitivity can also help.
Yes, but be aware that the PRO-FIND 40 won’t have the same sensitivity to very small nuggets as a quality Minelab metal detector. It will be a good aid in target recovery for larger nuggets.
Yes, the PRO-FIND 40 is waterproof to 3 meters (10ft) and can be washed. When washing always use clean fresh water.
If no targets are detected or buttons pressed for 5 minutes, then the PRO-FIND 40 will start a slow constant beep (Lost Alarm) this alarm will sound for 5 minutes and then the PRO-FIND 40 will power off to save battery life.
The battery may be flat or inserted incorrectly. Replace the battery and/or check the battery orientation. If you are still having issues, contact your closest Minelab Service Centre.
The PRO-FIND 40 has a 3rd beep that notifies you that the pin-pointer has calibrated to the environment. This can sometimes take up to 30 seconds to occur depending on environmental conditions. You can short press the power button to perform a rapid re-tune. You should then hear a confirmation beep and the PRO-FIND 40 should now detect metals.
Tips for switching on:
*Calibration usually takes less than a second when the unit has been used recently.*
In highly mineralised soils:
Wenn einige Minuten lang keine Ziele erkannt oder keine Tasten gedrückt wurden, gibt das Gerät einen Alarm aus, der lange ertönt, damit Sie Ihren Stiftzeiger finden können. Nach einigen Minuten schaltet sich der Stiftzeiger aus, um die Batterielebensdauer zu verlängern.
Auf diese Weise können Sie das Gerät finden, wenn es nach dem Graben eines Lochs auf dem Boden zurückgelassen wurde. Das akustische Signal ertönt nicht, wenn es sich nur im Vibrationsmodus befindet. Nach 5 Minuten langsamen Tons schaltet sich das Gerät aus.
Der Akku ist möglicherweise falsch herum eingelegt, wenn der Deckel aufgeklappt ist, aber das Festziehen ist schwierig. Der verschlüsselte Kunststoff verhindert, dass die Batterielaschen die Kontakte berühren - drehen Sie die Batterien, um dies zu beheben.
Nach dem Einschalten des Pro-Find hören Sie 2 Pieptöne, gefolgt von einem kürzeren dritten Kalibrierton. Diese Kalibrierung kann manchmal 15-20 Sekunden dauern. Warten Sie, bis dieser Signalton ertönt, bevor Sie den Pro-Find in die Nähe von Metallgegenständen bringen. Wenn sich der Pro-Find beim Umschalten in der Nähe von Metall befindet, wird er nicht kalibriert und Sie müssen den Pro-Find neu starten.
Seitenerkennung erfolgt mit dem Ziel (oder mehreren) in der Seite des Lochs. Verwenden Sie die Spitze der Sonde, um die Seiten des Lochs zu überprüfen. Eine Verringerung der Empfindlichkeit kann ebenfalls hilfreich sein.
Ja, aber beachten Sie, dass es für sehr kleine Nuggets nicht so empfindlich ist wie ein hochwertiger Minelab Golddetektor. Es wird eine gute Hilfe bei der Zielwiederherstellung für größere Nuggets sein.
Bei maximaler Empfindlichkeit kann der PRO-FIND 35 Ziele in größerer Entfernung erkennen, was sowohl ein Vorteil als auch ein Nachteil sein kann. Um ein Ziel zu lokalisieren, ist es manchmal besser, eine weniger empfindliche Sonde zu haben, um den Suchbereich zu verkleinern. Wir haben Ihnen daher die Möglichkeit gegeben, diese anzupassen, wie Sie es für richtig halten. In mineralisierten oder salzhaltigen Böden muss die Empfindlichkeit möglicherweise ebenfalls verringert werden, damit Sie nur Metall und nicht den Boden erkennen.
Der PRO-FIND 35 ist bis zu einer Tiefe von 3 Metern vollständig wasserdicht, sodass Sie den Stiftzeiger zum Reinigen unter Wasser halten können. Stellen Sie sicher, dass der Batteriefachdeckel vollständig festgezogen ist, bevor Sie den Stiftzeiger eintauchen.
Der PRO-FIND 15 ist nur wasserdicht. Wenn Sie den Lautsprecher mit Ihrem Daumen abdecken, können Sie ihn unter fließendem Wasser abwaschen.
Tipps zum Einschalten:
Die Kalibrierung dauert in der Regel weniger als eine Sekunde, wenn das Gerät kürzlich verwendet wurde
In stark mineralisierten Böden:
Audio ein und aus (nur Pro-Find 35):
Eisenton ein und aus (nur Pro-Find 35):
CTX 3030, GPZ 7000 und XChange 2 verwenden alle SQLite für die Datenspeicherung. Die Verwendung eines Tools wie SQLiteSpy kann beim Extrahieren der Dateien helfen. Es ist nicht erforderlich, SQLiteSpy zu installieren, da die extrahierte Datei direkt ausgeführt wird.
1. Schließen Sie den Detektor an einen PC an und navigieren Sie zu dem neuen Wechseldatenträger, der erstellt wird.

2. Öffnen Sie das Laufwerk.

3. Darin finden Sie eine Datei. Kopieren Sie dies an einen Ort, an dem Sie es verwenden können. Diese Datei ist die Speicherdatenbank, die geöffnet werden muss.
1. Wählen Sie in XChange 2 die Punkte aus, die Sie extrahieren möchten.
2. Ziehen Sie sie in den Ordner „Datei“.

3. Öffnen Sie den Ordner 'file', indem Sie darauf klicken.
4. Klicken Sie auf die Schaltfläche 'Minelab-Datei exportieren'.

5. Die Datei sollte sich in Ihrem Ordner "Downloads" befinden.
6. Diese heruntergeladene Datei ist komprimiert, daher müssen Sie ein Tool wie 7zip verwenden, um die darin enthaltene 'shareData'-Datei zu extrahieren.
7. Kopieren Sie 'shareData' an einen Speicherort, um es zu verwenden. Diese Datei befindet sich in der Speicherdatenbank, die geöffnet werden muss.
In diesem Beispiel wird SQLiteSpy verwendet, ein ähnlicher Prozess gilt jedoch auch für andere Tools.
1. Öffnen Sie SQLiteSpy
2. Wählen Sie 'Datei'> 'Datenbank öffnen ...'

3. Navigieren Sie zum Speicherort der Datenbank.
4. Ändern Sie den Dateityp in "Beliebige Datei (*. *)".

5. Wählen Sie die Datenbank aus und wählen Sie "Öffnen".
6. Auf der linken Seite befinden sich je nach verwendeter Datenbankdatei mehrere Tabellen.
ein. "findpoint": enthält jeden der gespeicherten FindPoints
b. "Wegpunkt": Enthält jeden der gespeicherten Wegpunkte
c. "Punkt": Dies enthält jeden der Punkte, die zum Erstellen einer Spur in allen GeoHunts verwendet werden. Beachten Sie, dass jede GeoHunt durch eine UUID in der Spalte "geohunt_fk" gekennzeichnet ist.
d. "geohunt": Enthält die UUID, die in der Tabelle "points" verwendet wird, um die einzelnen GeoHunts zu identifizieren.

7. Nehmen wir auch an, dass Sie einige FindPoints extrahieren möchten (das gleiche Verfahren wird auch für die anderen Punkte verwendet).
8. Doppelklicken Sie auf die Tabelle "Findpoint". Dadurch werden alle extrahierten FindPoints angezeigt.
9. Klicken Sie auf eine Zeile in der Tabelle und drücken Sie die Strg + A-Taste, um alle Zeilen auszuwählen.
10. Drücken Sie die Taste „Strg + C“, um alle Daten zu kopieren.
11. Öffnen Sie Excel
12. Fügen Sie die Daten in die Tabelle ein.
13. In einigen Datenbankdateien müssen Längen- und Breitengrad durch 10.000.000 geteilt werden, um sie in das richtige Format für die Verwendung zu bringen.
14. Machen Sie mit den Punkten von hier aus, was Sie brauchen.


